Monitoring via Zabbix
Introduction
This article describes the configuration of r_keeper_7 monitoring via Zabbix system.
The monitoring allows the user to keep track of relevant metrics and be notified of exceeding critical measure values.
The monitoring system consists of 2 parts:
- Zabbix server
- Zabbix agents
Agents should be installed on each computer, where monitoring is required.
The minimum compatible r_keeper version is 7.06.04.
Definitions
- Trigger — a configurable system reaction to an event
- Host — a monitoring object
Procedure

System Capabilities
Currently, the following can be monitored:
- System module versions
- The type of system modules. It can have the following values:
- Reference Server
- Report server
- Service station
- Component network name
This article describes the basic configuration of the interaction between r_keeper 7 and Zabbix. So, correct r_keeper 7 and Zabbix settings should open a metrics transmission channel.
Planned Updates
In the future, it is planned to create new triggers and metrics. Triggers will react to critical measure values by means of sending notifications.
Trigger examples:
- The number of files in the SQL database upload queue has exceeded 10
- The number of files in the upper-level server transmission queue has exceeded 10
- The number of SQL database upload errors has exceeded 0
Metrics examples:
- Metrics for shift data/online data collection
- Metrics for references synchronization processes
- Metrics for business operations — average receipt time, loyalty systems operation, etc.
- Metrics for component availability monitoring — main/backup printers.
Zabbix Settings
For monitoring purposes, you will need a Zabbix server. At the time of this writing, only versions for Linux were available. They can be downloaded from the official site. Installation instructions are available there, as well.
Hereinafter, it is implied that the server is already installed and functioning.
Agent Installation
A Zabbix agent should be installed on each computer running the r_keeper 7 system. You can download it from the official site. We well describe installation on Windows.
- Launch the agent installation file and follow the instructions. Accept the license agreement
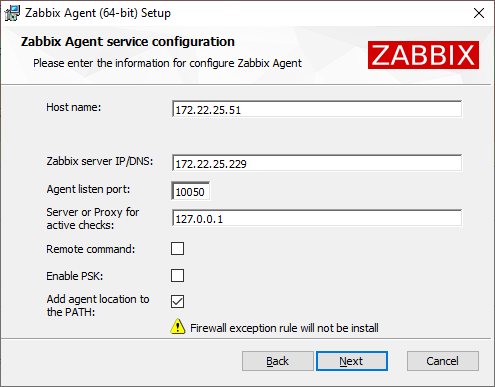
- In the Host name field, specify the IP address of the computer, where the agent is to be installed. In the Zabbix server IP/DNS field, specify the address of the Zabbix server, and enter the port it is listening to in the Agent listen port.
We recommend checking the Add agent location to the PATH box so that it would be easier to check the agent operation via the console
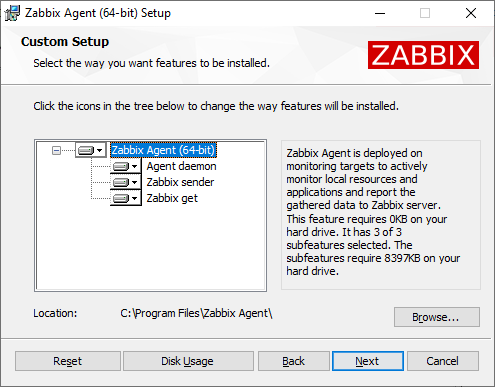
- Select the installation path and components, and then click Next and Install

As a result, the agent is installed and starts sending data to the server.
r_keeper 7 Settings
As part of the monitoring configuration, you should configure the r_keeper 7 INI files. It should be performed individually for each required module.
Open the INI file of the required server and add the following entries:
[ZABBIX]
; Zabbix server name / IP address (interface: Zabbix Trapper)
ZabbixAt = "172.22.10.152"
; Yhe own name at the Zabbix server: i.e. the name of the selected host (a single PC can have multiple modules with different names)
SelfName = "199995181-REP-01"Add these settings for each required server.
Use examples:
Reference server
[ZABBIX] ZabbixAt = "172.22.10.152" SelfName = "199995181-REF-00"CODEReport server
[ZABBIX] ZabbixAt = "172.22.10.152" SelfName = "199995181-REP-01"CODECash server
[ZABBIX] ZabbixAt = "172.22.10.152" SelfName = "199995181-MID-01"CODECash station
[ZABBIX] ZabbixAt = "172.22.10.152" SelfName = "199995181-POS-01"CODEIf you need to run the service with a non-standard port, add the port with the "-p" key to the IP address in the INI files. For example:
ZabbixAt = "192.168.15.15" "-p" "10055"
Save INI files and restart the servers.
Zabbix Settings
Template Import
Download the template right here or find it in the attachment.
Open the Zabbix web interface. By default, it is available at: http:// server IP address/zabbix.
Log into the system.
- Login name — Admin
- Password — zabbix
Navigate to Configuration > Templates and click Import in the right corner. Template App R-Keeper 7 will appear on the list of templates.
Select the uploaded file and click Import again.
It is recommended to delete unnecessary templates. For this purpose, set relevant flags and click Delete at the bottom.
Creating Hosts
To create a host, first, you need to create a group. For this purpose, navigate to Configuration > Host Groups and click Create host group in the right corner  .
.
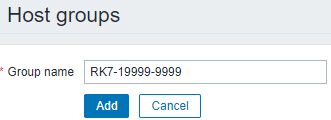
Specify the name of the new group and click Add
Now, create the hosts.
Navigate to Configuration > Host and click Create host.
Fill in the following fields:
- Host name — the name of the host. Only Latin letters without spaces are allowed. It must match the name specified in the server INI file
- Visible name — the name to be displayed. It can contain spaces and non-English letters
- Groups — the group of hosts
- Agent interfaces — the Zabbix agent address. Here, you should specify the r_keeper 7 IP address and port to be monitored
- Other fields can be left empty.
Go to the Templates tab, click Add and select the newly installed Template App R-Keeper 7 from the list of templates. This action can be performed later in batch mode.
Click Select. The template will be added to the host. Click Add in order to save the host settings.
The host will appear on the list. Repeat the same actions for all required hosts.
Make sure that a correct template has been selected for each host, otherwise, data will not be displayed.
Now, the configuration is complete, and you can proceed to monitoring.
Monitoring
Navigate to Monitoring > Latest data. Specify the group in the Host groups field and click Apply. In the list below, the monitoring data will appear. Currently, only the version transfer is available. In the future, there will be more metrics.
If there is no data in the columns Last check and Last value, it means that no data is received.
Troubleshooting
To check the transmission of data to the Zabbix server, use the manual launch of the zabbix_sender.exe console utility, which is installed together with the agent. This utility sends the specified data to the server, and you can see it in the monitoring section.
Open the command line and launch the zabbix_sender utility:
C:\Program Files\Zabbix Agent\zabbix_sender.exe\zabbix_sender.exe -server_IP_address -s host_name -k metric-name -o metric_valueKey values:
- -z — IP address of the Zabbix server
- -s — host name
- -k — metric name
- -o — metric value
In case of a successful transmission, the following message appears: processed: 1; failed: 0. In case of errors, it will be vice versa.
The transmitted metric value will appear on the monitoring page.
Metrics Description
- rk7.app.version: version
- Component version, f.ex.:
- 7.6.4.212
- 7.6.5.113
- Component version, f.ex.:
- rk7.app.appkind: software type
- Component type, f.ex.:
- Reference server ({A0AB2F9D-BC5A-4B6F-8E31-F08EF59E2A31})
- Service station (POS) ({DA5D57BC-21C9-4DBD-B86F-F01B23B9862C})
- Component type, f.ex.:
- rk7.app.netname: network name
- Component network name within the r_keeper_7 infrastructure, f.ex.:
- OA-02-MIDS-001
- OA-02-CASH-001
- Component network name within the r_keeper_7 infrastructure, f.ex.:
