Excerpt | ||||
---|---|---|---|---|
| ||||
How to configure integration between r_keeper 7 and StoreHouse 5 |
Introduction
Integration of StoreHouse 5 and r_keeper_7 allows synchronizing databases and keeping sales records and food product balances.
Integration setup
Integration of r_keeper 7 and StoreHouse 5 is realized via the QUSH utility. The utility connects to the SQL database and gets the information on r_keeper 7 references and sales from there. Any database can be used:
- MS SQL
- PostgreSQL
QUSH server service is installed alongside StoreHouse, its port is 8087.
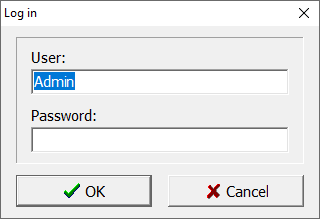
To integrate StoreHouse 5 and r_keeper 7 bases, open Qush_Manager utility. The default user is Admin, no password is needed.
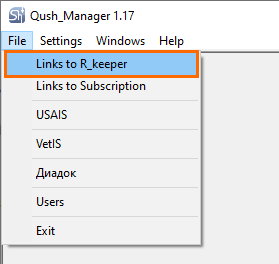
Go to File > Links to R_keeper.
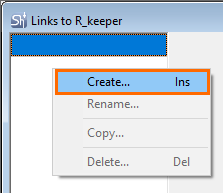
Right-click in the left field and select Create.
Specify the name of the connection.
A window will appear to connect StoreHouse 5 and your SQL database.
Go to the Databases tab and fill in the fields.
StoreHouse 5 section:
- Server — specify your local IP if StoreHouse 5 and r_keeper are installed on one and the same computer. Otherwise, specify the IP of the corresponding computer.
- T cp/ip port — specify the port of your SH5 server. The default one is 7771.
- User — specify the SH5 login. The default one is Admin.
- Password — specify the SH user password. By default, no password is needed.
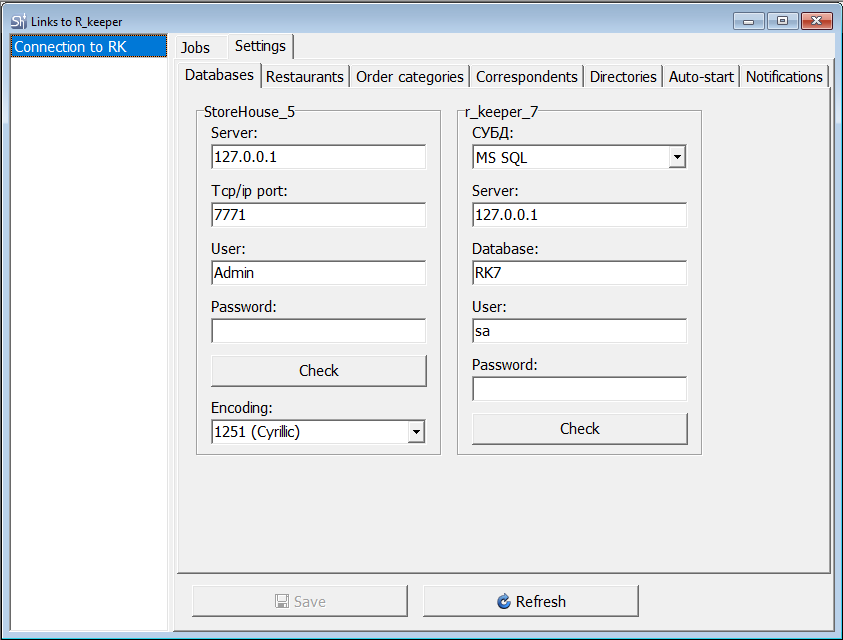
R_keeper 7 section:
- СУБД (DBMS) — select the database management system connected to r_keeper 7. The article describes connection via MS SQL but PostgreSQL may also be used.
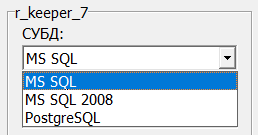
- Server — specify your local IP if StoreHouse 5 and r_keeper are installed on one and the same computer. Otherwise, specify the IP of the corresponding computer.
- Database — specify the name of the MS SQL database
- User — specify the DBMS user login
- Password — specify the DBMS user password.
Click Check to make sure you are connected to both databases. Then, click Save.
These are all technical settings. Now, move to detailed import settings.
Excerpt | ||
---|---|---|
| ||
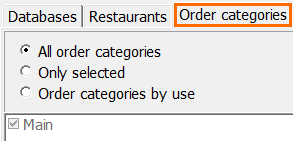
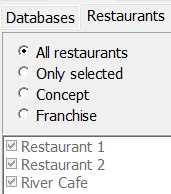
Detailed SettingsGo to Restaurants tab, and click Refresh. After that, the list of your restaurants from the r_keeper database will appear. You can select either all restaurants or restaurants with the same franchise or concept. Or just select the required ones, if you choose the Selected only item. Click Save and move to Order categories tab. Click Save.
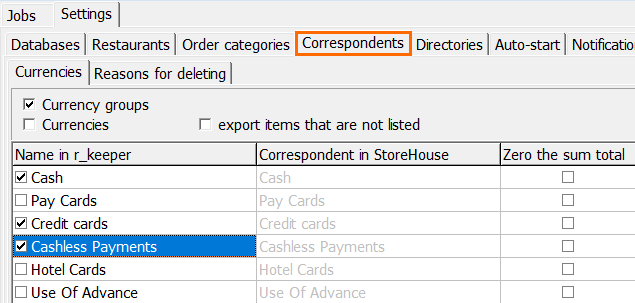
Click Save and move to Directories tab. Select restaurant menu groups. If there are none, they can be created directly in QUSH. To do so, click the square button with dots. The Create group window will appear. Specify the group name and modifiers group name. Press ОК.
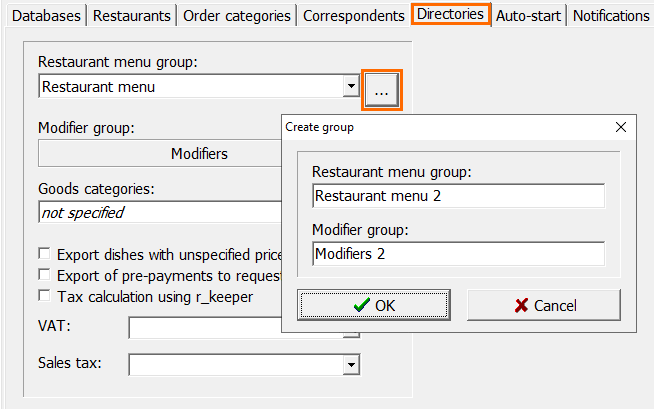
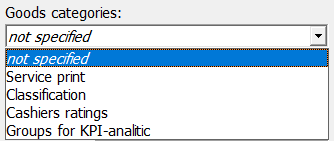
All goods categories can be created and viewed in the r_keeper manager station. Then, if needed, check the following items:
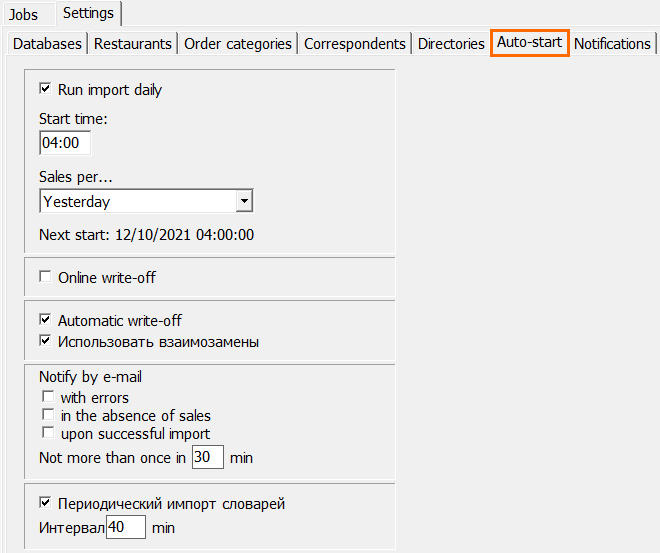
Then, choose if to take into consideration VAT and sales tax, specified in the r_keeper manager station. Click Save and go to Autorun tab. Here you can configure the start time, specify the period for which import shall be performed, and allow automatic and online write-off.
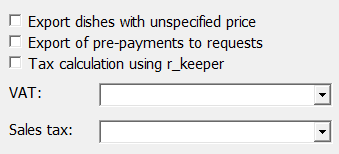
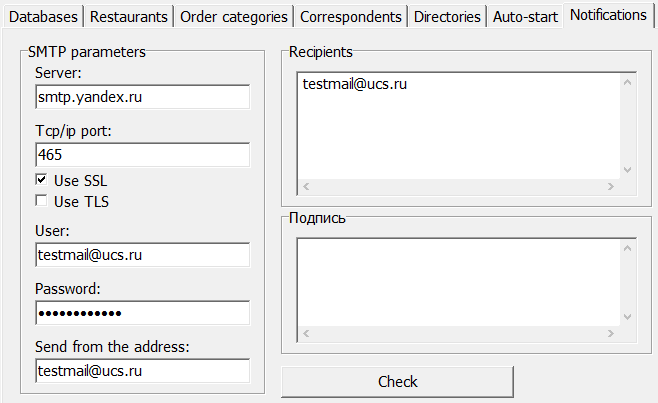
Check the Notify by e-mail with errors box to receive notifications in case of import errors. Click Save and move to the Notifications tab. On the Notifications tab, configure e-mail notifications. In the left window, enter the parameters of the e-mail from which mailing will be performed. On the right side, specify the recipients. Press Check to send a test email. Then, click Save. |
Configuring Automatic Write-Off
With sales being imported from r_keeper 7, automatic write-off can be configured.
Automatic write-off: the system automatically generates delivery notes based on an imported request in accordance with preset rules. When pressing Run or configuring a schedule, not only the request will be loaded, but all delivery notes for its processing will also be generated.
If sets are reconciled and necessary goods quantity is entered into books, the delivery notes will be generated correctly. If there is a lack of goods, delivery notes will be created with compensation records which can be analyzed and changed later.
If there are new menu items sold in r_keeper, for which writу-off departments are not specified, sets are not created or are incorrectly created, the system will not be able to fully process requests. As a result, an error log will be generated. This log can be viewed in import record if the import was launched manually.
If the import is launched automatically by the system, then, in case of errors during import or write-off, e-mail notifications can be configured. When specially configured, the import server will import data from r_keeper automatically. To do so, specify the settings in Autorun tab.
Run import daily: if this box is checked, data import from r_keeper 7 will be launched automatically every day at a specified time.
Start time: enter the start time of automatic import into this field using the keyboard.
Sales per…: select a day for which sales will be downloaded automatically: Today, Yesterday, or Day Before Yesterday.
If r_keeper data was not up-to-date at the moment of data import from r_keeper — not all cash registers closed the day, network problems during data transmission to r_keeper cumulative base, — then, to update StoreHouse data, perform the import manually. It is recommended to delete requests that have already been imported, before starting the import.
If the Run import daily box is checked and an import error occurs, the system will repeat import attempts — 8 times with 15 minutes break
In case of import errors during requests creation or processing, import attempts will not be repeated.
Automatic write-off: if this box is checked, the system will try to create delivery notes based on imported requests automatically after the Import from RK operation.
Notify by e-mail with errors: if this box is checked, as well as Run import daily, and Notifications settings are configured, information on import errors or automatic write-off errors will be sent to e-mails specified on the Notification tab.
Next start: date and time: information on the next automatic import launch will be displayed in this field if Run import daily box is checked.
It is impossible to create two imported requests with the same date, sales location, unit, and customer in the request list. Therefore, if documents re-import is required, first delete requests already created by import for the required period.
Operation check
Now, when all settings are made, go to the Jobs section. Here you can make manual data import.
Select the required period, and press Start.
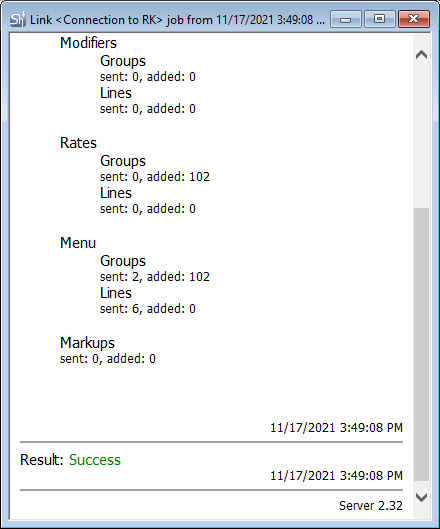
If all settings are correct, you will see Success in the Result field.
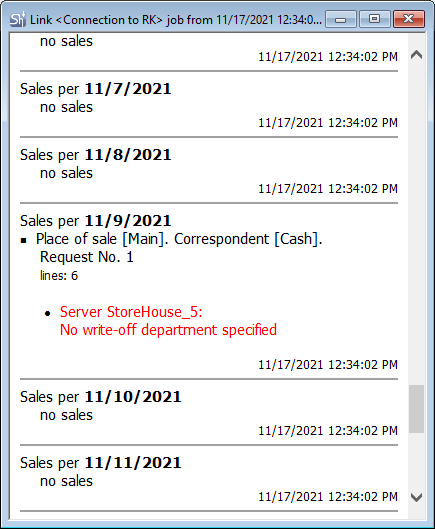
In case of import errors, the import history will look as follows:
To find more about import results or errors, double-click on the required line:
If Automatic write-off is configured, logs will contain information on write-off errors.
The list of write-off errors in the log is equivalent to the errors list in the Expected expense generated during manual processing of imported requests.
If necessary, the log can be saved in HTML and XML formats. To do so, open the log, select the Job main menu item, and select the required format.
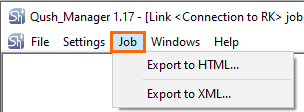
In the next window, select the place to save the file and change the file name, if needed. Then, press Save.
Troubleshooting
Issue: Sales from r_keeper 7 are not downloaded into StoreHouse 5
Reason: No sales are downloaded into the SQL base. Open SQL and view ORDERS, PAYMENTS, VISITS tables — they should not be empty.
Solution: Check SQL settings and make sure the DB is specified correctly. If everything is correct, re-download the shifts.
Introduction
Interactive (IA) reports are the current report version in RK7. When the installer is used, they can be configured during the installation process.
MS SQL Server 2012 or higher is required.
To work with IA reports, the user should have the relevant restaurant specified in the Current Restaurant field.
Server interaction schematic diagram
Interactive reports are installed with the use of the r_keeper 7 installer.
For IA reports operation, do the following:
- Install and configure the Common Server.
- Install and configure the report function server (IRReportsFSPrj.exe).
- Configure the manager station plugin. To do this, copy the files FCLocalize.xml, SchRepPluginClient.xml, SchRepPluginClient.ini into the RK7/bin/win/plugins folder.
- Configure INI files.
Note |
---|
If an SQL Server client is not installed on your local PC, the report function server will be unavailable for selection in the installer! |
Before the RecalcInvalidShifts parameter has been added, the Feature Server did not recalculate broken shifts. Now, if the shift is repaired, broken shifts will be recalculated with this parameter enabled within the time interval specified in the FastControlDays parameter. If the shift remains broken after FastControlDays being applied, it will not be recalculated again.
Installation Procedure
...
Then, select the required components and click Next
Info |
---|
It is obligatory to select UCS CommonServer, Report function server, and Reports plugin. If Common Server has already been installed on the PC, you can use it. |
Also, pay attention to the RK7 Manager station item. When it is selected, a new manager station instance will be created with a configured plugin.
If you selected this item, go to step 6, if not — to step 7.
...
Specify the IP address of the report function server (IRReportsFSPrj.exe) and the port, to which the service will be physically, then click Next
Info |
---|
Important: the report function server port should be unique; it is also recommended to specify a port, different from 8888. |
...
Specify the IP address and port for the new CS(CommonServer), then click Next
Info |
---|
Note: this event happens if you select UCS CommonServer during the installation. |
...
The plugin log file is created automatically in \bin\win\Logs\plugins\SchRepPluginClient\log\schRepPlugin.txt. The file location should not be changed.
The FS server log file is created automatically in the *Logs\ directory of the FS server. The file location should not be changed.
Select the components that will operate as services and click Next
Info |
---|
It is recommended to launch servers as applications when run for the first time. |
...
Info |
---|
Important: when changing the FS version, the aggregates version does not always change, so aggregates may not be recalculated when switching to the new Feature version. It is also recommended not to delete aggregate DBs. If you transfer the DB to another server, you should transfer aggregate DBs as well, or downgrade the version of aggregates in the database (for test DBs only). |
...
Description of INI Files
Below, you can see the minimum required set of parameters; if you have specified additional parameters, do not delete them.
CS_Service.ini — CommonServer configuration file
...
Main parameters description
...
connect_timeout(s)=30
receive_timeout(s)=30
send_timeout(s)=30
def_port=7007 ;; Common Server main port
FeatureServPrj.ini — FS server configuration file
...
Parameters description
[FS_CONNECTION] section
Timeouts in seconds. In case of large databases (10 GB and larger), it is recommended to set high values (from 30,000 to 50,000).
ConnectTimeout=50000
ReceiveTimeout=50000
SendTimeout=50000
CommandTimeOut=50000
SessionTimeOut=50000
url=http://127.0.0.1:7777/soap/IStructuresInfo ;; Feature Server native URL
start_port=7777 ;; Feature Server native port
DB_Connect_Count=10
[CS_CONNECTION] section
url=http://127.0.0.1:7007/soap/UCSCommonWS ;; address and port of the PC running the Common server
[FS_TYPE] section
i_Guid — a unique FS server code (FS server GUID) This one is unique for each server instance;
intrance_name — the name of the FS server service (specified during the installation, does not change later. If it is necessary to change the service name, it has to be changed in the registry too);
MasterServer=1 — the parameter controlling the prohibition to edit references (0 = prohibited, 1 = allowed)
connection_string — SQL database connection string
MainLang — localization setting. If the localization does not match the RK7 localization, you need to replace the file and specify it in FeatureServPrj.ini.
[FS_MAILING] section
Mailing — mailing (1 = enabled, 0 = disabled);
[RPL_PARAM] section
...
url = http://121.10.10.111:8892/soap/IStructuresInfo — an external address visible to CS, where "/soap/IStructuresInfo" is an identical prefix for all FS
start_port = 8892 — the port at the physical PC, where the Feature is launched.
Info |
---|
URL in all microserver settings (not only of this Feature) is the feedback address, controlling its visibility for the Common Server. Any Feature Server should use this address to register at the CS. |
...
Info |
---|
Starting from the FS 1.24.1.0, it is possible to restore an interrupted database connection. By default, a time interval between database re-connection attempts is set to 1 minute. If it is necessary to increase this time, add the WaitConnectionInterval parameter to the [FS_AGREGATE] section of FS INI file. This parameter sets the time in minutes for the service to wait before trying to re-connect to the database in case of connection failure. |
SchRepPluginClient.ini — the plugin configuration file
Plugin configuration file (\\rk7_5_3_Z\bin\win\plugins\SchRepPluginClient\SchRepPluginClient.ini)
[CS_CONNECTION] section
url = http://127.0.0.1:7007/soap/UCSCommonW
fs_guid = {F4DED846-8913-4F1D-B5B5-5699CAC45DA9}
ConnectTimeout = 300000
ReceiveTimeout = 300000
SendTimeout= 300000
[CL_TYPE]
i_Guid={0DA2E90B-C4CA-46D1-80E0-E26A076B4042}
Parameters description
[CS_CONNECTION] section
url=http://127.0.0.1:7007/soap/UCSCommonWS — the url used to connect to the Common Server
fs_guid — the FS server unique code (GUID). Here, you specify the GUID of the server, where the plugin connects to. FS server GUID should be unique for each FS server instance. However, multiple plugins can access one FS server; in this case, different plugin instances will have an identical fs_guid
ConnectTimeout=300000 ;; depending on the SQL DB size, it can take the values of 300,000 to 500,000,000
ReceiveTimeout=300000 ;; depending on the SQL DB size, it can take the values of 300,000 to 500,000,000
SendTimeout=300000 ;; depending on the SQL DB size, it can take the values of 300,000 to 500,000,000
[CL_TYPE] section
i_Guid — the plugin unique code (GUID). This one is unique for each plugin instance.
Launching reports in RK7MAN
Log in to the manager station.
If you see the You are not authorized error upon login, make sure that the SQL database has r_keeper 7 references. If not, check the SQL communication settings and repeat the export.
In the upper menu, you will see the IR reports section with links to reports, and in the Extensions section — additional settings for IA reports.
Configuring Reports for Restaurant Chain
Below, you can see the scheme of report implementation via the plugin for several restaurants.
FS connects to the database (the communication with SQL is specified in FeatureServPrj.ini), and registers its GUID at the CS. Consequently, you can configure a separate FS for each SQL DB (or each point, whether local or central). The FS functionality is vast enough; it can work without plugins, e.g. in the report mailing mode. All FS will register at the same CS.
The RK7 plugin connects to FS via CS. The plugin can interact with one FS only. Each plugin will connect to CS and search for the required FS by GUID. CS may be single, and it can work with multiple FS.
If you need to display the data (IA reports) from point B at point A, you should reconfigure the plugin at point A for FS at point B (line H in Figure below). Alternatively, you can reconfigure FS at point A for the DB at point B (change the SQL DB communication parameter in the FS INI file).
Hiding a restaurant from the report filter.
- Protect the restaurant with a preset object privilege
- Disable those privileges for the role, the restaurants of which should be made inaccessible
- As a result, the role users will not see those restaurants, for which they do not have privileges. The method works for all preset interactive and web reports
- This method might not work for custom reports. In this case, you need to adjust the value selection request for the Restaurant parameter — just copy the request for the same parameter from any predefined report. To do this, open the report parameters and edit the SQL request
- For the parameter, you can create a list of values, from which the user will select the required ones by setting the relevant filter flag:
This list is created via an SQL request in the parameter settings - In the parameter settings of the created report data set, specify the same request for the Restaurant parameter, as in the data sets of the predefined reports for the same parameter. The request for the Restaurant parameter in predefined reports is intentionally configured in a manner considering the availability of restaurants to the user according to privileges.
Troubleshooting
Connection issues
- Error: You are not authorized
19.12.2019 17:22:01.743> [LOG]User entered incorrrectly
19.12.2019 17:22:02.080> [LOG]You are not authorized
19.12.2019 17:22:12.893> [LOG]After registration: code 2, Server re-registration
19.12.2019 17:22:28.217> [LOG]After registration: code 2, Server re-registration
Reason: In the Feature Server connection settings, no database user is specified.
Solution: Open the IRReportsFSPrj.ini file, and in the connection_string field, specify the correct connection string with a username and a password. For example:
connection_string=Provider=SQLOLEDB.1;Password=1;Persist Security Info=True;User ID=sa;Initial Catalog=7171848;Data Source=127.0.0.1
- Error: Invalid PLG_EMPLOYEEROLES object name
Reason: Feature Server has not created the table PLG_EMPLOYEEROLES
Solution: Use the script attached to the article. Do not forget to specify your database name in the script.
Issues concerning SQL collation
Possible Error: Cannot resolve the collation conflict between "SQL_Latin1_General_CP1_CI_AS" and "Lithuanian_CI_AS" in the equal to operation
As a result, some IA reports may become non-functional.
Solution: Check the sorting settings of the SQL server and the DB itself (see the figure below). After that, re-create the STAT aggregate databases:
- Stop the FeatureServer
- Execute the following script in the main database: UPDATE [dbo].[DBInformation] set [DBVer]=0 where [Alias] = 'Agregates'
- Delete all aggregate databases (STAT)
- Launch the FeatureServer.
Issues when importing the report from an XML file
Possible Error: Could not find stored procedure 'RPL8_GET_CURRENT_DATABASE_GUID
The problem is caused by the absence of certain tables and procedures.
Solution: Perform the following scripts:
...