The Hall Plan Editor is the editor of the Hall Plan property of the object of the same name from the Tables and Hall Plans directory. The directory is designed to apply tables of this hall plan to the area of the layout. A previously created bmp file can be used as the background of the hall plan layout (substrate).
In the editor you can work with two types of objects: tables and the layout substrate.
Appearance
Font Type – text font type: select font size with fixed width of any character or proportional to character shape;
Image – image editor;
DB image – select image from DB to display table;
Text – text of table object;
Text Alignment – text alignment relative to image. Possible values: "Bottom", "Top", "Center", "Left", "Right".
Position
Left – distance from the center of the clickable area to the left border of the layout, in pixels;
Top – distance from the center of the clickable area to the top border of the layout, in pixels.

To select a background for the floor plan, left-click anywhere except the area of the table placed on the layout. The background (substrate) properties will appear in the Inspector area:
Appearance
Background color – background color;
Color – background (substrate) color for the hall image;
Picture – opens the Picture Editor window to create a new picture or upload an existing one;
Position
Height – layout height in pixels;
Width – layout width in pixels;
Horiz. Alignment – horizontal alignment of the image relative to the layout area. Possible values: "Left", "Right" or "Center";
Vert. Alignment – vertical alignment of the image relative to the layout area. Possible values: "Bottom", "Top" and "Center".
At the top of the window, above the layout, there is a list of tables included in the hall plan but not yet placed on the layout. To place a table on the layout, left-click it, then click the place on the layout where the table should be placed. The table will appear in the specified place on the layout, and will disappear from the list of tables to select. You can move the table to any place using drag and drop.
Table properties:
Behavior
Synchronized – if the flag is set, display the table's appearance on the workstation screen according to the description in the Tables directory (the Visualization group of properties). If the flag is not set, the table's appearance on the workstation screen will correspond to the description in the graphic editor.
Press Radius – the radius of the press zone when selecting a table on a Touch Screen type station in pixels. On the floor plan layout, the press zone is made visible when a table is selected. The press zone has the color of the table's service position. If the service position for the table is not defined, the press zone has no color (transparent color).
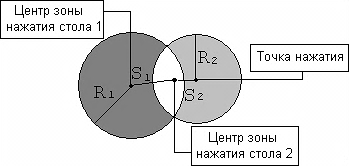
If the pressing point falls into the intersection of pressing zones of different tables, the following rules apply:
- The table with the smaller distance from the pressing point to the center of the pressing zone is selected (comparison of distances S1 and S2).
- If this distance is the same, the table with the larger radius of the pressing zone is selected (comparison of radii R1 and R2).
- If this distance is also the same, the table is selected randomly.