The Service Menu (manager panel) consists of several parts:

The Information menu displays the following information:
Available options of the functional menu:
In the Settings > Manager Settings section, all functional elements can be hidden.
Clicking the CLOSE THE GENERAL SHIFT button closes the general shift.
If the shift was not opened, an error will appear.
The CLOSE THE GENERAL SHIFT button is inactive for users who do not have the Close The General Shift permission.
Clicking the CLOSE CASH REGISTER SHIFT button closes the cash register shift.
The CLOSE CASH REGISTER SHIFT button is inactive for users who do not have the right to perform the Close Cash Register Shift operation.
When you click the X-Report button, an X-Report is generated.
When you click the Z-Report button, an Z-Report is generated.
Clicking the PRINTER TEST button will test the printer.
To set up the printer test layout, go to the Manager section under Settings > Basic Settings and select the PRINTER TEST VIEW IDENTIFIER parameter. The printer test layout should be created from the cash balance report layout copy.
When you click the PIN-PAD VERIFICATION, an intermediate reconciliation of totals is printed on the PIN-pad: neither the сash register nor the general shift is closed.
When you click the REMOVE CHECK (RECEIPT) button, a receipt selection window appears.
| If the receipt was created in a different (not current) shift, then it is impossible to delete such a receipt. |

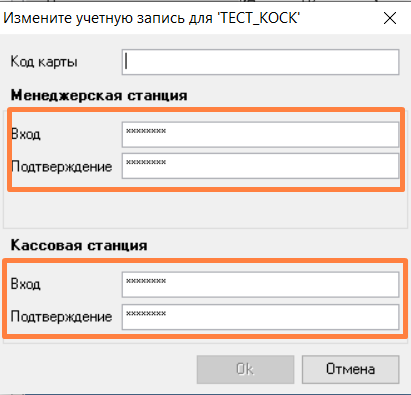
Please specify:

Personal pass – enter the employee password for the cash register, under which the service menu (manager panel) is entered.
To enter the service menu, use the manager password; to delete a receipt, use the cash register password.
If the operation is successful, a window will appear.
If the receipt has already been deleted, an error will appear.
If the receipt is not found, a corresponding error will be displayed.
The kiosk is capable of printing duplicate receipts paid during the current cash register shift.
When you click the Print Receipt button, a window appears.
Enter the receipt number and click the Next button.
The receipt number can also be selected from the list of receipts for the current shift. To go to the list of receipts, you need to click the SHOW ALL CHECKS (RECEIPTS) button, a list with the following data from the receipts will appear:
If the operation is successful, a window will appear.
The information about stopping sales of certain dishes is entered manually in the out-of-stock list editor.
The out-of-stock list editor displays all menu items loaded into the kiosk (including inactive ones and those in the hidden selector hiddenSelector). The list of menu items is grouped by selectors that include the menu items.
If the selector has sub-selectors, they will also be displayed.
Hidden menu items are displayed in the Hidden Dishes group.
To add a menu item to the out-of-stock list, click on the Dishes button in the corresponding selector
and then for a specific menu item select the inactive switch position. – the menu item is active,
 – the menu item is inactive (added to the out-of-stock list).
Inactive menu items are not displayed in the kiosk menu and cannot be added via the Coupons button.
To avoid scrolling through the entire list in search of the desired menu item, there is a search for menu items by code or name at the top of the screen. Pressing on the field brings up the on-screen keyboard.
To clear the search bar, click the Clear Search button.
If a menu item that is an obligatory combo component is added to the out-of-stock list, the combo meal will no longer appear on the menu.
Information about resuming sales of menu items is also entered manually. If the sale of all menu items from the out-of-stock list has been resumed, you can use the Reset Stop List button.
To save changes to the stop list, you need to press the Save button at the bottom of the screen.
Information about stopping the sale of modifiers is entered manually into the Stop List editor (modifiers).
The Stop List Editor (Modifiers) displays all modifiers loaded into the kiosk. A switch in the On position ![]() means the modifier is active, a switch in the Off position
means the modifier is active, a switch in the Off position ![]() means the modifier is inactive. Inactive modifiers are not displayed in the kiosk menu.
means the modifier is inactive. Inactive modifiers are not displayed in the kiosk menu. 
To avoid scrolling through the entire list in search of the required modifier, there is a search at the top where you need to enter the modifier code.
Information about resuming sales of modifiers is also entered manually. If the sale of all menu items from the out-of-stock list has been resumed, you can use the Reset Stop List button.
To save the changes you have made, click the Save button at the bottom of the screen.
Described in the Licensing chapter (ссылка)
Described in the Settings chapter (ссылка)
Described in the Scenarios chapter (ссылка)
If you select Yes, the self-service terminal will be blocked (not available for work). When you exit the manager panel, the message Proceed to the cash registers. The kiosk is temporarily out of service will appear on the screen.
To unlock the kiosk, you must set the Lock kiosk parameter to No.
When you select Yes, the Time and Date are displayed in the upper right corner of the screen.
If you select No, the Time and Date are not displayed.
If you select Yes, after closing the common shift, the self-service terminal will reboot.
If you select No, the self-service terminal will not reboot after the common shift is closed.
When you click the RESTART KIOSK button and confirm the operation, the self-service terminal will restart.
When you click the EXIT button, a confirmation window appears, and after selecting Yes, you will exit the service menu and go to the kiosk start page.
When you click the SHUT DOWN button, a confirmation window will appear, and after you select YES, the application will close.