HyperCom Terminal installation and configuring for RK7
1. Setup manager station
1.1. Set service>stations and devices>all>[your restaurant]>[your cash server]>[your cash station].
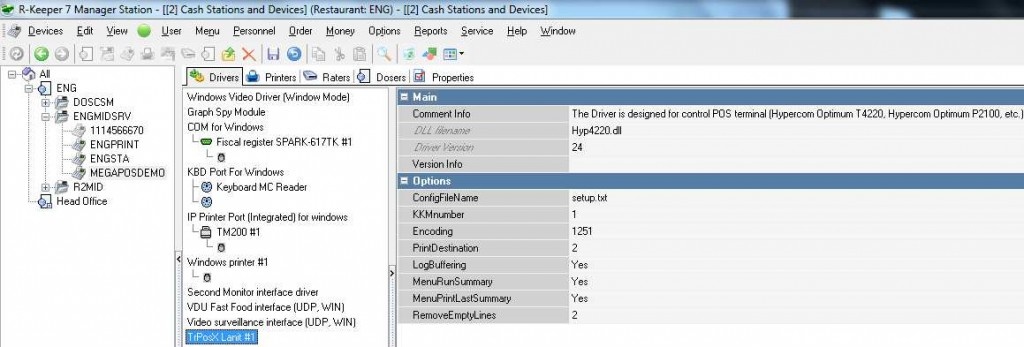
1.1.1. Add "TrPosX Lanit" driver to your windows cash station (drivers tab) and set print destination code and other settings if necessary.
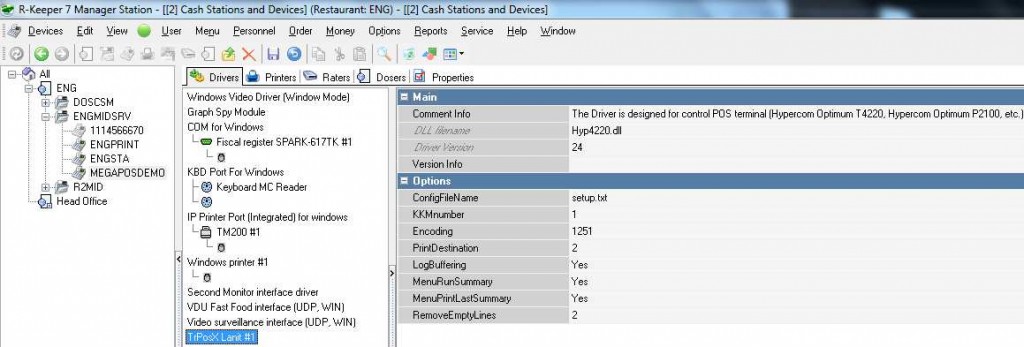
1.1.2. Create logical printer and set the driver created in its properties basic -> module (printers tab).
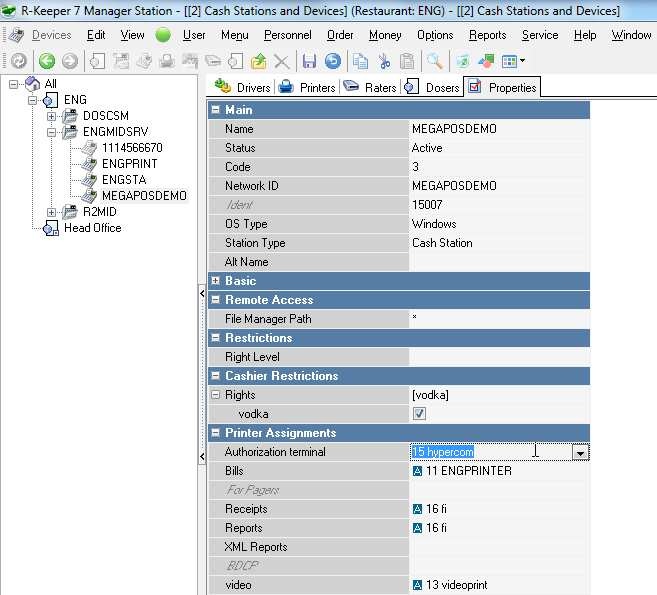
1.1.3. Set printer assignments -> authorization terminal the logical printer created (properties tab). Do not assign this logical terminal to other printer purposes!
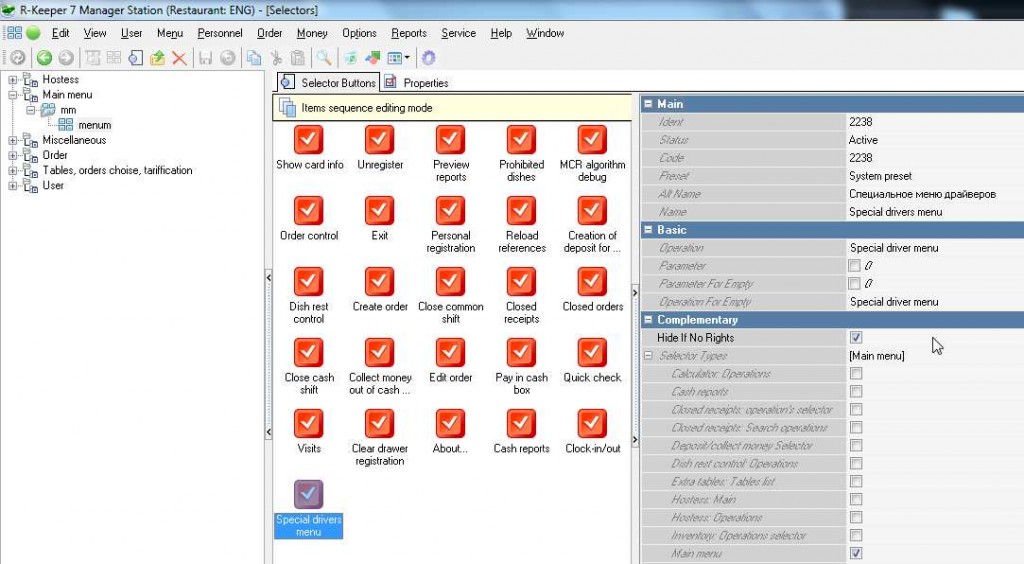
1.2. Set options>user interface>selectors>main menu>[your main menu].
1.2.1. Add "special driver menu" function key (selector buttons tab).
1.3. Set personnel>employees>>all>[your restaurant]>[your employee group].
1.3.1. Enable right "special driver menu" in cashier restrictions rights group (properties tab).
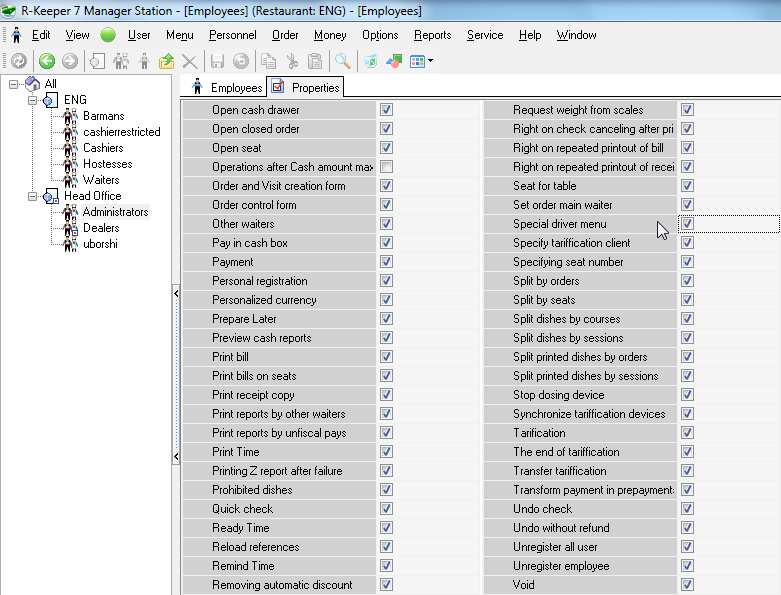
1.4. Set Options->Printing->Documents and layouts->Other->[Authorization result] and [Authorization error] document type layouts.
1.4.1. New layouts should be of the following format (save this code to text file with ".mak" extention and import in RK7 built in editor as usually):
| Authorization result | Authorization error |
| object Report: TPDReport EngineVer = 1 Width = 40 IVars = < item Name = 'p' TypeStr = 'integer' end item Name = 'slip1' TypeStr = 'string' end item Name = 'slip2' TypeStr = 'string' end> UnionTables = <> RepParams = <> FixedHeight = 0 TwoPasses = True object Document1: TPDDocument Height = 40 object bndAuthResultReport1: TPDBand Color = 14547963 Top = 1 Height = 2 Footer.Size = 0 BandType = btMasterData DataSetName = 'AuthResultReport' BeforeStart.Strings = ( 'begin if pos (#10#10#10#10#10, AuthResultReport.SlipToPrint) <> ' + '0 then ' 'begin' ' p:=pos(#10#10#10#10#10,AuthResultReport.SlipToPrint);' ' slip1:=copy(AuthResultReport.SlipToPrint,1,p);' ' slip2:=copy(AuthResultReport.SlipToPrint,p+7,Length(AuthResult' + 'Report.SlipToPrint)-6);' ' memSlipToPrint1.Content.Text:=slip1+'#39'<EndRoll>'#39'+slip2+'#39'<EndRol' + 'l>'#39 'end' 'else' ' memSlipToPrint1.Content.Text:=AuthResultReport.SlipToPrint+'#39'<E' + 'ndRoll>'#39'; end') CalcFields = <> object memSlipToPrint1: TPDMemo Left = 0 Top = 1 Width = 40 Height = 1 Content.Strings = ( '[Slip1]') end end end end | object Report: TPDReport EngineVer = 1 Width = 40 IVars = < item Name = 'p' TypeStr = 'integer' end item Name = 'slip1' TypeStr = 'string' end item Name = 'slip2' TypeStr = 'string' end> UnionTables = <> RepParams = <> FixedHeight = 0 TwoPasses = True object Document1: TPDDocument Height = 40 object bndAuthResultReport1: TPDBand Color = 14547963 Top = 1 Height = 2 Footer.Size = 0 BandType = btMasterData DataSetName = 'AuthResultReport' BeforeStart.Strings = ( 'begin if pos (#10#10#10#10#10, AuthResultReport.SlipToPrint) <> ' + '0 then ' 'begin' ' p:=pos(#10#10#10#10#10,AuthResultReport.SlipToPrint);' ' slip1:=copy(AuthResultReport.SlipToPrint,1,p);' ' slip2:=copy(AuthResultReport.SlipToPrint,p+7,Length(AuthResult' + 'Report.SlipToPrint)-6);' '// memSlipToPrint1.Content.Text:=slip1+'#39'<EndRoll>'#39'+slip2+'#39'<EndR' + 'oll>'#39' ' 'end' '//else' '{ memSlipToPrint1.Content.Text:=AuthResultReport.SlipToPrint+'#39'<' + 'EndRoll>'#39'; } end') CalcFields = <> object memSlipToPrint1: TPDMemo Left = 0 Top = 1 Width = 40 Height = 1 Content.Strings = ( '[SlipToPrint]') end end end end |
1.4.2. Add layouts to the Printing scheme(s): Options->Printing->Printing schemes->[active printing scheme]. Make sure that there are no other documents of the same document type in each scheme (mind deleting previous ones).
1.5. Check that "Terminal authorization" document type layout view is properly assigned (3.1.5.).
2. Files and folders
2.1. Necessary files
2.1.1. What files are there in the distributive?
2.1.1.1. TrPosX distributive (one archive) contain these files:
SETUP.TXT |
2.1.2. Where could you get genuine TrPosX software?
2.1.2.1. This distributive is supplied by "Lanit" Ltd.
2.2. Setup files
2.2.1. General information
2.2.1.1. You have to change settings in 2 files from TrPosX distributive (setup.txt and trhems.ini) and nothing to set in RK7 ini files.
2.2.2. SETUP.TXT
2.2.2.1. File content format
| COMMType=ip COMM=COM1 BaseAddr=0x3F8 IRQ=4 BaudRate=115200 DataBits=8 Parity=N StopBits=1 IP=127.0.0.1 Port=16500 POSport=20500 T1=2 T1repeat=3 T2=60 Tici=200 Timeout=180 PrinterWD=40 PaperCut=1B37 UsePDS=1 NoPrint=0 PANmask=1 LeftPANdigits=6 RightPANdigits=4 MaskPANsymbol=x SuppressExtraRC= ResultWinSuppress= CardholderVerification= SRVSettleEnable=0 ReceiptLine1= ReceiptLine1 ReceiptLine2= ReceiptLine2 ReceiptLine3= ReceiptLine3 ReceiptLine4= ReceiptLine4 DebugLevel=6 Encoding=1251 Server=0 |
2.2.2.2. Settings in SETUP.TXT file
2.2.2.2.1. Check and edit if necessary COM port settings in several parameters: "COMM=" (port number); "BaseAddr=" (port address); "IRQ=" (port interrupt request number). These parameters you could see in your PC BIOS settings and OS device manager settings (make them to be identical).
2.2.3. trhems.ini
2.2.3.1. File content format
| server = 127.0.0.1; 20500; 0 DefHost = 127.0.0.1; 20500; 30 com = 1; 115200; 8n1; 41200; 200 DebugLevel = 6; |
2.2.3.2. Settings in trhems.ini
2.2.3.2.1. You have to check COM port number in "com =" parameter.
2.2.3.2.2. Set "DefHost=" proper Bank host address. Test this connection by windows telnet application if necessary.
2.3. File movements
2.3.1. You have to put all the files listed in 2.1.1.1. and previously set as described in 2.2. to your cash station folder on the Hypercom terminal connected computer (by default: \bin\win\).
3. Licensing
3.1. No special software license required. This RK7 driver is under R-keeper 7 Stations license agreement.
4. Start programs
4.1. Start your cash station in a usual way. Make sure that Hypercom terminal is connected properly (COM port or IP network).
5. Remarks
5.1. Printer redirection doesn't work when perform Hypercom operations.
6. Troubleshooting
6.1. Log files
6.1.1. HYP4220.LOG.
6.1.2. trhems.log.
6.1.3. trpos.log.
6.1.4. cash.stk.
6.2. Testing
6.2.1. Perform tests from "Special driver menu".
6.2.2. If pinpad test is not ok, check terminal connection to cash station: RK7 settings, TrPosX files settings, Windows and BIOS settings.
6.2.3. If pinpad test is ok, but host test is not ok, check TrPosX files settings, Terminal firmware settings, station network settings.