R-Keeper 7 installation and upgrade manual
1. General information
1.1. General servers and stations interaction scheme
1.1.1. RK7 applications are connected to each other by means of TCPSOC protocol.

1.1.1.1. Where .exe - applications (clients are started using .bat files); .ini - settings files for applications; .stk - log files of applications; .eng - translation files for applications.
1.1.2. Application interaction chart looks reverse tree-like hierarchy. In simple case it looks like in-line-chain: Manager station -> Reference server <- Cash server <- Cash station.
1.1.3. All servers are DBMS. Clients get data from DB through servers.

1.1.4. RK7 system applications are separated by its purpose into 2 big groups: back office and front office.
1.1.4.1. Back office part: Reference server, Report server(s), Manager station(s).
1.1.4.2. Front office part: Cash server(s), Cash station(s), Print station(s) + all the other applications which are connected TO them (RK7 additional modules).
1.1.5. You are recommended to make the system on POS start cashier station automatically with windows.
1.1.5.1. One of the ways to do that, is to change windows registry "HKLM\SOFTWARE\Microsoft\Windows NT\CurrentVersion\Winlogon" path "Shell" parameter value to "wincash.bat" file (full path). You may set pause in bat file in case you need time to wait for cashier server loaded.
1.1.5.3. Your windows user session have to use autologin after computer turned on.
1.1.6. You have to install all servers as windows service.
1.1.6.1. Give "/install" parameter to .exe file for that.
1.1.6.2. You must install "as administrator" in Windows Server 2012 or newer.
1.1.6.3. If you install more than 1 server in 1 OS, use parameter "/srvname:SOMENAME" to specify different names.
1.2. Operational sequence
Installation and start should be done in the following sequence:
1) Reference server
2) Manager station
2,5) Report server(s)
3) Cash server (midserver)
4) Cash station and other stations
5) Optional modules: WEBmonitoring, KDS, VDU, PDS, VideoControl, TMS, etc.
2. Preparing for installation
2.1. Where can you get the original UCS R-keeper 7 distributive
2.1.1. Copy any archive named as a version number with RK7 distributive from UCS FTP server (ftp://ftpint.ucs.ru/rk7/versions/).
2.1.2. If you don't know why another version meets your requirements better, take the latest one.
2.1.3. Use RK7 installers (like RK7_Setup_7.6.4.63.1.exe) to extract distributive files and use them for manual manipulations similar to archive installation\update.
2.2. What files and folders are in the distributive
2.2.1. Folders
2.2.1.1. There are 2 folders to use in installation and upgrade: \BIN\ and \base\.
2.2.1.2. Installer will extract same files to many folders.
2.2.2. \BIN\ folder
bin\win\refsrv.exe - RK7 reference server (protected by Guardant key)
bin\win\bldcube.exe - builds and recalculates cubes (it is called from refsrv.exe)
bin\win\midserv.exe - midserver (=cash server). It is protected by Guardant key and needs license for working.
bin\win\escape.txt - list of printer commands (used by midserv.exe)
bin\win\wincash.bat - running cash station (+ preliminary update).
bin\win\wincash.dat - running cash station (+ preliminary update) under Linux+Wine
bin\win\winprint.exe – printer server (Windows)
bin\win\rk7man.exe - manager station
bin\win\port32.exe – this programs installs special driver, that allows to work with processor ports under Windows. It is necessary for some drivers (API Windows is not enough for their correct working)
bin\win_no_preload\wincash.exe - runs doscash.exe, it is left for compatibility /deprecated (cashier station application is 'doscash.exe').
bin\win\ini\*.ini - examples of files with settings.
bin\dos_no_preload\doscash.exe – cash station
bin\dos_no_preload\doscs.exe – server+station (protected by Fidus)
bin\dos\preload.exe - loads new modules in sub-folder PRELOAD (all settings in bin\dos\cash.ini)
bin\dos\movemod.exe - moves files and subfolders from PRELOAD to current folder
All programs take ini-file as parameter.
bin\dos – to copy on DOS station during installation.
bin\dos_no_preload - all files and libraries (if you copy files manually, without automatic updates) – for DOS
bin\win_no_preload - the same for Windows
bin\for cardserv - to set iteraction with PDS (see ini.doc for more information)
bin\sh4tr- for SH4 (see ini.doc for more information)
bin\sh4import – for cost import from SH4 (works starting from version of shserv.dll 4.35.52.0). Place all files in folder with refsrv.exe (usually BIN/WIN). Also see ini.doc for more information.
bin\rkonline – to display balance online in SH4Utils - move these files to SH4Utils.exe working folder (see SH4 manual for more information).
bin\webmon – for web-monitoring (see ini.doc for more information).
bin\remotefm – for access to files on cash station.
bin\shelter – for connection with Shelter (see ini.doc for more information)
bin\Invoice - for printing invoices via invoice.dll (see ini.doc for more information).
bin\rds – receipt discount server (see ini.doc for more information)
2.2.3. \BASE\ folder
2.2.3.1. base – folder with database of reference server (by default - you might have changed that path in server ini file).
2.2.3.2. rk7.new – reference empty (new) DB; you can rename this file to rk7.udb (in this case some additional information is already added, for example, stations are already created).
2.2.3.3. upgradepresets.udb or upgrade.udb – all information for creation of new base and upgrade of old one.
2.2.3.4. upgradedevices.udb or upgradedev.udb (deprecated name upgradefr.udb) - information about device, like fiscal registers and their fiscal types (file is obligatory in case of fiscal registers usage).
Do not forget to delete upgradefr.udb in case of upgrade to new version.
2.2.3.5. \drvlocalize\ – folder contains files, that are used for drivers (fiscal printers, etc.) localization and default settings.
2.2.3.5.1. \drvlocalize\defparams.all - special default driver settings (ini file format inside) - must be copied to \base\defparams.ini manually or using \base\drvlocalize\copyrus.bat script.
2.2.3.5.2. \drvlocalize\defparams.rus (russian drivers - other countries prepare their own - see below).
2.2.3.5.3. \drvlocalize\defparams.xxx (where xxx=language ident) - default settings for countries specified drivers (fiscal printers, etc.).
2.2.3.6. defparams.ini (created by server or user - not in distributive) - default settings of device drivers.
2.2.3.6.1 For versions under 7.5 see drvlocalize\readme.txt for instructions for defparams.ini creation
\workmods\ – folder contains modules bases (for automatic update on cash stations with the help of preload.exe). You should leave only necessary files. Also see base\workmods\readme.txt
\midbase\ – folder created for cash server database (see Cash server settings description for more information)
2.3. Distributive manipulation
2.3.1. Simple installation (only one application per type).
2.3.1.1. Extract the archieve and switch off “read only” property for the whole folder and subfolders (ini files usually preset as "read only").
2.3.1.2. Copy INI files from BIN\WIN\ini\ to BIN\WIN (see below how to set each of them).
2.3.2. More than 1 application (server or station) of the same type.
2.3.2.1. You should create separate folder for each new copy (instance) of any apllication to be installed in the same OS.
2.3.2.2. It is possible, but not recommended, to start more than 1 station of the same type from one folder specifiying different ininame as parameter.
2.3.2.3. More than 1 cashier station
2.3.2.3.1. Must have wincash.ini copy with different settings inside each working folder.
2.3.2.4. More than 1 cash server
2.3.2.4.1. You must specify different DB path in each rkeeper.ini.
2.3.2.5. You may choose only necessary files from \win\ folder to copy to another instance folder.
2.3.3. You are able to choose and copy to your desired folder only those files required by the application.
2.3.3.1. This is best practice to leave only those files required (minimum) in working folder.
2.4. Operation system (environment)
2.4.1. You have to prepare stock Windows for UCS applications before starting them.
2.4.2. You must completely turn off UserAccoutControl.
2.4.3. You have to add firewall exceptions for each RK7 executable.
2.4.3.1. We recommend you use only Windows preinstalled firewall (not any other additional application).
2.4.3.2. We do not recommend you ever turn the firewall off! Use exceptions only. Firewall must be on and protect the OS.
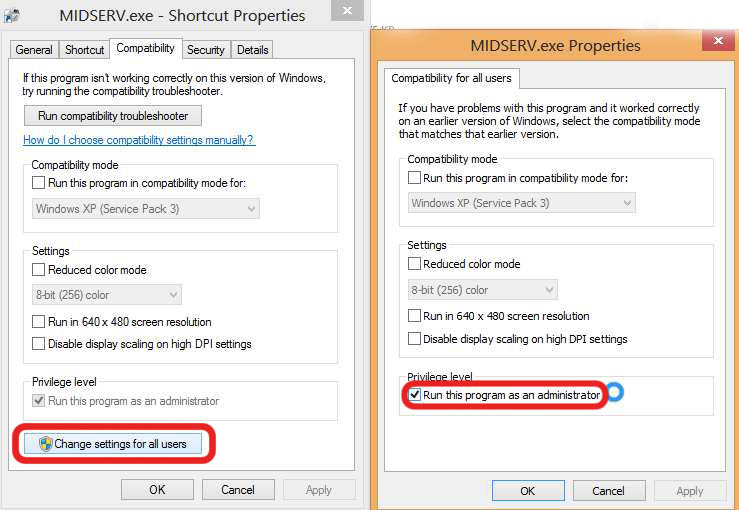
2.4.4. You must start each RK7 application as competent user (Administrator).
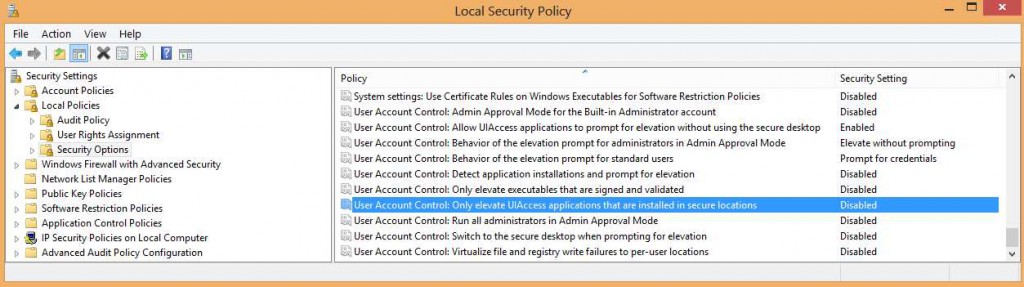
2.4.5. If you use modern OS (like Windows 8), you have to disable additional security settings: change local security policy entries (secpol.mcs->Security Options-> last 8 entries related to UAC) - disable them and set "No Prompt".
2.4.6. In other case it might be enough to grant elevation in the shortcut.
2.4.7. If you have got another security applications installed in the same OS, you must configure them to allow everything for UCS applications.
2.4.8. We recommend you use such a neutral antivirus software as Microsoft security essentials or Eset Nod32 antivirus.
2.5. Network
2.5.1. Before starting RK7 ini files configuration (basic application settings), you have to prepare well-organized working IP (TCP+UDP ready) network.
2.5.2. Your hosts in local network which are going to be used for RK7 applications (and most important - all servers) run must have static IP addresses.
2.5.3. You must discover free TCP port range(s) in your OS to use them in RK7 settings.
2.5.4. Communication between RK7 applications by default utilizes TCPSOC protocol (which works over both TCP and UDP). Main library is TCPSOC.dll.
2.5.5. Common settings for this protocol are in [TCPSOC] ini section ("Port" parameter is the current application main port to listen) and [TCPDNS] ini section (specification of host connection, parameter format is: [remote_host_network_ident]=[remote_host_IP_address_or_name]:[port_on_remote_host]).
2.5.6. Change network protocol for RK7 if necessary (not recommended) you may in [NETKERN] section "Protocols" parameter (set DLL filename).
2.5.7. As for TCPSOC Port and all interface ports added to server, it is highly recommended to be set by you for each server in RK7 system, so that you must know IP address and port for every client to host connection.
2.6. Planning
2.6.1. It is recommended to use unifying settings for every installation you do.
2.6.2. You have to prepare dealer preset reference DB to use.
2.6.2.1. You need to prepare dealer preset assembly of RK7 files (both for new installation cases and upgrade cases).
2.6.2.2. You need to test dealer preset assembly in your showroom before distribution to customer sides.
2.6.3. You have to prepare installtion scheme before go to client to start installation.
2.6.3.1. Define: Network names. IP addresses, Ports, Object codes, Object quantity, so on.
2.6.4. You have to get all necessary licenses before go to client to start installation.
2.6.5. You may use RK7 reference DB to save all those useful information about this system copy (for example, create extended properties for objects).

2.6.6. On planning follow recommendations from http://support.ucs.ru/en/node/7200 .
2.7. Hardware
2.7.1. Minimum hardware requirements are different for RK7 system applications.
2.7.1.1. For new versions requirements are bigger than below (must be modern productivity), since you should use MSSQLS and WEBKIT.
2.7.2. Reference server: CPU - P4 2.0GHz ; RAM - DDR-333 1.0GB; LAN - 256 kbit/s (if used); ROM - 1GB
2.7.3. Manager station: CPU - P4 2.0GHz ; RAM - DDR-333 1.0GB; LAN - 256 kbit/s (if used); ROM - 1GB
2.7.4. Cash server: CPU - P4 2.0GHz ; RAM - DDR-333 512MB; LAN - 256 kbit/s (if used); ROM - 1GB
2.7.5. Cash station: CPU - P4 2.0GHz ; RAM - DDR-333 512MB; LAN - 256 kbit/s (if used); ROM - 1GB
2.7.6. Report server: CPU - Pentium Dual core 2.0GHz ; RAM - DDR2-666 2.0GB; LAN - 256 kbit/s (if used); ROM - 10GB
3. Reference server and manager station (back office part)
3.1. Reference server: rk7srv.ini
3.1.1. File format
| [REFSERVER] Server=MAINRK7SRV UDBFILE=..\..\base\rk7.udb MainLang=.\RefSrv.Rus AltLang=.\RefSrv.Eng WorkModules=..\..\base\workmods UseSQL=1 UpgradeTranslateRussian=0 UpgradeAltTranslateRussian=0[NETKERN] Protocols=tcpsoc.DLL;localnet.dll [TCPSOC] PORT=3639 [CubeDLL] CommandTimeout = 300 |
3.1.2. Settings description
3.1.2.1. You have to start reference server first time with UseSQL=0 parameter in [REFSERVER] section.
3.1.2.2. [REFSERVER] section UpgradeAnyTime=1 parameter makes the system do upgrage on each reference server start.
3.1.2.3. [REFSERVER] section DisableSMARTVerify=1 parameter makes the system do not check new hardware additions (in order not to loose license).
3.1.2.4. [REFSERVER] section "Server=" parameter value is the name of RK7 reference server (must be unique in the network).
3.1.2.5. [REFSERVER] section "UDBFILE=" parameter value is the path to reference database. If after starting refserver, this file is not found, program will create new one.
3.1.2.6. [REFSERVER] section "MainLang=" parameter value is the path to file with translation strings, which will be used for main language.
3.1.2.7. [REFSERVER] section "AltLang=" parameter value is the path to file with translation strings, which will be used for alternative language.
3.1.2.8. [CubeDLL] section "CommandTimeout=" is the timeout for loading cubes from SQL Server.
3.1.2.9. [REFSERVER] section "ShortTimeout=" – maximum one element network operation execution time (milliseconds).
3.1.2.10. [REFSERVER] section "LongTimeout=" – maximum collection network operation execution time (milliseconds).
3.1.2.11. [REFSERVER] section "DisableSMARTVerify=" parameter takes "1" (do not sent SMART query to device or emulator on licensing) or "0" (check SMART).
3.2. Initial configuration and command line
3.2.1. Name of ini-file by default: rk7srv.ini. If it is needed to run refserver with other ini-file, use refsrv.exe /ininame: XXX.ini startup option (command line parameter).
3.2.1.1. Change ini name may be useful in case you start several servers in one folder.
3.2.1.2. Each server instance must have own ini file.
3.2.2. Refserver can be run as usual Windows desktop application or can be installed as a service. In both cases it accepts some command line parameters.
3.2.2.1. In first case run like this: refsrv.exe /desktop
3.2.2.1.1. After refserver is started as desktop, its icon will appear in Windows tray: ![]() If you make a double-click on it, you can view its properties: connected servers (for example, manager station), debug, etc.
If you make a double-click on it, you can view its properties: connected servers (for example, manager station), debug, etc.
3.2.2.2. In second case: refsrv.exe /install.
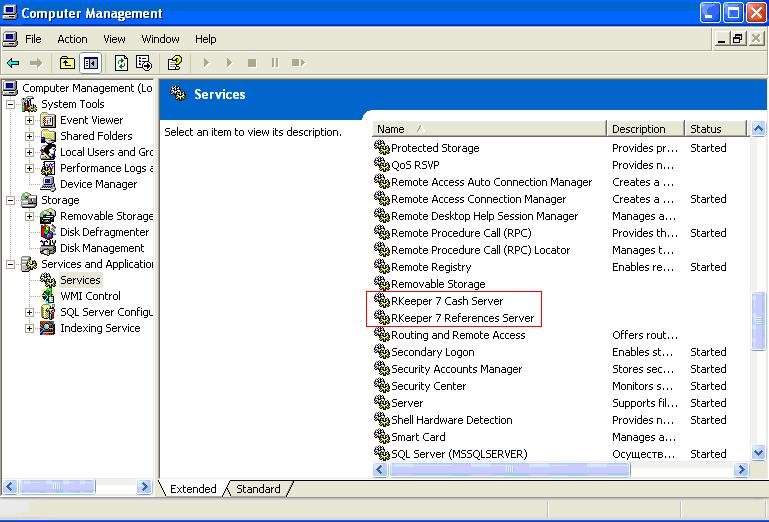
3.2.2.2.1. In this case it is shown in the list of Windows services)
3.2.2.3. /uninstall - delete service from OS.
3.2.2.4. /srvname:SomeName - add service name ‘SomeName’.
3.2.2.4.1. This is useful in case several instances to be installed in one OS.
3.2.2.5. /listkeys - for saving protection key numbers to log file.
3.2.2.5.1. Useful when making license on remote manager station.
3.2.2.6. /norefslogs - disable registration of changes in references to log.udb
3.2.2.7. Useful in case of big database with a lot of price types and trade groups.
3.2.3. Refserver works with 2 internal databases (both are stored in folder BASE by default):
3.2.3.1. rk7.udb (contains information about menu, discounts, stations, employees, etc)
3.2.3.2. check.udb (contains information about closed checks and closed shifts. All sales OLAP back office reports are built using this base.)
3.2.4. Reference server is protected with Guardant key. So after making all necessary settings (see below) don’t forget to plug the key into your computer before starting server.
3.2.4.1. Moder version supports virtual keys
3.2.4.1.1. Virtual keys are checking for license periodically
3.2.4.1.2. For virtual key you need to set in server ini file additional parameters as below:
| [REFSERVER] UseNetChecking=1 [NetLicense] LicServerIP=l.ucs.ru:60606 ProxyServer= ProxyPort= ProxyBasicAuthentication=0 ProxyUsername= ProxyPassword= |
3.2.5. Reference server the same as cash server, print server, report server, cash station and other RK7 applications are Windows32.
3.2.6. In order RK7 apps could load modules properly you have to disable User account control (UAC) in OS since Vista version (and restart OS before starting RK7 apps).
3.2.7. In case you enable MSSQL DB usage, you have to start reference server after sqlsrv
3.2.7.1. You can make control using service dependency with command like:
| sc config RKeeperRefServer depend=MSSQL$SQLEXPRESS |
3.3. Manager station: rk7man.ini
3.3.1. Manager station is a main application to edit references (which are stored in rk7.udb) and get reports – you can add menu items, set parameters, create stations, etc.
3.3.2. Name of ini-file by default: rk7man.ini. Format is the following.
[REFEDIT] MY_REFSERVER=198.154.196.149:3639 - for connection to reference\report server in case no network name resolution possible (server is on another computer in different subnet), add here its name and IP-address |
3.3.3. You may not set [TCPSOC] and [TCPDNS] sections if operating from 'server' OS.
3.3.4. Run rk7man.bat to start this application with updates preload; enter manager station (make sure, that your server, to which manager station will connect, is started and listenes the specific port, given in [TCPDNS] settings).
3.3.5. User and password by default: ‘Administrator’ and ‘=’. If you want to enter as dealer, see 3.4. below.
3.3.6. Remember that you are able to edit references only when connected to refsrv.exe, rkReportsServer.exe connection is view only.
3.3.7. You may choose server (network name) to connect to directly in rk7man.exe login form, press 'Ctrl+Alt+s' for that.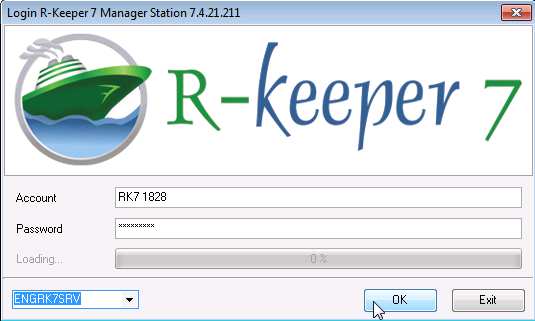
3.3.8. Mind that you should have at least user role right 'Manager station' to login into rk7man.exe.
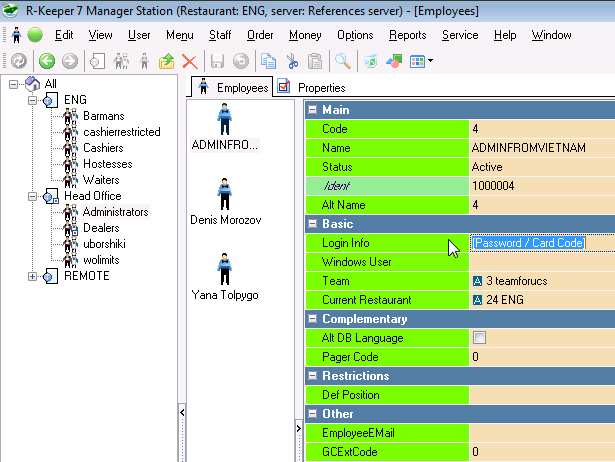
3.3.9. Active user credentials (password or cardcode) you have to set in 'Employees' -> 'All' -> [restaurant] -> [role] 'Basic' section 'Login info' property.
3.3.10. You can edit reference DB and make settings when connected to preset reference server only. It is not possible to edit settings when connected to report server.
3.4. Dealers
3.4.1. Dealer IDs and passwords are stored in RAL.DAT file.
3.4.2. Place RAL.DAT (download from UCS file server /dealers/r-keeper/ folder) to the folder /BASE/ of each reference server. This will allow you to enter manager station, using your dealer login and password like: RK7 XXX, where “XXX” is a particular dealer ident.
3.4.3. Put this file to /base/ folder before refsrv.exe start. Don’t forget to restart reference server after placing RAL.DAT during its uptime to apply new dealer DB.
3.4.4. Each RAL.DAT has its expire date inside. You have to download and apply new file periodically (or after you get 'access list is obsolete' message on login).
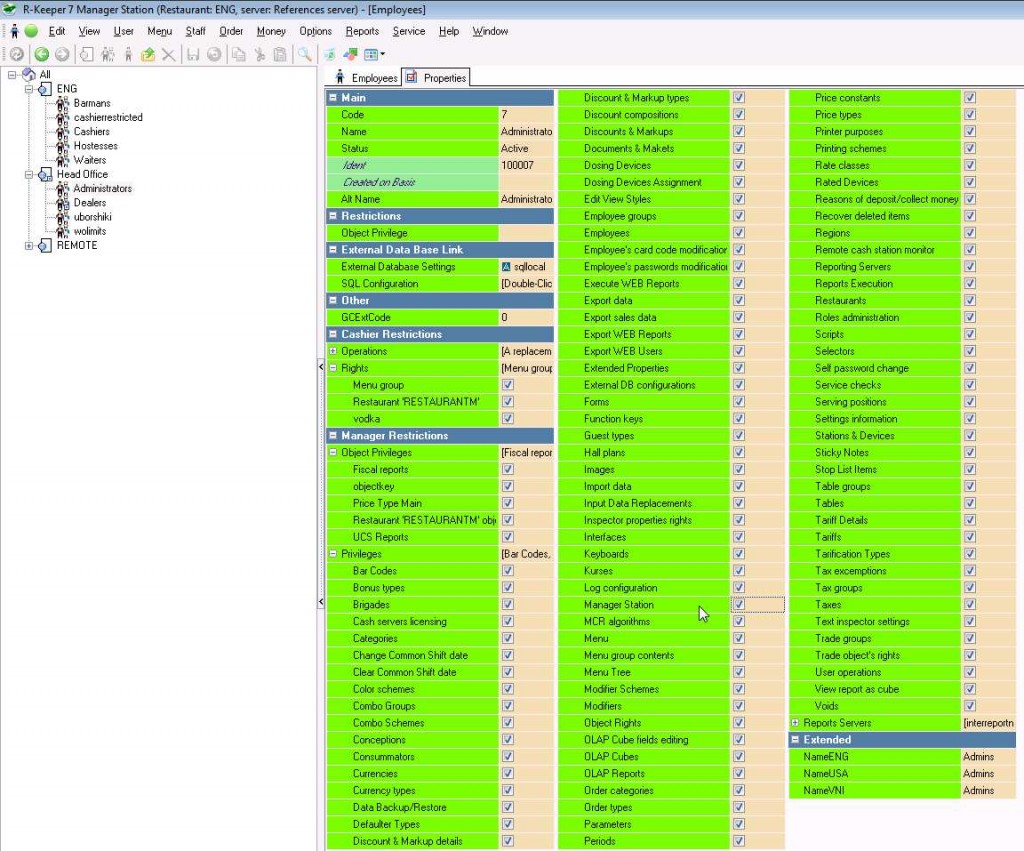
3.4.5. Users who are referred to “Dealers” group (preset users in rk7man.exe), have some special features:
* They have all privileges
* They see user group “Dealers”
* They can change names of object features (Service – Manager Station – Inspector Settings)
* They can create dealer’s predefined settings (described below)
* They see properties, that are hidden in “Inspector Settings” (list of properties, hidden by default)
* Thay cannot operate on cash station
3.5. Enterprise code
On manager station choose
“Options” --- “Parameters” --- “Installation” --- Enterprise code.
Set your enterprise code here.
ATTENTION: enterprise code is checked in license, that’s why it should be put correctly.
If you don’t have your enterprise code yet, you should fill a request on our site (see “Licenses in RK7” on http://support.ucs.ru for more information) to create new enterprise and generate code for it.
3.6. Restaurant code
On manager station choose
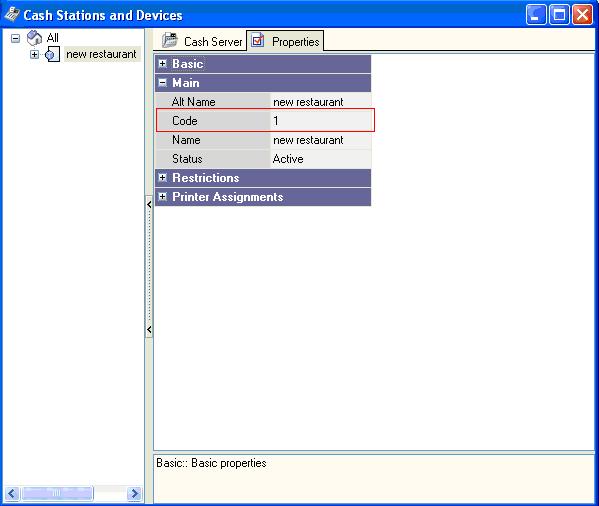
“Service” --- “Stations and devices”.
In properties of restaurant enter restaurant name and code
ATTENTION: Restaurant code should be put correctly, because it is checked in license.
If you don’t have your restaurant code yet, you should fill a request on our site (see “Licenses in RK7” on http://support.ucs.ru for more information) to create new restaurant and generate code for it.
4. Cash server and cash station (front office part)
4.1. General info
4.1.1. Every cash server should have its own folder, where references (files come from reference server) and accumulative data (work.udb and other) are stored, because they have different data. See below 4.3.1. how to set path to this folder.
4.1.2. Cash station cannot work without connection to cash server, because it takes and saves all the necessary data from/to cash server databases.
4.1.3. WORK.UDB is an accumulative database for the current common shift.
4.1.4. Both cash station and server can work inside DOS or/and Windows OS with TCP/IP interconnection between. This also means that you are able to use any Windows based device to run this software on (including Tablet PC).
4.2. Cash server settings in RK7 manager station
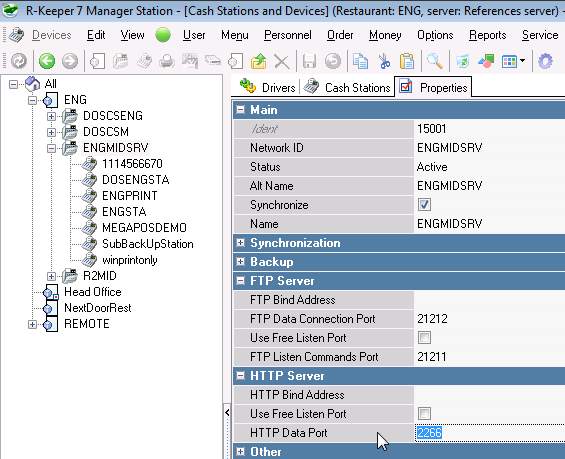
4.2.1. Creating new cash server
4.2.1.1. On manager station in Service --> Stations and devices create new cash server for your restaurant.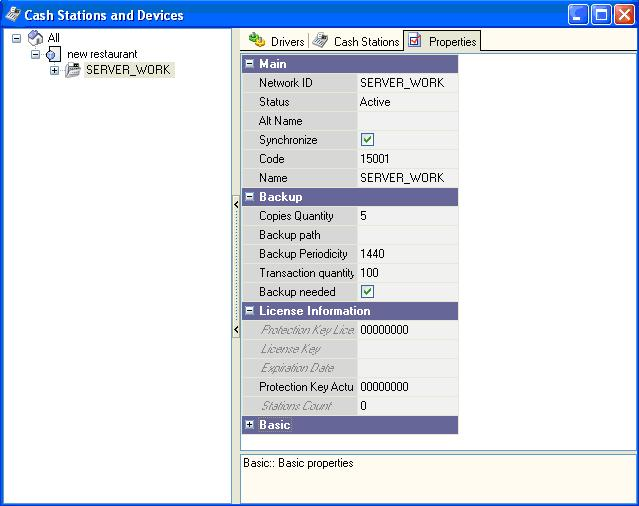
4.2.1.2. Fill necessary information:
* Network ID – network ID of this server, this name is used in rkeeper.ini file (see below)
* Name – server name. Should not be empty.
* Status – set to “Active”.
* Synchronize – put a tick, if you want to switch on real-data synchronization with reference server.
* Backup – set path, periodicity, N of copies and transactions (if needed).
4.2.2. License
4.2.2.1. Some general information about license:
* Every midserver is protected with Guardant key (so it can not be run without the key)
* For each midserver you should receive license (see below).
* License contains information about key number, hardware, restaurant code and corporation code.
Note: for more information about license please see ‘Licensing.doc’
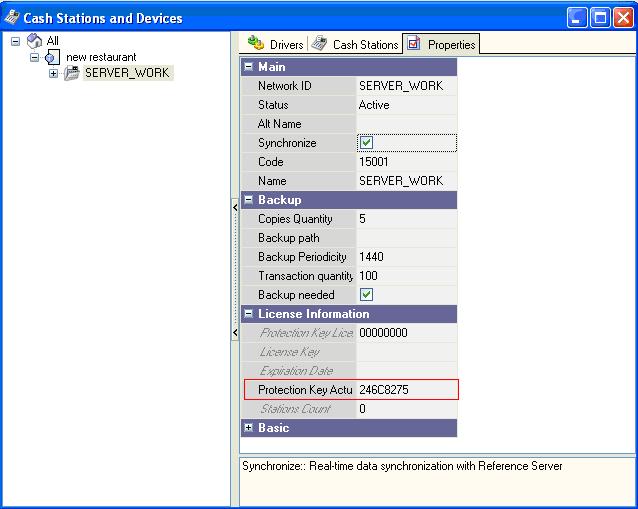
Have a look at Service --- Stations and devices --- midserver properties --- License information --- Protection key actual number
Here you should choose key that will be used for you midserver.
Key number can be chosen in 2 ways:
1) Run midserver for the first time. Error message will be shown, that there is no license. After that key number will appear in corresponding field (midserver sends info about the key to refserver).
2) Plug this key into computer and click on this field. Guardant driver will detect key number automatically and you’ll be able to choose it in the list.
Now make right-click on your server and choose “Licensing” --- “First activation / License change” (in 'current' versions: Actions --- Generate license request)
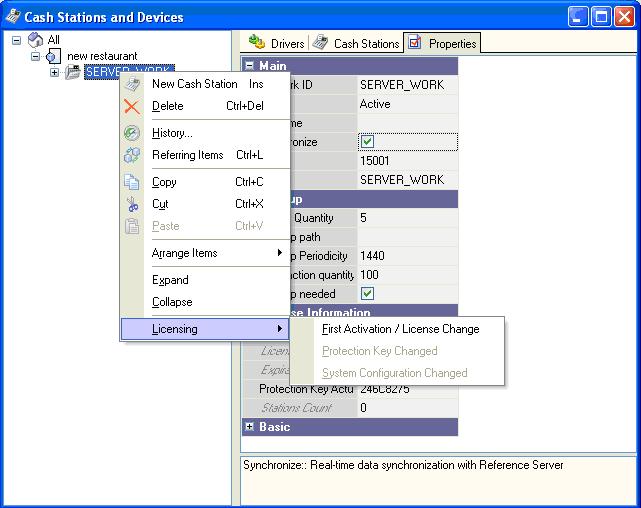
“License request data” will be filled automatically, later you will use it on our site to receive license key.
(For more information about getting licenses for different cash servers please also see “Licences in RK7” on http://support.ucs.ru).
After your license was generated, enter it in field License key.
4.2.3. BACKUP
4.2.3.1. Setup [Backup] section parameters, mind recommendations.
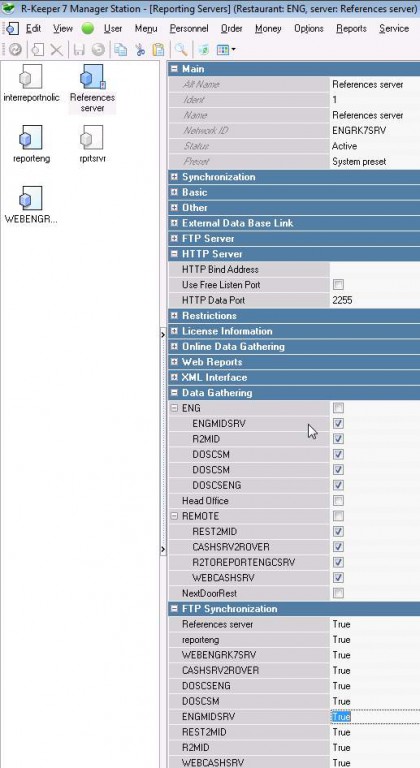
4.2.4. Synchronization
4.2.5. FTP server
4.2.5.1. These settings are necessary if you want some report server, which is not upper-level one for given cash server, get accumulative data (closed shifts) from this cash server directly (in case they are on the same network or have network with valid routing between them).
4.2.5.2. In order this option could work, you have to enable FTP data gathering on report server(s) and assign given cash server there (set 'true').
4.2.5.3. If your report server can't resolve TCPSOC network name(s) of cash server(s) you have to specify [TCPDNS] details in its ini file besides valid routing check.
4.2.6. HTTP server
4.2.6.1 The same way as report servers, cash servers have got WEB interface with administrative data (monitoring and troubleshooting purpose).
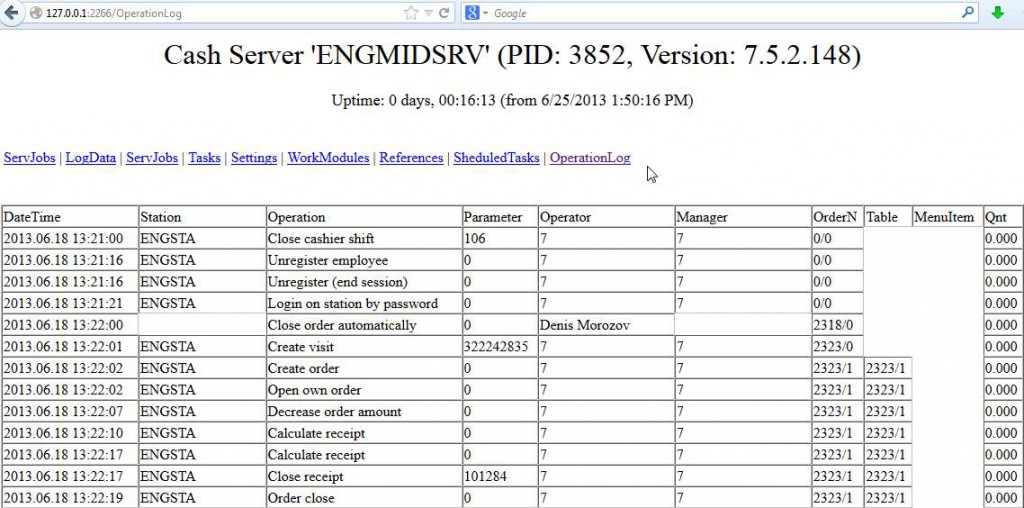
4.2.6.2. This section in cash server settings allows you to change port for WEB interface and/or bind that to only one IP address on local PC.
4.3. rkeeper.ini
4.3.1. File format
[Config] |
4.3.2. Parameters
4.3.2.1. PollEvents= - =1 enable time-based sync with upper level server, =0 use event-based (default) sync
4.3.2.2. PollRepeatTime= - set in seconds how often to get updates (sync), if PollEvents=1
4.3.2.3. [NewBaseGenerators] section ShiftPrintNumber= is first shift print number generator for newly created database.
4.3.2.4. CommonShiftNumber= is initial common shift number for new DB
4.0.1. Name of ini-file for midserver by default: RKEEPER.ini. If it is needed to run midserver with other ini-file, use midserv.exe /ininame: XXX.ini .
4.0.3. Midserver can be run as usual application or can be installed as a service. In first case run like this: midserv.exe /desktop .
4.0.4. After windows cash server is started as desktop, its icon will appear in Windows tray: If you make a double-click on it, you can view its properties on separate tabs (interfaces, work modules, tables, orders, operations, stations, version information).
4.0.5. In second case: midserv.exe /install - you are able to find cash server in the list of Windows services.
4.4. Creating cash station
Create at least one cash station for your server.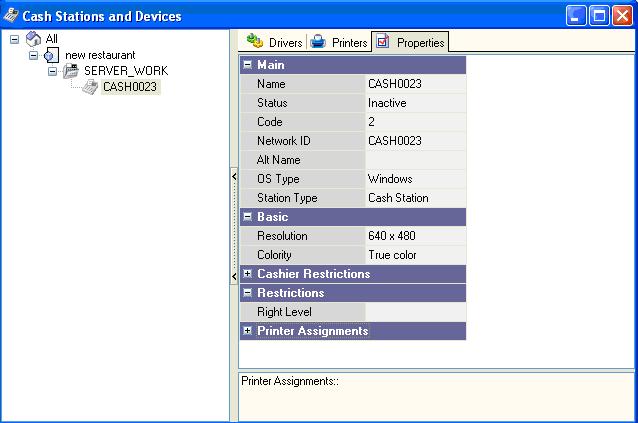
Fill necessary information:
* Name – station name.
* Network ID – station network ID, it will be used in wincash.ini file (or cash.ini).
* OS Type – DOS or Windows.
Driver list for DOS and Windows station is different.
ATTENTION: R-Keeper will not allow you to make station active until you add video driver for it.
* Resolution
* Colority.
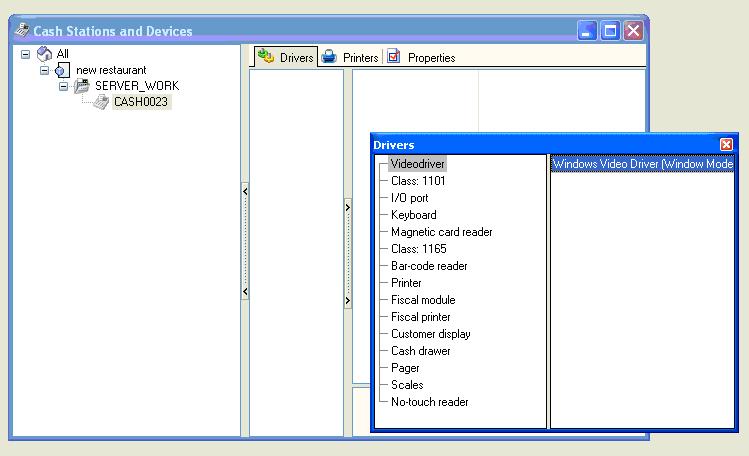
4.5. Adding drivers to cash station
Right-click in “Drivers” section and drag necessary devices and drivers. As it was said before, video driver should be added first.
4.6. Setting printers
Drag necessary I/O ports and attach printers and logical devices to them.
Example: setting printer for printing to file.
Add I/O driver “Print to file” and connect any printer with it, for example, TM200.
In properties of the port you can set filename for printing. By default this file will be saved in BIN/WIN, but you can write any path, for example, C:/Checks/MY_FILE.PRN .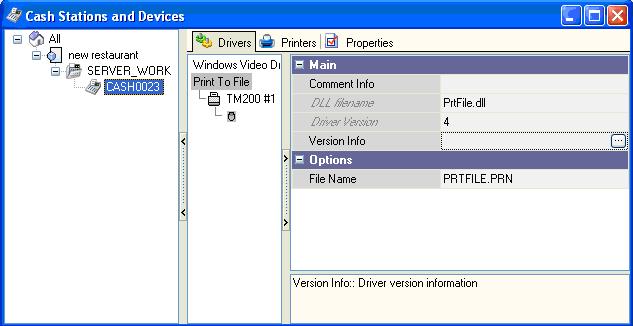
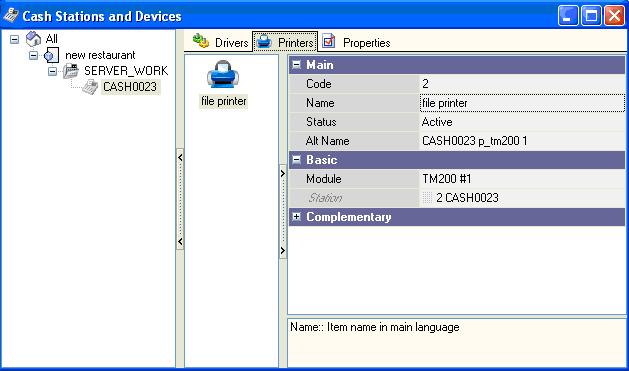
Printer will appear in “Printers” section. If you wish, you can change its name for convenience, for example, “file printer”. Don’t forget to set its status to ‘Active’.
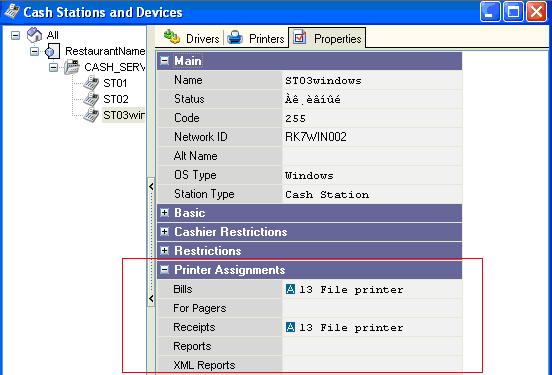
After that fill printer assignments in properties of the station
4.7. Windows cash station: wincash.ini
[Config]
STATION= TEST_ST02 // station network ID (the same as on manager station).
Server = TEST_MIDSERVER // midserver network ID. In our case it is SERVER_WORK.
4.8. DOS cash station: cash.ini
[Config]
STATION= TEST_ST01DOS //station network ID (the same as on manager station)
Server = TEST_MIDSERVER //midserver network ID. In our case it is SERVER_WORK
4.9. Additional parameter for cash station
On manager station:
Options --- Parameters --- Station parameters ---- Station worker modes --- Cash station.
Set this Boolean parameter to “True” – this means, it will be allowed to make payments on this cash station. If you need more complicating settings (for example, some stations can work with money and some are ordinary waiter stations, you should create exceptions of this parameter).
4.10. Running cash station
4.10.1. Windows
File doscash.exe stands for running cash station (don’t be confused by its name, file stands both for DOS and Windows).
This file takes wincash.ini as parameter and in common cases it is run like:
doscash.exe .\wincash.ini
There are 2 ways:
1) with automatic modules update
In this case additional application preload.exe is run – it downloads modules on cash station (that are set in property ‘Drivers’ of cash station plus necessary ones). It is not recommended to use such method, when there are problems with network (or slow channel) – better use manual update (see p.2) below.
* Use folder BIN/WIN from installation archive for Windows cash station.
* Set wincash.ini (see above)
* Run wincash.bat (it automatically runs preload.exe and doscash.exe with necessary parameter).
2) with manual modules update
In this case folder with all DLL files are placed manually on machine of cash station (they are not donloaded from server – cash station uses existing files)..
* Use folder BIN/win_no_preload from installation archive
* Set wincash.ini (see above)
* Run cash station as: doscash.exe .\wincash.ini
4.10.2. DOS
The same as for Windows cash station, there are similar settings for DOS cash station:
System runs 2 additional applications:
* preload.exe - it downloads modules on cash station (that are set in property ‘Drivers’ of cash station plus necessary ones).
* movemod.exe – moves files from PRELOAD folder to folder with doscash.exe.
Sequence of actions:
* Copy folder BIN/DOS from installation archive
* Set cash.ini (see above)
* Write into autoexec.bat:
| cd\nwlite call startip cd\rk7 preload movemod doscash |
4.11. Settings for station + DOS server
4.11.1. In this case midserver and cash station are run on the same machine (DOS) and their network names obligatory should be the same.
4.11.2. You should receive license for this midserver (requires LPT key, not USB).
4.11.3. On manager station you have to create midserver and DOS cash station for it with the same names.
4.11.4. RKEEPER.ini (taken as settings for doscs.exe).
4.11.4.1. By default KeepModules=0. Value 0 should be put to save time and memory. If you plan to connect other stations to this station+server and
a) they are updated with preload.exe
b) modules consistency check parameter is switched on (Options -> Parameters -> Installation -> Modules consistency check mode)
then switch KeepModules to 1.
4.11.4.2. In parameter PROTOCOLS (section [Netkern]) choose protocol for connection with refserver and also protocol localnet.dll.
4.11.4.3. File format
| [Config] Client = DOSCSM RefServer = ENGRK7SRV BasePath = .\MIDBASE TwoFilesMode = 1 KeepModules=1[NewBaseGenerators] InvoiceGen=0 CheckGen=100000 PrintNumberGen=0 [NETKERN] Protocols=TCPDOS.dll;localnet.dll [TCPDOS] PORT=3640 [TCPDNS] ENGRK7SRV=1.1.1.200:4407 |
4.11.4.4. Client = network name of midserver and DOS cash station (the same as in manager station).
4.11.4.5. RefServer = network name of reference server.
4.11.5. CASH.INI
4.11.5.1. File format
| [Config] STATION= DOSCSM Server = DOSCSM [NETKERN] Protocols=.\TCPDOS.dll;localnet.dll FILEMANAGERPATH=* [TCPDOS] LISTEN=0 |
4.11.6. AUTOEXEC.BAT
4.11.6.1. File format
prompt $p$g |
4.11.7. You may start only doscs.exe, but you won't get changes from references in this case.
5. Other settings on manager station
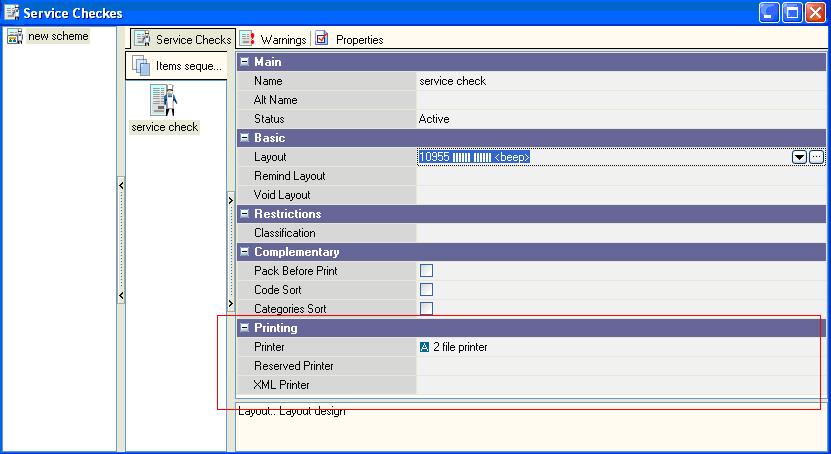
5.1. Service-printing
Options --- Printing --- Service-checks
Create new service-scheme here and add checks in this scheme. For every check set status, name, layout and printer in “Printing” section.
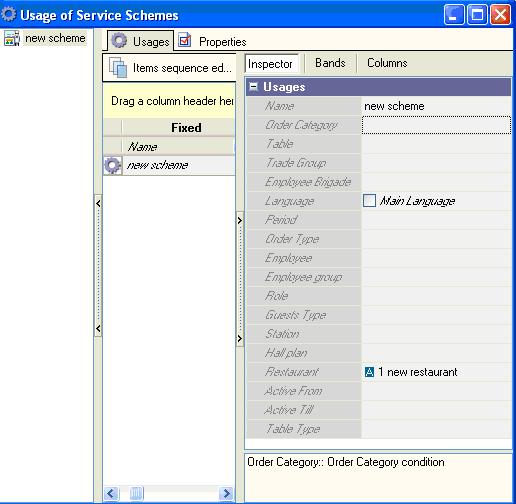
Drag this scheme in “Usage of service-schemes” and set usage conditions for it.
5.2. Obligatory settings: menu items, employees, tables, etc.
Options --- Tables and Plans --- Hall plans and tables
Create at least 1 hall plan and several tables and drag these tables to hall plan.
Note: If you use only ‘'quick check' mode, you won’t need hall plan at all.
Menu --- Menu
Add some menu items here.
Menu --- Menu categories
Set at least 1 categories for each of classifiers Category and Service printing.
Personnel --- Employees
Here you need at least one role with the right “First registration after booting”. (because after first running of cash station there should be at least 1 employee with ability to log in)
Options --- Parameters --- Station parameters --- Station working modes --- Start window
If you wish, you can set initial window for every station, worker, role in standard “Usage” form of this parameter. So that some employees will see main menu after logging in, some - order creation window, some - hall plan (form 'Choose order') - it depends on your settins.
5.3. Additional parameters to set (optional)
5.3.1. Logic date
Options --- Parameters --- Enterprise working settings --- Shifts --- Logic date
Set these 4 parameters, if you would like to open/close shift with some specific date, for example, close shift using next date (system date + 1 day). By default you open and close shift using current system date.
5.3.2. Usage
Switch off options that you don’t need:
* Use guest type (Options --- Parameters --- Options usage --- Visit property)
* Use guest count (Options --- Parameters --- Options usage --- Visit property)
* Use visit comments (Options --- Parameters --- Options usage --- Visit property)
* Use serving positions (Options --- Parameters --- Options usage)
* Use seats (Options --- Parameters --- Options usage)
* Use invoices (Options --- Parameters --- Options usage)
5.3.3. Auto Close Order
Options --- Parameters --- Station parameters --- Order editing
* Switch on, if you want order to be referred to closed orders automatically, after it is fully paid. In this case the table will become free.
* Switch off, if you want to close orders manually at cash station. In this case even after order is fully paid, it remains connected with particular table and the table does not become free.
5.3.4. Auto Create Order
Options --- Parameters --- Station parameters --- Station working modes
Switch on and after you full all necessary information about order (guest quantity, table, comments, etc), you don’t need to press button “Create new order”, new order will be created automatically.
5.3.5. Order type is obligatory
Options --- Parameters --- Station parameters --- Order editing
If you switch it on and no order type was not chosen on cash station, before making payment system will ask you to choose one from existing order types.
5.3.6. Add guests to the table
Options --- Parameters --- Options usage
Switch in, if you want to allow waiters add more guests to the table, than max number of guests (in property of particular table).
5.3.7. Timeouts
Options --- Parameters --- Station parameters --- Timing --- No-action timeouts
Set parameters for timeouts here.
5.3.8. Name formats
Options --- Parameters --- Station parameters --- Visualization --- Object buttons
Set name formats for tables, rater devices, dishes, etc. For example, if you want to show only name of object or name & code.
5.3.9. Shift duration
Options --- Parameters --- Enterprise working settings --- Shifts
Shift maximum duration (in minutes). After this time ends, message “Common shift was opened for too long. Please close common shift” will be shown and system won’t allow you to create new orders.
5.3.10. Time-Keeper
Options --- Parameters --- Enterprise working settings --- Working time account
Set parameters for Time-Keeper.
To disable Time-Keeper set parameter Clock: login form buttons to Don’t show.
6. Upgrade
6.1. Procedure
6.1.1. Stop all servers and close all stations (including manager stations) including windows services (because all servers must be installed as services).
6.1.2. We reccomend you to make a full copy of all RK7 folders (or at least copy databases from folders \base\ and \midbase\) before upgrade = manual additional backup (to be able to restore the whole system in case of serious failure).
6.1.3. Copy with overwriting all corresponding folders from new RK7 version distributive (base and bin) to you Reference server (only - other levels are upgraded automatically over the network) folders. If you made some changes to wincash.bat or other setting files do not overwrite them or overwrite them repeatedly after that with the files from backup made in 6.1.2 (but you have to compare setting files format with new version files and add necessary settings to your ones). Main idea is to replace all working modules with new versions but keep your settings.
6.1.4. Pay special attention to language and translation files to be recently filled with all the translation strings! Make an additional translation on compare with new distributive english or russian translation files if necessary. Follow manual.
6.1.5. Run reference server (we recommend you upgrade all servers as "desktop" in order to see errors if some), wait until it is upgraded (tray icon becomes green), then start report servers and wait until they are upgraded, then start cash servers and wait until they are upgraded. You must start higher level (according to their connection scheme to each other made by you) servers before lower level ones (you must wait not only for higher level server to update modules, but for its reference syncronization too).
6.1.6. If your cash stations run with "preload" and "movemod" (in DOS) or via original wincash.bat (in Windows), then they will be updated automatically. All necessary modules should be preloaded automatically. If your manager stations using original rk7man.bat, then they will be updated automatically.
6.1.7. If your cash servers with its stations are updated manually (no connection to reference server), then copy all corresponding files from preload created folder on reference server to preload folder on cash server (obsolete).
6.1.8. Run cash, print, manager stations as usually (wincash.bat, rk7man.bat - not exe).
6.2. Update optional modules
6.2.1. Copy all new optional modules that are used in your program configuration from \bin\[folder] to that folder, where these modules are installed (during all the related applications are stopped).
6.3. Notes
6.3.1. Do not upgrade the system during current common shift - close all common shifts before upgrade and check that data came to accumulative DB(s). Work base structure change may damage your current shift data if you violate this rule.
6.3.2. ATTENTION: “downgrade” (to obsolete version) is NOT Possible. Use only backup restore in critical situation.
6.3.3. You have to upgrade to newest available version as follows, if you you have got no specific arguments against this.
6.3.4. You should upgrade all RK7 servers in /desktop mode (first start after replacing files).