Video Display Unit (VDU) for RK7 fast food
1. General
1.1. VDU – Video Display Unit – Kitchen display software for fast food type restaurants.
1.2. Order data is shown on the screen immediately after changing from cash station - not waiting for cash server save order data.
1.3. Software is protected with license.
1.4. You may run VDU software both on regular PC or ARM controller (Windows CE). There is difference in version of the application you do need for each platform.
1.5. You may use special keyboard or standard one.
1.6. All necessary files download from ftp://ftpint.ucs.ru/dealers/r-keeper/VDU/ .
1.7. There is one EQ add-on for VDU, read in Electronic Queue solution addon for VDU
1.8. Since VDU version 3.8.4 made in 2015 and RK7.5.4.206 it has order status send back to RK7 optionally.
1.9. Since VDU version 3.9.8. released in 2016, you have virtual (software XML) printer interface in VDU for incoming orders from RK7.
2. Set VDU side
2.1. Software
2.1.1. By default, software distributive includes the following files: *.exe (ROSTVDU.EXE), vdu.ini, *.WAV (sound files).
2.1.2. You may do settings before starting .exe in .ini file or using GUI form after starting .exe.
2.1.3. Run application and press F0(h) to enter settings.

2.1.4. Enter password (numeric only) and press F1(f).
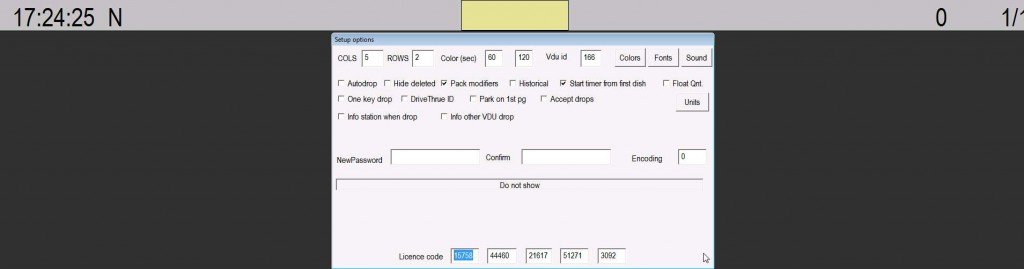
2.1.5. Edit settings and press save (f). In order to apply settings, you need to restart this application.
2.1.6. "VDU ID" parameter must be unique for each device group (that show the same orders from the same stations), by default you assign unique VDU ID to each VDU application (or device, if ARM used).
2.1.7. You may use VDU.INI to do settings before running .exe without need to set them up using GUI. Put .ini file near .exe file. File format:
| Password=1 VduId=166 Lic0=15758 Lic1=44460 Lic2=21617 Lic3=51271 Lic4=3092 RedAfter=120 YellowAfter=60 ColsCount=4 RowsCount=2 AutoDrop=OFF CodePage=0 packmodi=ON HideDelorders=OFF StartTimeBeforeClose=ON Historical=ON FloatQNt=OFF OneKeyDrop=ON Close1=1 Close2=4 Clr0=8421376 Clr5=7895160 Clr10=16777161 ExtUnits=ON units=4 6 7 8 9 showunits=1 2 4 6 7 8 9 uclr1=16777215 uclr4=16777215 uclr6=16777215 uclr7=16777215 uclr8=16777215 uclr9=16777215 |
2.1.8. VDU can be set to accept data by UDP interface or TCP interface or both (both must not accept data from the same station - only from different clients).
2.1.8.1. TCP interface will be opened by VDU application and listen to TCP port (default is 5434) for incoming XML documents from RK7 cashier station(s). Special service print document layout for RK7 is distributed with VDU.
2.1.8.2. UDP mode is the default one, VDU will get UDP batches from RK7 cashier station and TMS server in this mode.
2.1.8.3. For these modes, you set in vdu.ini the following parameters
| VDUUDPPort=11900 VDUPrinterPort=5434 |
2.2. Hardware
2.2.1. ARM controllers with Windows CE could be used for VDU software to work on.
2.2.2. You may read settings (ini file) from device and save them to ARM controller using FSERVER.EXE utility.
2.2.2.1. Your controller version must be newer than 2.2.
2.2.2.2. Start FSERVER.EXE.
2.2.2.3. Open CMD shell and type (execute each command with "enter" as usually):
telnet IP_address 1234 LOCK G | open connection to host it will allow to modify memory on VDU device it will save file VDUSAVE.BINI to disk |
2.2.2.4. VDUSAVE.BINI is the binary encoded ini file, you should convert it to text using bini2ini.exe.
2.2.2.5. After running bini2ini.exe application, it will create file vdusave.ini.
2.2.2.6. Modify file vdusave.ini (use notepad) and save it as VDU.INI.
2.2.2.7. Convert back to binary using ini2bini.exe, it should create file vdu.bini.
2.2.2.8. To transfer new settings to VDU, go back to TELNET (command line) and type:
C X | it will copy settings to VDU device it will restart VDU device |
2.2.3. You may save image directly to ARM controller memory and boot that without BootImpLoader.bat server side.
2.2.3.1. Attention! You may break controller loader if do something wrong.
2.2.3.2. Application stored as image in file NK.BIN, should be located next to fserver.exe (use the one which fits your monitor resolution).
2.2.3.3. Use svc.exe to check VDU IP address and ID. SVC.EXE will work only if ROSTVDU.EXE is loaded on terminal.
2.2.3.4. To upload image:
Place image NK.BIN
Start fserver.exe
Start telnet from CMD like
telnet IP_Address 1234
type LOCK
L
X
To save image - need to know pass.
Input password, then press 'S'.
2.2.4. Keyboard
2.2.4.1. You may use special or standard keyboard.
2.2.4.2. Special keyboards give the same key scancodes as standard, but reduced in quantity to the following: "1234567890 abcdefghij".
2.2.4.3. Default VDU keys:
'a' - delete the last,
'j' - return the last cancelled,
'f' - enter.
2.3. Callback
2.3.1. This optional function can send order status to RK7.
2.3.2. For this function you must have compatible RK7 version and configure it with access to cash server XML interface HTTP protocol as in 3.3.
2.3.3. You can use any VDU assembly made after 2015-10-30 (VDU, VDU+EQ etc.)
2.3.4. Set additionally the following parameters in vdu.ini file:
RK7CashServerAddr=172.22.3.200 // IP address
RK7CashServerPort=2277 // TCP port of HTTP-XML interface, as in 3.3.1.
RK7CashServerUser=666 // your RK7 user code
RK7CashServerPass=123 // your RK7 user password
PrinterDestination=1 // Printing purpose ID as shown below in 3.3.3
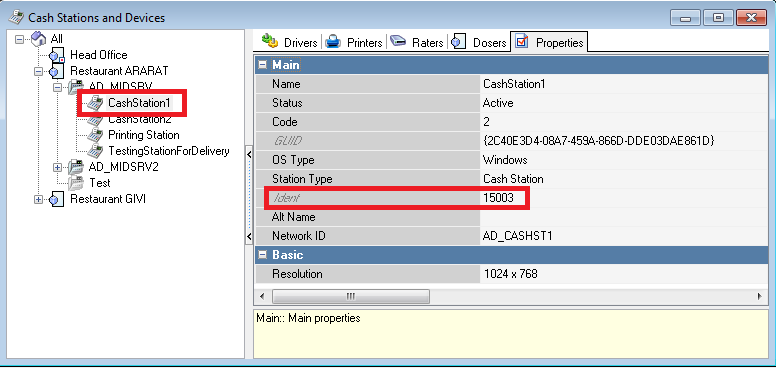
PrinterStation=15003 // ID of cashier station which is being used as printer host, as in 3.3.4.
2.3.4.2. To print order after it was collected mark in settings GUI “Print on collected” or add into vdu.ini file
PrintOnCollected=ON
2.3.5. Start rostvdu.exe, go to settings, mark needed checkboxes in VDU settings, also you can change colors as you can see at the picture below
2.3.5.1. Since VDU version 3.8.4 supports other order statuses, it is necessary to set them up using graphical user interface.
2.3.5.1.1. For usual VDU use states 0,4
2.3.5.1.2. For VDU+EQ use states 0,4,5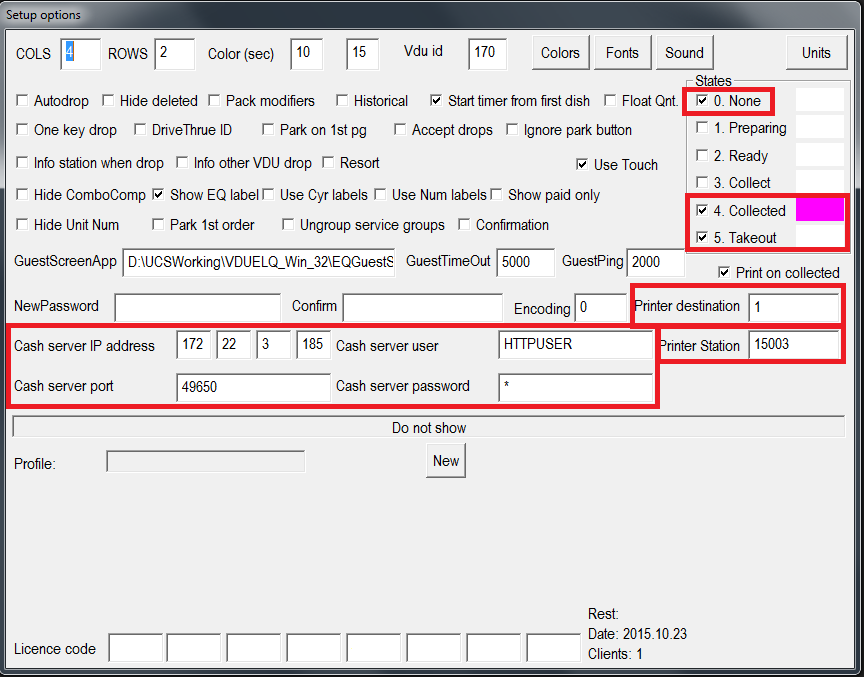
2.3.5.1. Also you can set these parameters in vdu.ini file:
State0_None=ON
State1_Preparing=OFF
State2_Ready=OFF
State3_Collect=OFF
State4_Collected=ON
State4_Color=16712191 (ex. How to set color)
State5_Takeout=ON
3. Set RK7 side
3.1. Add interface
3.1.1. Put «VDU Fast Food interface (UDP)» driver to cash station(s). This interface you add in case regular UDP VDU mode chosen.
3.1.1.1. Set driver properties:
- LocalPort(4567) – local UDP port in cash station OS. If busy, will try next (+1) ports. VDU application uses port 11900.
- VDUID – display group identifier (you have to set several different to separate screens; for example, if one local network has got several restaurants using VDU), must be the same as you set in corresponding VDU application (see 2.1.6.).
- Log File() – log file name. Empty mean disable.
- VDU Version - protocol version (VDU defined), modern applications use "2".
3.1.2. Put TCP port and text printer drivers to cashier station configuration. You do his only in case TCP (virtual XML printer) VDU mode chosen.
3.1.2.1. Add unique driver instance for each VDU .
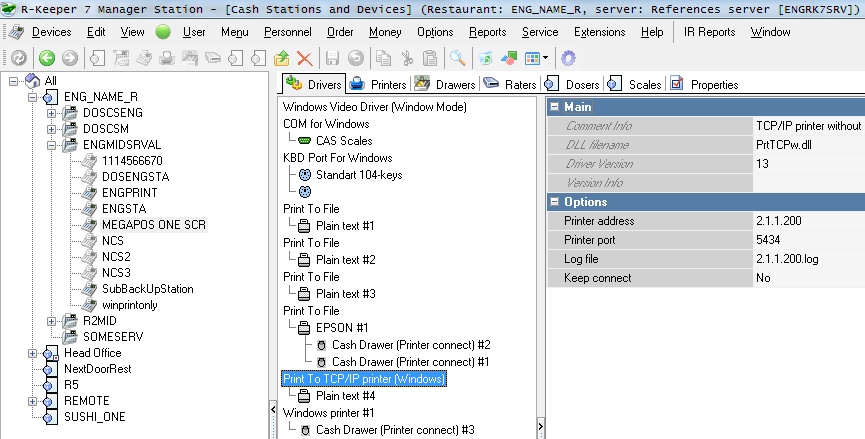
3.1.2.2. Add logical printer(s) as usually.
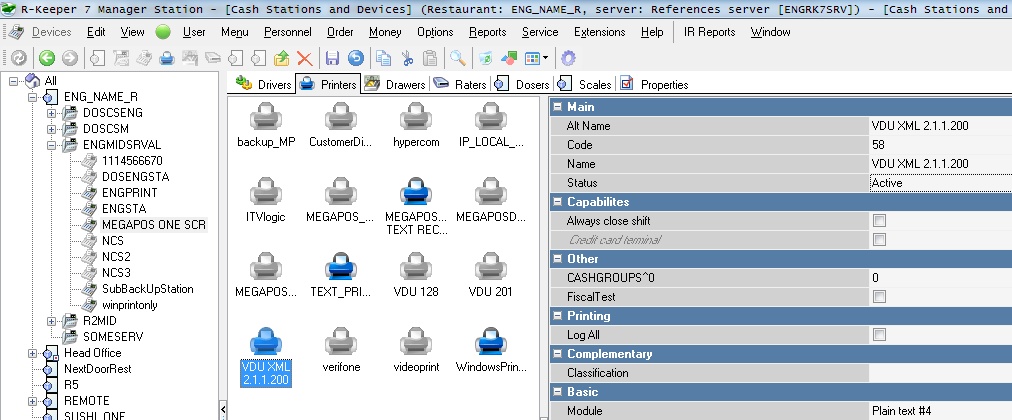
3.1.2.3. Import special XML service print document layout from distributive of VDU.
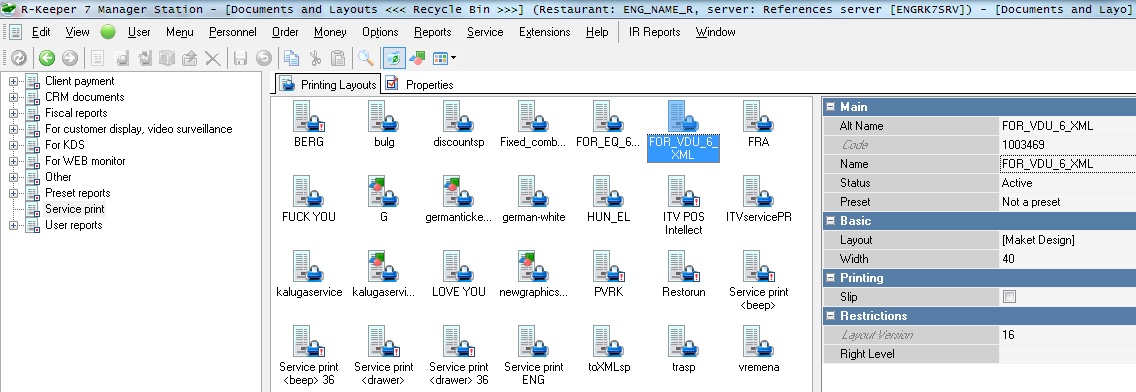
3.1.2.3. Assign as many views in service scheme as necessary.
3.2. Set common parameters
3.2.1. Choose classification in «KDS and VDU» group. This is valid for UDP interface only.
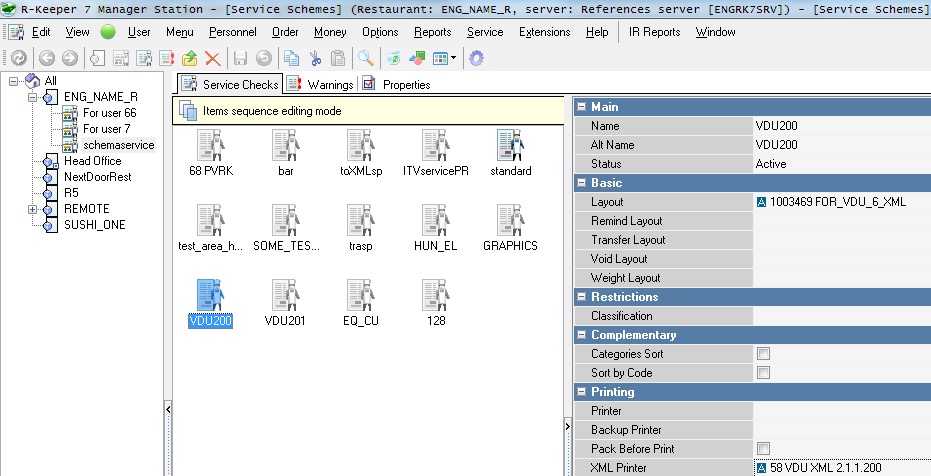
3.2.2. Choose classification and categories in service scheme on each document view object for TCP mode.
3.3. Callback
3.3.1. In cashier server(s) properties you heed to set "HTTP server" section parameters, minimum is to specify TCP port
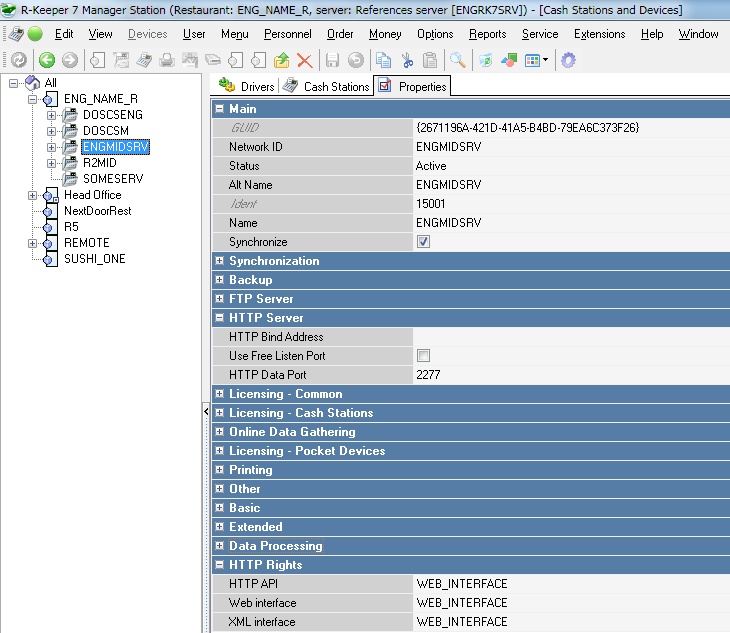
3.3.2. You must assign "HTTP rights" as well (previously set in corresponding RK7 reference)
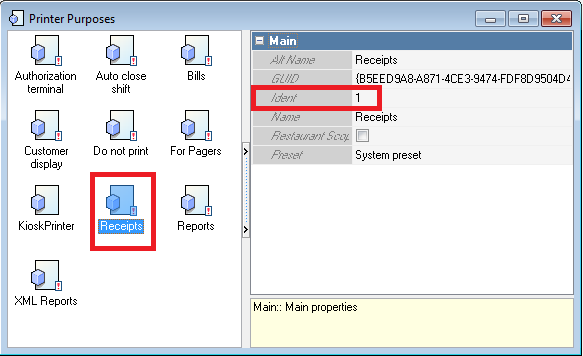
3.3.3. Check printing puprose Ident set in vdu.ini
3.3.4. Chech cashier station Ident sent in vdu.ini (printer host)
4. Licensing
4.1. License is given for specific restaurant code (full 9 digit) - you have to specify that in request.
4.2. You should make license request the same way as for any other UCS software - sending order by e-mail.
5. Use
5.1. Header
5.1.1. Time
5.1.1.1. Time is taken from current board clock.
5.1.1.2. Time format is "Hour:Minute:Second".
5.1.1.3. Time is shown in left top screen corner.
5.1.2. Status
5.1.2.1. VDU status code is shown next to clock (left top screen corner).
5.1.2.2. When VDU is started and items are not shown on the screen, there is possibility to determinate what is the reason for that:
N - no packages received from terminals;
I - package received, but with diffrenet VDU ID;
L - package received, with correct VDU ID, but VDU has wrong license;
U - package received, with correct VDU ID, with correct VDU license, but packages are from UNIT which is disabled on this VDU.
We recommend to check error code when only 1 terminal is sending data.