Detailed KDS Server and Client Settings
Important!
KDS has not been updated since June 1, 2020. Please use KDS PRO.
The software has not been suported since December 31, 2020.
Introduction
Before reading this article, please, get acquainted with the main one about installing and configuring the KDS system.
The KDS system can fully replace or be used alongside the print service. It is more convenient as the cook and waiters working on an order, as well as the prepared and delivered orders or separate dishes can be viewed in different modes.
Several cook's display forms — for orders being prepared — and several waiters display forms — for orders delivered — can be used.
The user can adjust the display form using the Fast Report technology. The inbuilt report designer can be launched from the required active KDS client display by pressing the D key on the keyboard.
All the orders made at the cash station are displayed on the cook's display after they are saved. A cook can supervise the preparation of the orders and dishes on their display, and delete them once they have been prepared. A water can view and analyze the order readiness on their display, f.ex., how many dishes from an order are ready, and manage the ready orders and dishes — remove them from the display once they are handed to the client. Instead of deleting the dish or the order it is possible to leave them displayed but against the different background.
To analyze the efficiency of the kitchen's work, it is possible to use the nominal, i.e. theoretical preparation time specified in the dish card. In this case, as soon as the order/dish is ready, the system will record the actual dish preparation time; and once the order is delivered the system will record the time period between its preparation and delivery. The difference between these two indicators will show how efficient the kitchen and waiters are in the Kitchen Operation report.
The software can operate in the Simultaneous Serving mode, i.e. when all the dishes from an order should be prepared simultaneously, and the standard Serve as Ready mode.
KDS System Features
- Since version 1.3, it is possible for several KDS servers to work with one database, with each KDS server working with its own r_keeper cash server
- Earlier versions allowed only one KDS database, one KDS server, and one r_keeper cash server
- RK6 and RK7 Support
- It is possible to install KDS client's win32 version or the WinCE version at the ARM controllers.
Client Settings
General Settings
The KDS client general settings are activated in the General Settings section and are backed up in the kdsclient.ini. configuration file.
The values of some general parameters can only be set in the kdsclient.ini configuration file:
- UseNewKBD = 0 — the used keyboard type: 0 — do not use, 1 — for a new 3-row USC/COM keyboard, 2 — a new 3-row USB-keyboard for Win32 clients
- StayOnTop=OFF — display the client overhead other windows (ON), or do not display (OFF)
- Left — the horizontal initial coordinate for the lower left-hand corner of the client's active window, in pixels
- Top — the vertical initial coordinate for the lower left-hand corner of the client's active window, in pixels
- Height — the height of the client's active window, in pixels
- Width — the width of the client's active window, in pixels
- LogLevel — the log level (0-9)
- LogSizeMB — the maximum size of the log file, in MB
You can configure simultaneous view of several KDS clients on the same display using the Left, Top, Height and Width parameters.
Display Settings
During the first client launch the display settings are taken from the kdsclient.ini file. They are then entered into the database — if the StationName parameter is not empty and there is no StationName with such a name in the database yet — and the file is no longer used for reference.
To save the file settings in the database, create a new, i.e. previously non-existing StationName parameter.
If the StationName is empty, the display parameters are taken only from the kdsclient.ini file. Such a configuration is used for ARM hardware controller (T700) which identifies the StationName based on the device's MAC address.
In order to access display settings, launch the KDS client and press the F2 key on any of the displays: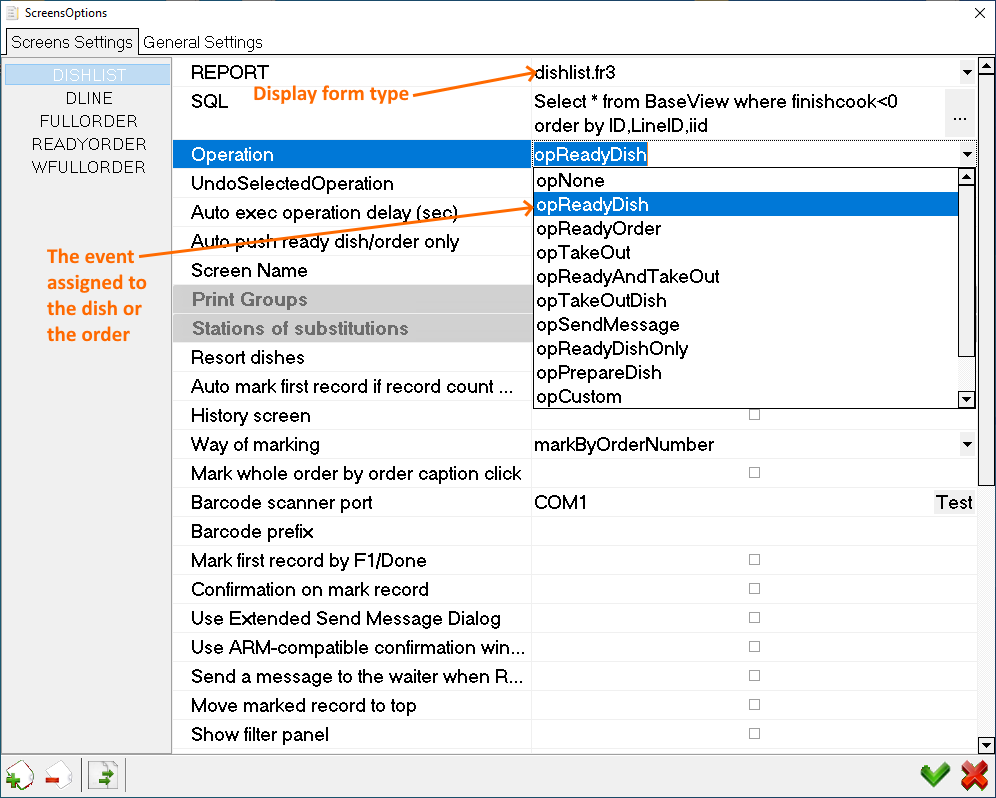
Screens Settings Section
Each KDS client stores their settings in the database. If there are several KDS clients, you can copy the previously made settings from one client to another, using the button in the lower left-hand corner. A window with a choice of stations from which you can copy the settings will open at the time of copying: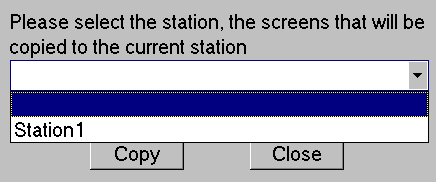
The settings editing window consists of two tabs: Screens Settings and General Settings.
Creating New Display Form
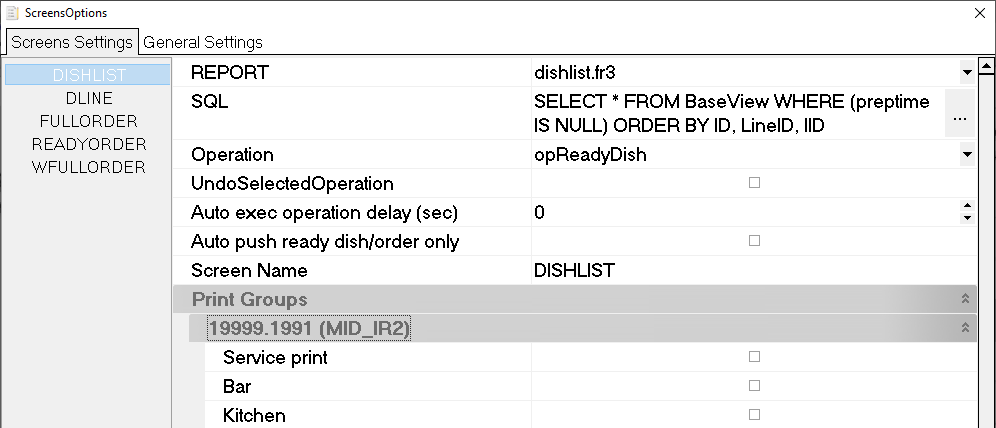
On the first Screens Settings tab, it is necessary to create all the display forms or keep the default ones, and apply the settings.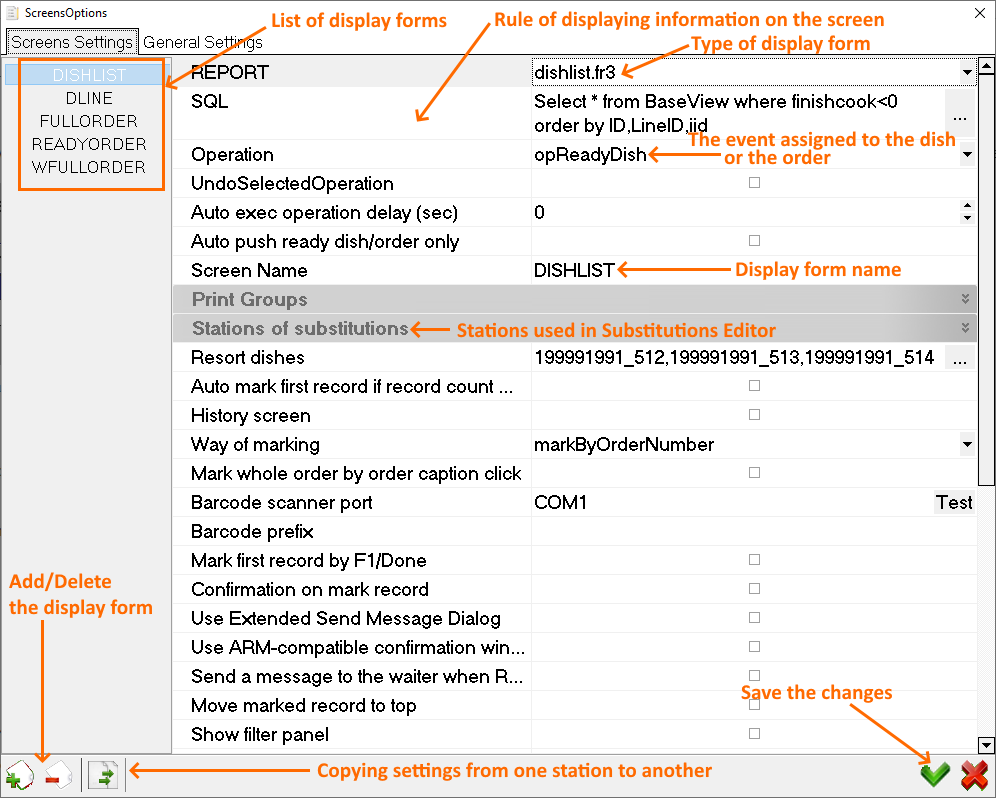
To generate a new display form press the + key in the lower left-hand corner and specify the main parameters for it:
- Report settings field
- SQL settings field
- Operation settings field
- Prints Group settings field
Specify other parameters if necessary.
REPORT Field
The REPORT field is used to set an active display form. You can use the default forms or create your own ones.
Use the REPORT field to choose a form to display the dishes or the order on the KDS display:
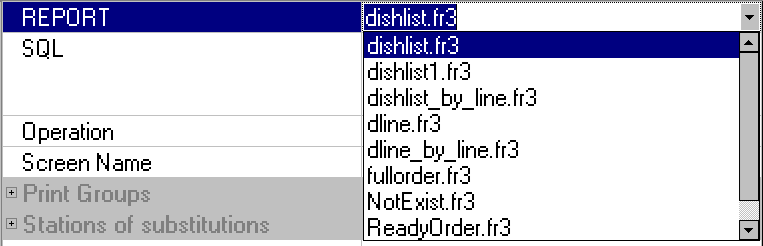
A list of preset forms
- Form dishlist.fr3
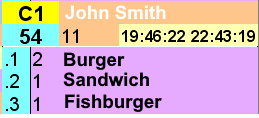
The order is displayed in the form of a dynamic window each of which contains one order item — one per dish. It supports the simultaneous delivery mode. I.e. some of the dishes are displayed as inactive and with a timer for each dish as regard to the overall preparation time.
- Form dishlist_by_line.fr3
The order is displayed in the form of a dynamic window each of which contains one order item — one per dish. The simultaneous delivery mode cannot be applied in this case. I.e. the dishes from are displayed with a timer set for each dish individually.
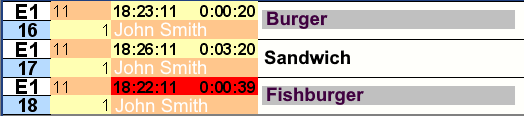
- Form dline.fr3
The order is displayed in the form of lines spanning across the display with each KDS line containing one line from the order. It supports the simultaneous delivery mode. I.e. some of the dishes in the order are displayed as inactive and with a timer for each dish as regard to the overall preparation time.

- Form dline_by_line.fr3
The order is displayed in the form of lines spanning across the display with each KDS line containing one line from the order. The simultaneous delivery mode cannot be applied in this case. I.e. the dishes from the order are displayed with a timer set for each dish individually.
- Form fullorder.fr3
The order is displayed in the form of a dynamic window which fully shows the order session with a timer set for a dish requiring the longest preparation time.
- Form NotExist.fr3
An auxiliary form. If the layout used in the display form gets deleted — a file is deleted by mistake from the installation package — the NO EXIST message will be displayed when viewing this display form.
- Form ReadyOrder.fr3
The Take Away waiter mode — the order is displayed in the form of a dynamic window showing the entire order session.
- Form wfullorder.fr3
The Being Prepared waiter mode — the order is displayed in the form of a dynamic window showing the entire order session.
SQL Field
Important!
The operations algorithm of the KDS client app is set in the SQL settings field. You can choose one of the preset scripts or create your own algorithm.
In the SQL field, you need to choose the option for the information display rules.
- You can set the rules to display only the necessary information using the SQL request.
For example, to display only the ready dishes, dishes to be delivered, orders being prepared, etc. As the selection of a dish or an order changes their status, the KDS display will only show those meeting the request's conditions that will be highlighted in a color corresponding to their current status. Items not meeting the request's requirements will not be displayed. For this reason, when selecting the dish or order, they will either be removed from the display, or change their highlight color.
- Several standard options are offered but the user can generate their own request.
After the dish data is transferred from the cash station to KDS, the dish and the order get the Unprocessed status. It is possible to change the status when selecting the dish or order:
Status - Unprocessed --->

Status - Prepare ---> Status - Prepared

Status - Prepare ---> Status - Ready

Status - Deliver/Pick Up ---> Status - Taken outStandard Scripts Table
| Item No | Script Name | Script | Description |
|---|---|---|---|
1 | Not prepared | SELECT * FROM BaseView WHERE (preptime IS NULL) ORDER BY ID, LineID, IID |
Not recommended for use in a standard configuration. |
2 | Not ready dishes | SELECT * FROM BaseView WHERE (finishcook < 0) ORDER BY ID, LineID, IID |
|
3 | Not ready orders | SELECT * FROM BaseView WHERE (ready < 0) ORDER BY ID, LineID, IID |
|
4 | Not taken out dishes | SELECT * FROM BaseView WHERE (ltakeout IS NULL) ORDER BY ID, LineID, IID |
|
5 | Not taked out orders | SELECT * FROM BaseView WHERE (takeout < 0) ORDER BY ID, LineID, IID |
|
6 | Prepared and not ready dishes | SELECT * FROM BaseView WHERE (preptime IS NOT NULL) AND (finishcook < 0) ORDER BY ID, LineID, IID |
|
7 | Prepared and not ready orders | SELECT * FROM BaseView WHERE (preptime IS NOT NULL) AND (ready < 0) ORDER BY ID, LineID, IID |
|
8 | Prepared and not taked out dishes | SELECT * FROM BaseView WHERE (preptime IS NOT NULL) AND (ltakeout IS NULL) ORDER BY ID, LineID, IID |
|
9 | Prepared and not taked out orders | SELECT * FROM BaseView WHERE (preptime IS NOT NULL) AND (takeout < 0) ORDER BY ID, LineID, IID |
|
10 | Ready dishes and not taked out dishes | SELECT * FROM BaseView WHERE (finishcook > 0) AND (ltakeout IS NULL) ORDER BY ID, LineID, IID |
|
11 | Ready dishes and not taked out orders | SELECT * FROM BaseView WHERE (finishcook > 0) AND (takeout < 0) ORDER BY ID, LineID, IID |
|
12 | Ready orders and not taked out dishes | SELECT * FROM BaseView WHERE (ready > 0) AND (ltakeout IS NULL) ORDER BY ID, LineID, IID |
|
13 | Ready orders and not taked out orders | SELECT * FROM BaseView WHERE (ready > 0) AND (takeout < 0) ORDER BY ID, LineID, IID |
|
14 | Prepared dishes | SELECT * FROM BaseView WHERE (preptime IS NOT NULL) ORDER BY ID, LineID, IID |
|
15 | Ready dishes | SELECT * FROM BaseView WHERE (finishcook > 0) ORDER BY ID, LineID, IID |
|
16 | Ready orders | SELECT * FROM BaseView WHERE (ready > 0) ORDER BY ID, LineID, IID |
|
17 | Taked out dishes | SELECT * FROM BaseView WHERE (ltakeout IS NOT NULL) ORDER BY ID, LineID, IID |
|
18 | Taked out orders | SELECT * FROM BaseView WHERE (takeout > 0) ORDER BY ID, LineID, IID |
|
19 | All | SELECT * FROM BaseView ORDER BY ID, LineID, IID |
|
Operation Field
In the Operation field, you need to specify the event that will happen when selecting the dish or the order.
- Dish and order management means changing their status during the work process.
The system uses four statuses. Once the dish is transferred from the cash station to KDS, the dish and the order are given the Not Processed status.
When selecting a dish, you can change the status to the following:
- Prepare
- Ready
- TakeOut
The status can only be changed in the following order:
Not Processed ---> Prepared ---> Ready ---> Taken Out
Therefore, it is impossible, for example, to change the status of a dish from Not Processed directly to Taken Out.
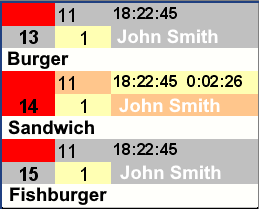
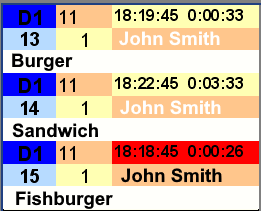
By defaultm the following colors are used for highlighting each status:
- Transferred from the cash station — white
- Prepared — yellow
- Ready — purple
- Taken Out — blue

Operations Table
Item No. | Transaction Name | Description |
0 | opNone |
|
1 | opReadyDish |
|
2 | opReadyOrder |
|
3 | opTakeOut |
|
4 | opReadyAndTakeOut |
|
5 | opTakeOutDish |
|
6 | opSendMessage |
|
7 | opReadyDishOnly |
|
8 | opPrepareDish |
|
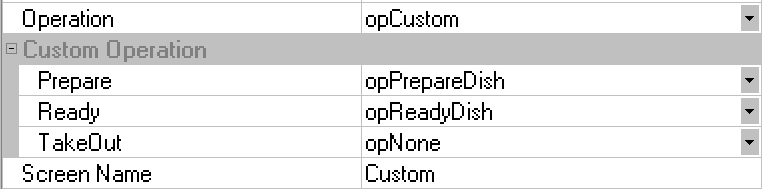
9 | opCustom |
|
The additional fields used for the opCustom operation are shown in the figure below:
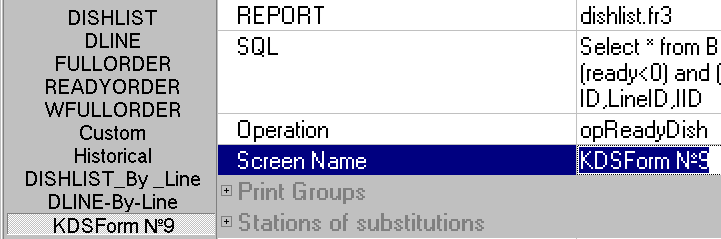
Screen Name Field
In the Screen Name field, you should specify the name of the display form to be shown on the KDS display.
- The name and ordinal number of the newly created form are inserted by default.
Print Groups Field
In the Print Groups field, you need to select the service print groups to be shown in this display form. Dishes from other service print groups will not be shown in this display form.
- If none of the groups are selected, ALL groups will be shown.
Other Settings of Screen Settings Section
View and configure other parameters in the Screen Settings section if required.
Table 1 — Other Screen Settings Parameters
| Item No | Parameter | Description |
|---|---|---|
1 | Auto mark first record if record count more then one screen |
|
2 | History screen |
|
3 | Way of marking |
|
An example of window numbering options:
- markByGenValues — by a unique value within the display. If #1 is reset it can be assigned to the next order)
- markByOrderNumber — by an order number from r_keeper 7
- markByPacketNumber — by a package number from r_keeper 7
Since KDS version 1.3.0.4, a new Mark Whole Order by Order Caption Click option is available, which can only be used with the activated "Way of Marking: markByGenValues" or "MarkByOrderNumber". Allows you to perform a configured dish by dish operation for the entire order by tapping the order header
Table 2 — Other Screen Settings Parameters
| Item No | Parameter | Description |
|---|---|---|
4 | Barcode Scanner port |
|
5 | Barcode prefix |
|
6 | Mark first record by F1/Done |
|
7 | Confirmation on mark record |
The message will be sent independentl of the display form, service principle, operation and location in the order area. I.e. if you selected the Msg for Waiter item, the dispatched message will contain the text from r_keeper settings, for example, Ready Table #XX, or Cook call waiter. |
The dialog box: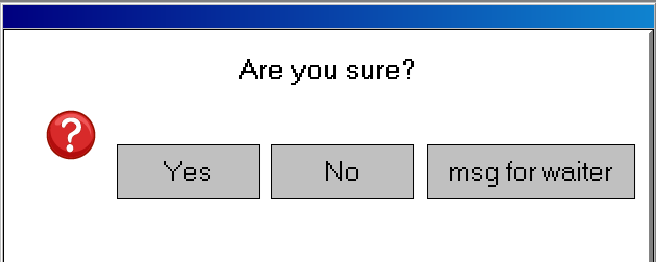
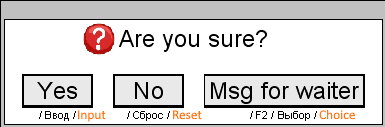
- If this setting is on when using ARM, the next setting — Use ARM-compatible confirmation window — should also be activated

- There is a note under each button for what to press on the cook's keyboard, as ARM does not support sensory input TS
- Only a picture which is not a fully-fledged client is displayed.
Table 3 — Other Screen Settings Parameters
| Item No | Parameter | Description |
|---|---|---|
8 | Use ARM-compatible confirmation window |
|
9 | Send a message to the waiter when Ready dish (RK6 only) |
|
10 | Move marked record to top |
|
11 | Show some last operation |
|
An example of using the Show Some Last Operation parameter:
An example of the log parameters:
- When such settings are used, five log lines will be displayed. The next operation will be shown as the last in the list while the first line will be deleted from the list.
Table 4 — Other Screen Settings Parameters
| Item No | Parameter | Description |
|---|---|---|
12 | Group By: Print Group(True)/Order Number(False) |
|
13 | Sound file or beep theme |
|
14 | Duration of sound |
|
15 | Use letter enumerate |
|
16 | Static letter number |
|
17 | Zoom |
|
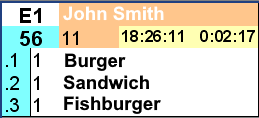
18 | Join By Order |
Examples of how an order is displayed using the Join By Order parameter:
|
19 | Group Combo Dish | This parameter allows to show combo dishes on the display. If the Show Combo Dish As Line parameter is enabled, the dishes will be shown as a line. If the parameter is disabled, the dishes will be shown vertically. For the combo dishes to be displayed in the proper format, in the manager station, go to Options > Parameters > Installation > Link with other systems > KDS and VDU, and select Components Only in the Value property. If this setting is skipped, not all data on combo dishes will be transmitted through the xml interface leading to misdisplayed information on KDS displays. |
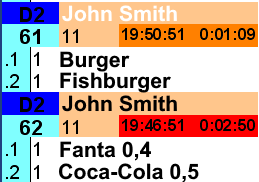
Table 5 — Other Screen Settings Parameters
| Item No | Parameter | Description |
|---|---|---|
20 | Join By Order + OneKDSCheck (RK6) |
When such an order is created, it is given the first service print group — the print group with a minimal cipher — from r_keeper 6 Editor. You can see the cipher in streams.db. It is necessary to tick this service print group at the KDS server, otherwise this service print group will be reset and the order will fail to reach the KDS server. |
- When configuring the KDS display in the window called by the F2 key, only the actual service print groups that use the dishes should be ticked. It is not obligatory to tick the Print group. But if the Print group is used by the dishes for this display, you should tick it as well.

When using the Join By Order and OneKdsCheck=ON setting, the order on the display will be the same as entered at the cash station — with the same dish sequence — and when the OneKdsCheck=OFF setting is used.
It is also necessary to make the following setting in the FSVDU.ini file:PackLines=OFFCODEIn this case the dishes will not be packed.
- When working with Ipod devices, it is necessary to specify KDSSolid=1 in tms2.ini, section [TMS] — since TMS version5.39, to disable dish grouping by print service groups. This setting only operates jointly with the OneKdsCheck=ON r_keeper server setting. If the OneKdsCheck=OFF setting is used, the Ipod will send the orders classified by service print groups and to different windows.
General Settings Section
It is necessary to configure the main settings on the General Settings tab.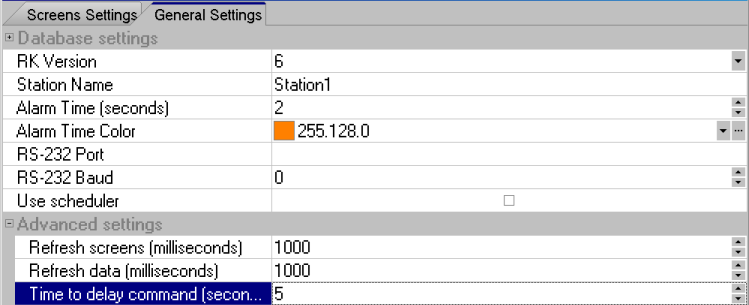
DataBase Settings Field
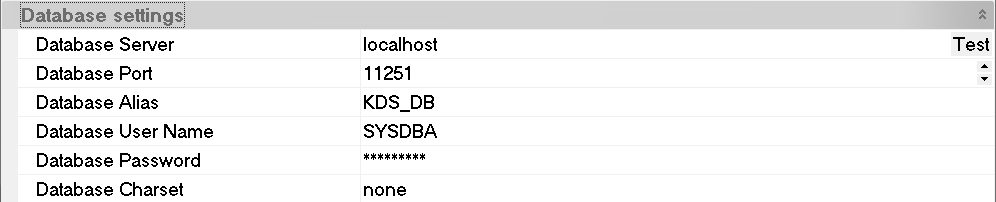
Table 1 — General Settings Parameters
| Item No | Parameter | Description |
|---|---|---|
1 | RK Version |
|
2 | Station Name |
|
3 | Alarm Time (minutes) |
|
4 | Alarm Time Color |
|
Example:
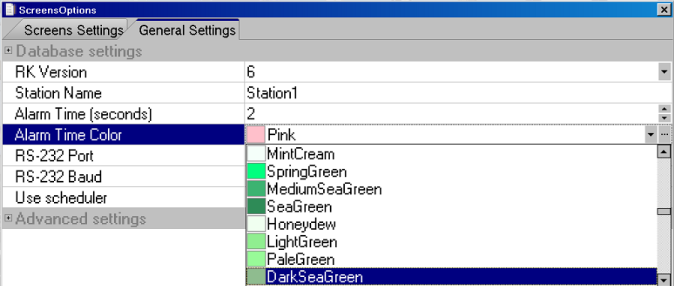
Table 2 — General Settings Parameters
| Item No | Parameter | Description |
|---|---|---|
5 | RS-232 Port |
|
6 | RS-232 Baud |
|
7 | Use Scheduler |
|
Example:

Table 3 — General Settings Parameters
8 | Refresh Screens (milliseconds) |
|
9 | Refresh data (milliseconds) |
|
10 | Time to delay command (seconds) |
|
11 | Localization |
|
Additional KDS Client Settings
Changing Field Colors in Display Form
Here an is an example of how to change from blue to another color.
Open the display form in the report designer by pressing the D key, find and change the following part of the algorithm in the form code after ScreenNumberOnBeforePrint(Sender: TfrxComponent):
begin
    if screenNumber.Color=clBlue then begin
    ScreenNumber.Color:=$0000DDDD;
end;where $0000DDDD is for the RGB color, you can specify a color other than blue.
Additional KDS Server Settings
- Specifying the service print groups in the KDS server settings does not affect how they are displayed at the KDS stations and how orders are formed in KDS. They are required only for selecting the already formed orders in KDS for the server. I.e. if some of the orders are not required at the server they can be reset this way, thus reducing the load on the server
- If the Preparation Control function is not activated in the r_keeper 6 Editor for the service print flow, the service print groups will still be visible in the KDS display settings (ScreenOptions) and at the KDS server (Options), but in this case no orders will be sent to KDS from the cash station.
FSVDU.INI Parameters
The following FSVDU.INI parameters have been added to the KDS server settings for r_keeper 7, since KDS version 1.3.1.2:
UseOrderNameAsTable – It should be switched on if new persons are welcome to join a party at a table. In this case the table's full number is transmitted as OrderName

AutoChangeMainWaiter – Updating the orders when changing the main waiter.The following FSVDU.INI parameters have been added to KDS sever settings since version 1.3.2:
DelayTimeSec – The possibility of delaying sending a message on the readiness of a dish (in seconds)

DelayedPrintGroups - Listing print groups separated by a coma, similar to the PrintGroups client settings.