Installation of Report Visualizer
It is recommended to use the installer from FTP: ftp://ftp.ucs.ru/rk7/other/webreports/
It is required to have an installed .Net Framework 4.0. on the computer where the visualizer will be installed.
Also, perform the following actions for the web interface to function:
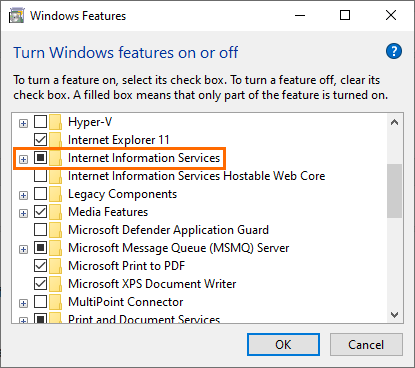
Install Internet Information Services:

If you are going to install the Report visualizer on the same computer as WebInterface, skip this step
To do that, open Windows Features:
- For Windows 10: press Win+R and enter OptionalFeatures in the window and click OK
- For earlier Windows versions: Start > Control Panel > Programs > Turn Windows features on or off.
Select Internet Information Services
Enable ASP.NET support: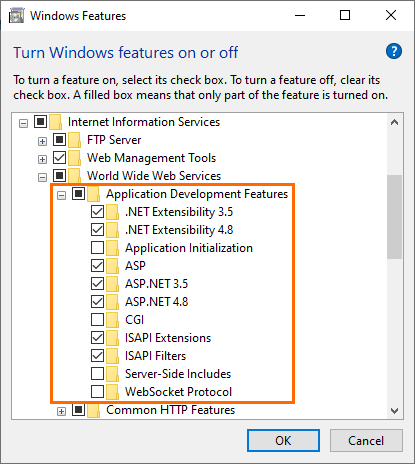
Now, you need to register IIS for ASP.NET. You can do it using aspnet_regiis.exe registration program. It is located in the NET Framework 4.0 folder, the usual path is: C:\Windows\Microsoft.NET\Framework64\v4.0.30319. See more details on the program on the official site.
Run aspnet_regiis.exe via the Command Prompt with the -i parameter.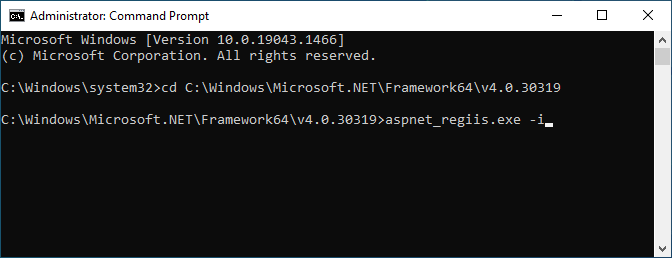
If you are going to install the Report visualizer on the same computer as WebInterface, skip the next steps.
Do not skip them if you use the Deploy (installer).
- Install Web Deployment tool. Find its distribution kit in the deploy folder of the archive. Select the version in accordance with your OS bitness.
If there is no required distribution kit in the archive, download it from the official site. - If you deploy a build, copy the r_frame archive contents to the pre-created folder for the app. The folder is usually created in the IIS directory: C:\inetpub\wwwwroot\. If you use the Deploy (installer), run the <BUILD NAME>.deploy.cmd file in the console with the specified parameter "/y"
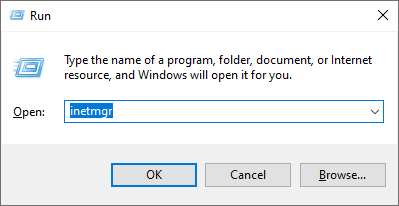
- Launch the IIS manager via the Rundialog: press Win+R, enter inetmgr and click OK
- In the IIS manager, .NET Framework 4.0 should be used in the application pool
- Create a new application.
Right-click the required website or create a new website, if needed, and select Add Application. In the window that appears, specify the relevant alias, the application pool and physical path
- Start the site with WebInterface in the IIS Manager
- In the process of interaction between the app and the Feature Server, it is periodically required to have access to the C:\Windows\Temp directory. Therefore, you should set access rights to this folder.
To do this, right-click the folder and select Properties. Select the Security tab. Here, select the user that runs IIS and press the Edit button. Next, grant this user the read\write\modify right. - Check the WebInterface operability: open the browser and use the address http://localhost/r_frame
- To ensure the correct work of the report visualizer (r_frame), change the settings in the r_keeper manager station.
Go to Extensions > Web Menu. The window containing a report tree will appear. Each report has the Url property. Change it to the one that matches the URL deployed on your computer.
For example, if the r_frame application has the address http://localhost:789/r_frame in the IIS settings, copy it to the report Url property and change the localhost to your computer IP. Thus, you should save http://192.168.34.123:789/r_frame.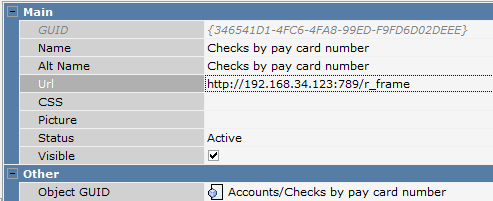
- In the web.config file, change the version_plugin parameter: set the Feature Server version as its value. If there is a version mismatch error, take the version from the error text and save it as the value of this parameter.


If a report is in a report group (for example, Analytical Reports), it is enough to indicate a URL for the group instead of indicating it for each individual group report.
WebInterface and r_frame can be installed on separate computers.
Possible issues: if Skype is launched, forbid the port 80 for the app. Run it and check if it is working properly.