Installing and Configuring PDS
Introduction
The Personal Discount System — hereinafter PDS — is the program for managing the database of personal payment and discount cards and organizing work with various elements of the loyalty system, such as discounts, bonuses, savings, etc.
As a rule, PDS is installed as an addition to the r_keeper system, but it can also work as standalone software.
System Components
The system includes the following mandatory applications:
- Card server — CARDSERV — the main application of the system, manages the database, and provides interaction with PDS clients
- Card editor — PCARDS — an application for managing system references and obtaining basic reporting
The system also includes the following optional modules:
- Request repeater — FARCARDS — a universal module for organizing various work schemes. In most cases, it is used independently of the main PDS modules to organize communication with third-party systems
- Card servers synchronization — SYNCARD — an application for synchronizing the main and local card servers in a distributed PDS scheme
- Card import — CARDIMP — application for batch cards loading in CSV — standard import format
- Card information — CARDINFO — an application for obtaining information on the card
- Card server database maintenance — DATACUT — an application for reducing the database size by linking old transactions
All PDS modules are installed and run under Windows
Licensing
The Card Editor module — PCARDS — requires a specially prepared Guardant Stealth II hardware token.
Additional licensing is not required for either PDS or r_keeper.
Card Server
The card server functions include managing the database and ensuring interaction with clients of the PDS system — cash system or other software, including third-party.
Card Server Components
The card server consists of the following components:
- Database in UDB format — card.udb
- Server executable file — Cardserv.exe
- Server configuration file — CARDSERV.INI
- Link libraries — RTCP.DLL, RLOCAL.DLL, RNBOPEN.DLL, etc.
- Utility for updating the database to the required version — Cardup.exe
Card Server Installation
To install the card server you need:
- Download the complete PDS assembly from FTP ftp://ftp.ucs.ru/r-keeper/versions/PERSCARD/PDS.zip
- Unpack the contents of the archive.
The archive contains a fully working assembly of PDS, you do not need to install anything else.
Card Server Update
To update the card server version, you need to:
- Download the distribution kit of the card server current version from FTP ftp://ftp.ucs.ru/r-keeper/versions/PERSCARD/CARDSERV
- Copy the Cardup.exe utility from the \UPGRADE distribution subdirectory to the working directory of the card server
- Stop the card server
- Make a backup of the card.udb database
- Run the Cardup.exe utility and update the database
- Copy the new version of the card server Cardserv.exe from the \CARDSERV distribution subdirectory to the working directory of the card server.
When updating the card server, it is also recommended to update the set of used communication libraries, which can be downloaded from FTP ftp://ftp.ucs.ru/r-keeper/versions/PERSCARD/netdll.7z
Card Server Settings
All card server parameters are stored in the CARDSERV.INI configuration file.
By default, CARDSERV.INI contains a minimum set of parameters.
Below is the description of all possible parameters.
[DB] — database parameters section
File = card.udb - card server database file
DayBound = 4:00 - day boundary time - the value that the server takes into account when checking various time limits (card expiration dates, limits, etc.), and also uses it when generating reportsIt is recommended to specify the time of day at which the cash server has already closed the day, and the new cash shift is not yet open. For round the clock enterprises, it is logical to use the astronomical boundary of the day — 00:00
Backup = - the path to the directory for saving automatic backup of CARD.UDB database. If not specified, the backup files will be saved in the same directory as the working database
Automatic backup is performed once a day, the execution time cannot be edited and is regulated by the server according to internal rules.
BackupCount = 2 - the number of automatic backup files. After reaching the specified value, the files are automatically overwritten
WeekStart = 7 - a parameter indicating the day of the beginning of the week. Used for cards with weekly limits, can take the following values: 1 - Mon 2 - Tue, 3 - Wed, ... 7 - Sun
Bonus = - if you specify the DISCOUNT value, the number (identifier) of the card's bonus will be equal to the number (identifier) of its discount. Find the details of this parameter below
MinRest = - if you specify an amount in this parameter, then the balance of the card will be considered zero if it is less than this amount
IgnoreStopDate = No - if = YES, then the expiration date is unlimited
Log = 2 - Log file level. 0 - rare events. 1 - query facts. 2 - details of some requests
[LinkDLL] - link library support parameters section
1 = RNetBios - support for a communication channel through the NetBios protocol
2 = RNBOpen - support for a special communication channel via the NetBios protocol, used only for the r_keeper v6 cash system
3 = RTcp - communication channel support via TCP/IP protocolCommunication modules are loaded and initialized in the same order as specified in the [LinkDLL] section
It is recommended to specify only the necessary link libraries in the [LinkDLL] section. After starting the server, it takes some time — about 5-20 seconds — to initialize all the communication modules
Following are the individual parameter sections for each link library:
[RNetBios] ; parameter section for NETBIOS communication module
Server = PCSERV ; unique within the local network case-sensitive network NETBIOS name of the card server

[RNBOpen] ; parameter section for RNBOPEN communication module
Server = ASERV ; unique within the local network case-sensitive network NETBIOS name of the card server, used ONLY to connect the r_keeper v6 cash system
[RTcp] ; parameter section for RTCP communication module
Port = - TCP/IP port for incoming connections, any unique free/open network port for communication with the map server through it. Usually between 3000 and 5000.

[RLocal] ; parameter section for RLOCAL communication module
Port = 0 - port for local connections, you can specify any number
Communication Modules Usage Features
- When connecting communication modules using the NetBios protocol — RNBOPEN.DLL and NETBIOS.DLL, keep in mind that the modules will be loaded on all numbers of NetBIOS adapters found in Windows OS. This leads to some delays when starting the card server. If the card server is configured to simultaneously support various communication modules, it is recommended to specify modules with NetBIOS support in the [LinkDLL] section at the end of the list
- When installing the card server on a 64-bit OS, communication modules with NetBIOS support will not work correctly. So, the NETBIOS module can be replaced with RTCP and/or RLOCAL modules. There is no replacement for the RNBOPEN module, but since the cash desk version 6.102, it is possible to configure an alternative connection via the TCP protocol /IP, using the RTCP communication module.
Thus, when installing the card server on a 64-bit version of Windows, it is recommended to use only two communication modules: RTCP for all remote connections, including the cash desk and cash server, and RLOCAL for all local connections.
Card Server Launch
CARDSERV.EXE can be launched both as an application and as a service.
No third-party components, including BDE, are required to run the card server, as well as no security key and/or license.
The launch mode is determined by the key:
- /DESKTOP — to start the server as an application
- /INSTALL — to install the server as a service
- /UNINSTALL — to remove the installed server service
Several servers with different settings and databases can be running simultaneously on one computer.
After launch, an icon of a working card server should appear in the system tray. By double-clicking on it you can open the server graphical interface and check the status of the work:
- Database tab — general information
- Connects tab — list of connected clients
- Protocols tab — list of link libraries with parameters and status. If the server is running as an application, a Shutdown popup menu will be available on this tab
When installing the card server on Windows 7 or later and running it as a service, the icon will not be displayed in the system tray.
Bonus=DISCOUNT Parameter
For a clearer understanding, here is a detailed description of this parameter.
In the PDS system for bonuses, there are no levels depending on the expenses of the cardholder. But such functionality is available for compound discounts. Using the Bonus=DISCOUNT parameter allows enabling the mechanism for supporting compound bonuses.
Sequence of Work:
- In the r_keeper 6 Editor module or in the r/-keeper 7 manager station, the bonuses necessary for the levels formation are created
- In the r_keeper 6 Editor module or in the r/-keeper 7 manager station, virtual or real — depending on the situation — discounts are created with codes corresponding exactly to bonus codes created in the previous step
- In the card editor, compound discounts are created according to the rules by which future compound bonuses should work. Specially created discounts should be used as discounts for each compound discount
- Compound discounts are assigned for cards in the card editor
Usage Features:
- The card server will always return both the discount code and the bonus code, which will be the same when using the Bonus=DISCOUNT parameter. Thus the flexibility of managing discounts is lost
- It is impossible to disable the use of discounts for the card — if the discount is not needed, you need to make it zero
Minimum Server Configuration Example
In case of the minimum configuration — when only the RTCP communication module is supported — CARDSERV.INI looks like this:
[DB]
File=card.udb
DayBound = 4:00
backup=
IgnoreStopDate = No
BackupCount = 2
weekstart = 7
log = 2

[LinkDLL]
1=RTcp

[RTcp]
port=3456An example of the \CARDSERV directory contents after installation:
CARDSERV.EXE - card server executable file
CARDSERV.INI - map server configuration file
CARD.UDB - card server database
RTCP.DLL - communication module using TCP protocolServer Configuration Example for Connecting on Different TCP/IP Ports
In some cases, you may need to connect to the card server on several different port numbers.
As far as it is possible to specify only one port value in the Rtcp.dll library parameters, we use a workaround solution: copying the Rtcp.dll library in the required number under different names, for example Rtcp1.dll, Rtcp2.dll and configuring CARDSERV.IN accordingly:
....

[LinkDLL]
1=RTcp1
2=RTcp2
3=RTcp3

[RTcp1]
Port = 1111

[RTcp2]
port=2222

[RTcp3]
port=3333The [LinkDLL] section must follow the sequential numbering of the link libraries
Card Editor
The card editor, or PCARDS, is the main user module in the PDS software and is designed to create and manage the database of cards (accounts). The module also provides basic reporting on the PDS system.
- Default login: ucs. If doesn't work, try 1
- Default password: ucs. If doesn't work, try 1
Card Editor Installation
The card editor can be installed on the same PC where the card server is located, or on any other PC within the connection with the card server.
Novex Guardant II hardware token is required to run the card editor.
The previously downloaded archive contains the card editor. To run it, open the PCARDS.EXE application
Card Editor Settings
The card editor configuration file is RKEEPER.INI.
Parameter values in the RKEEPER.INI file are case insensitive, except for parameters that specify NETBIOS names.
Configuration file example:
[Common]              - main section
Alias1 = d:\RK6\DB    - path to reference tables of RK6 manager database
Alias2 = d:\RK6\DB    - path to the RK6 storage database (ARK6.UDB)
EditFRF = YES         - enable/disable the Fast Report print forms
Language=.RUS         - localization. The default language is RUS/ENG

[PCards]              - section of the card editor
CSLinkDLL = RTcp      - specifies the card editor's link library for communication with the card server. The library is specified without the extension
CSLinkGate = 1        - DLL client number. Add this number to the DLL parameters
DBF = ANSI            - encoding in DBF files when exporting data from CARD.UDB. — ANSI or OEM
SaveLogin=YES         - to save the username in the login window of the program
Login=ucs             - default user
Birthday=0            - mode of building a report on birthdays. 0 — the specified year is taken into account. 1 — the specified year is not taken into account
ShowExport=1          - to show Export item in invoices — 1 or not — 0
Font = Antica         - here you can specify the font to use
Guardant = $232D7F11 - here you can specify a key with a license, preceded by a $ sign. If there is - h at the end of the number, then this character usually is not specifiedThe token ID is determined by the diagnostic utility included in the Guardant driver, located in Control Panel > Guardant Drivers
In each section, several groups of parameters with different values can be defined for link libraries. The parameter group is defined by a number that is indicated after the parameter name and can take a value from 1 to 16. For example, Server1 is the 1st group, Server2 is the 2nd group, and so on.
[RTcp]                    ; section of settings of the selected communication module
Client1 = Person_Cards    ; any string that is unique among the server's TCP clients
Server1 = 127.0.0.1       ; Server IP address - can be found by running ipconfig /all on the server from the command line
Port1 = 3456 ; the port number specified on the CARDSERV server in CARDSERV.INI.An example of configuring the card editor connection to the card server via NETBIOS:
............

[PCards]
CSLinkDLL = RNetbios        ; used communication module
CSLinkGate = 1

[RNetbios]
Server1 = PCSERV            ; NETBIOS name of the card server
Client1 = PCARDS_CLIENT     ; The NETBIOS name of the client, must be unique in the network
Adapter1 = 0 ; if not specified, will take the first existing one.Cards Import from Text File
In the PCards application, it is possible to import the list of cards from a text file of the CSV format.
To perform the import, go to File > Accounts, right-click in a blank space and select Import cards...
The Text file requirements — CSV format compliance:
- ANSI file encoding
- Every single line corresponds to one card
- Each line has multiple fields separated by commas
- If a comma is required in the content of the field, the field must be enclosed in double quotes, for example, "Baker Street, 221b"
- If quotation marks are required in the contents of the field, then all these quotation marks must be doubled and the entire field must be enclosed in quotation marks. For example, the name of "Romashka" LLC should be indicated as ""Romashka"" LLC"
How the import procedure works:
- If the server doesn't have any information on the card yet, a new account is created for it
- If there is already an account with such a card, its properties are changed
Description of the fields for each file line:
- The card number
- The card expiration date — the date in the CURRENT WINDOWS FORMAT. If the OS language is Russian, then the format should be: DD.MM.YYYY, for example: 08/12/2020
- The discount number — a number from 0 to 99. An optional field
- The bonus number — a number from 0 to 99. An optional field
- Birthday — the date in CURRENT WINDOWS FORMAT. An optional field
- The cardholder name — without any quotes
- The card type. An optional field, the default value is 0:
- 0 — manual replenishment without payment limits
- 1 — automatic replenishment without payment limits
- 2 — automatic replenishment with payment limit for one day
- 3 — automatic replenishment with payment limit for a week
- 4 — automatic replenishment with payment limit for a month
- 5 — manual replenishment with payment limit for one day
- 6 — manual replenishment with payment limit for a week
- 7 — manual replenishment with payment limit for a month
- Payment limit amount. An optional field
- Phone number one. An optional field
- Phone number two. An optional field
- E-mail. An optional field
- The subdivision name — an optional field. This field is case-sensitive and should not contain quotation marks. The subdivision should exist.
If the name is not specified or the specified subdivision is not found, a new account is created in the current one. If the account already exists, its subdivision is not changed.
If the account already exists and is located in another subdivision, it is transferred to the specified subdivision, if it exists - The type of discount restriction. An optional field, the default value is 0:
- 0 — no limits
- 2 — discount limit for one day
- 3 — weekly discount limit
- 4 — monthly discount limit
- Discount limit amount. An optional field
- The discount level name. Used if field 3 with a discount number is empty. An optional field
- The credit amount for cards with manual replenishment. An optional field
- The Withdraw card checkbox: 0 — to remove, 1 — to set, empty — not to change. An optional field
- The address. An optional field
- The card issue date — the date in the CURRENT WINDOWS FORMAT. An optional field, since version 3.27.02
An example of the text file contents for cards import:
1023,31.12.2007,5,10,02.02.2002, Ivanov Ivan Ivanovich
1024.01.01.2008,2,1.05.11.1980, A.B.Sidorov,1
1027,12.03.2007,2,,,Aleksey Alekseev,4,5000,222-22-22,,testmail@test.su,Test
August 2, 17, 2020, March 5, 1970, P.P. Petrov,,,, testmail@mail.ru, My divisionBatch Accrual of Funds
The PCards application has the ability to import accrual transactions from a CSV text file.
To perform the import, go to File > Accounts, right-click in a blank space and select Import cards...
The Text file requirements — CSV format compliance:
- ANSI file encoding
- Every single line corresponds to one card
- Each line has multiple fields separated by commas
- If a comma is required in the content of the field, the field must be enclosed in double quotes, for example, "Accrual of grant, November"
- If quotation marks are required in the contents of the field, then all these quotation marks must be doubled and the entire field must be enclosed in quotation marks. For example, "Transfer from ""Romashka"" LLC"
Description of the fields for each file entry:
- The card number — a number from 1 to 999999999
- The funds amount, can be negative
- The operation description. An optional field
An example of the text file contents for cards import:
1023, 550.00
1024, 1745.25, Additional accrual for November
1027, 0.50, Automatic bonus
2, -25, Penalty for broken dishesConnecting Сard Reader
For more convenient work with cards in PCARDS, you can connect an external reader, for example:
- Magnetic card readers
- Proximity card readers
- Barcode Scanners.
To connect a reader, a special driver is required that supports this reader model.
The general list of drivers can be viewed at FTP ftp://ftp.ucs.ru/r-keeper/versions/COM_READ. Each directory for a particular device has several subdirectories — \CARDREAD, \COMCARD, WINCAS, etc.
The \CARDREAD directory contains drivers to support this reader model in the PCARDS application.
To install the driver:
- Download the required driver from FTP ftp://ftp.ucs.ru/r-keeper/versions/COM_READ
- Unpack the contents of the archive into the PCARDS working directory
- Edit the CardRead.ini configuration file. Find the description of the driver parameters in the README.TXT file.
An example of the CardRead.ini file for the SRC-125 reader, located in /COM_READ/RFIDUCS3/CARDREAD:
[Options]
Port=COM1 — COM port name
Bits=28 — number of used bits from the card number 16..40
Mode=0 — 0- "long" number from the card, 1- "composite" numberThe universal driver can be downloaded from FTP: ftp://ftp.ucs.ru/r-keeper/versions/COM_READ/STANDARD/CARDREAD. It supports work with any reader that connects to the COM port — or any other interface whose driver allows emulating work through a virtual COM port — and sends the read data directly to the port.
In the PCARDS card editor, reader support is displayed with a special image:![]()
Card reading is supported in the account editing/creating mode and in the card search mode.
Connection with r_keeper 7
For the PDS and r_keeper 7 connection, it is necessary to add an interface to the cash server through which the cash station will receive information on the client's card.
To do this:
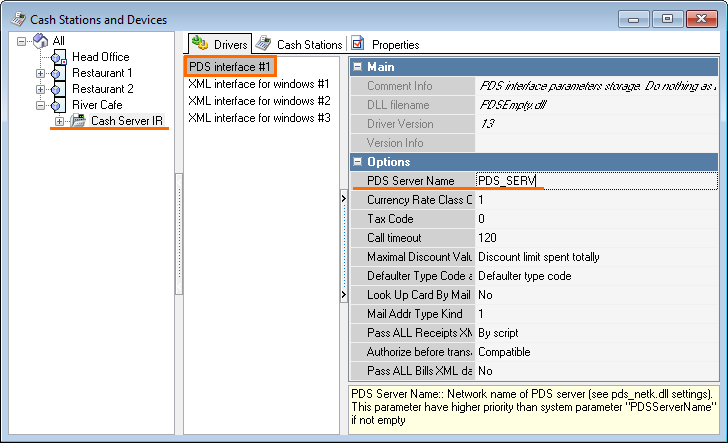
- In the manager station, go to Service > Stations and Devices
- Select a required cash server
- Go to the Drivers tab, right-click in the blank space and select Driver List...
- Find the PDS interface and drag it to the Drivers tab
- In the Options block of the driver properties, specify the unique name in the PDS Server name field
- Now, you need to link this interface to a logical one. To do this:
- Go to Service > Interfaces
- Make a copy of the preset Personal discount system interface
- In the DLL Library Files block, select the previously added PDS interface
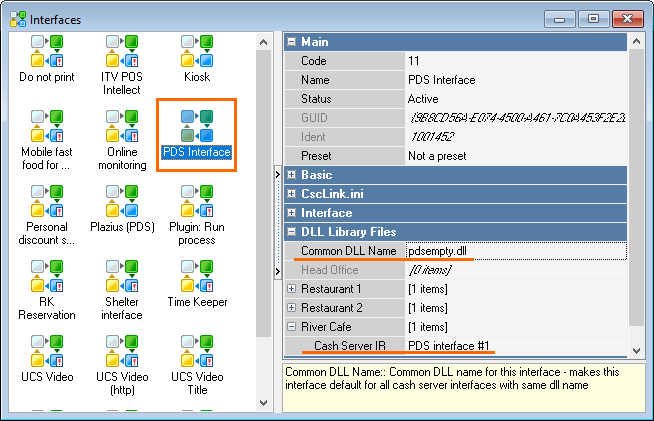
- To activate a new interface, restart the cash server. After the restart, you may check if the interface is available on the Interfaces tab of the cash server properties, if the server is launched as an application.
MCR Algorithm Settings
If you want to check how the PDS system works, but there is no card to check, you can do it using keyboard input.
- Go to Service > Device Signals Processing > MCR Algorithms
- Create an MCR Algorithm of the Masked Input type
- In the Object field, specify the previously bound interface. In our case, this is PDS Interface
- In the Device Types field, select:
- Keyboard
- Magnetic card
- In the Input Mask field, enter a mask. In our case, these are 4 digits — iiii
- In the Scope field, select Interface
- Activate the algorithm and save
- Launch the cash desk and create an order
- Tap the Code from keyboard button and enter the number of an existing card according to the Input Mask
- If the server is running, the card exists and is not expired, information about it will appear on the screen
- To activate a discount or bonus, tap on the picture in the right part of the screen.
FARCARDS Request Repeater
The FARCARDS application is a repeater. It receives requests from clients, for example, from a cash desk system, and transfers these queries either to the personal card server — CARDSERV — or to an external third-party system, and also returns responses to clients from the card server or external system.
A particular feature of FARCARDS is the absence of any built-in mechanisms for storing information about personal cards.
Interaction with an external system is provided by a special interface library implemented according to the FARCARDS specification.
FARCARDS Installation
The installation is performed in the same way as installing the card server:
- Download the distribution kit of the repeater current version from FTP ftp://ftp.ucs.ru/r-keeper/versions/PERSCARD/FARCARDS
- Create a directory, for example, UCS\PDS\FARCARDS and copy the contents of the distribution into it
- Download the archive with communication libraries from FTP ftp://ftp.ucs.ru/r-keeper/versions/PERSCARD/netdll.7z and unpack its contents into the FARCARDS working directory
FARCARDS Settings
FARCARDS parameters are stored in the FARCARDS.INI configuration file.
General parameters section:
[FarServer]
Type = 0                ; repeater operation mode, see below
DLL = RTcp              ; the name of the link library for connecting to CardServ or of the library for communicating with an external system
; Note: in Type=0 mode, the RTcp library cannot be present in the [LinkDLL] section. On startup, FARCARDS checks for this situation and, if necessary, automatically corrects FARCARDS.INI
Log = 0                 ; log file detail level (0..3)
Gate = 1                ; parameter number, used in the parameter section of the library specified in the DLL parameter
CloseMins = 5           ; disconnection timeout from CardServ after disconnection of the last client (min), 0 - disconnected immediately.

; Section for listing link libraries

[LinkDLL]
1 = RNB Open
2 = RLocal
3 = pds_netk

; Sections with Link Library Parameters
[RTcp]
Client1 = Remote Resto
Server1 = 127.0.0.1
Port1 = 2222
[RNBOpen]
Server = AServ
[RLocal]
Port = 1
[pds_netk]
NetServerName=FarCards
ininame=netk.iniThere is the Card Accounts band in print layouts, where all available information on the accounts linked to the card can be displayed. If there are no spent amounts, then there is no way to see them.
The following parameters are responsible for displaying spent amounts in the Client Info window:
HasUnitInfo=1
Show_AccountTypes=1Next, specify the ID of the expenses account, which can be seen in the configurator, in Show_AccountTypes.
FARCARDS Operating Modes
FARCARDS can work in two modes, which are determined by the value of the Type parameter in the [FarServer] section.
Type = 0 Mode
In this mode, FARCARDS connects to the CARDSERV card server and sends all client requests — for example, from cash servers — to it and returns responses.
In fact, this mode has lost its relevance due to a more functional distributed PDS configuration — SYNCARD), as well as the ability of the r_keeper v6 cash server to connect to the card server via the TCP/IP protocol, starting from version 6.102.
An example of using the Type = 0 mode:
- There is a restaurant with a working PDS system of personal cards
- There is a second restaurant, located in a different place, where you need to use the same cards
- When providing TCP/IP communication between restaurants, the second restaurant can use FARCARDS in Type = 0 mode
- Access to FARCARDS for cash servers in the second restaurant will be transparent, as to a regular CARDSERV, while FARCARDS via TCP/IP will communicate with the card server in the first restaurant and retransmit all information exchange
- Thus, FARCARS will act as an intermediate link between the cash servers and the card server:
RKCLIENT ⇔ RKSERVER ⇔ FARCARDS ⇔ LAN\WAN ⇔ CARDSERV
An example of FARCARDS.INI settings for mode Type = 0:
[FarServer]
Type = 0
DLL=RTcp           ; library for connection with CARDSERV
log = 0
gate=1
CloseMins = 5

; Section for link libraries list

[LinkDLL]
1=RNB Open
2=RLocal
3=pds_netk

; Parameters section for connection with a remote card server:

[RTcp]
Client1 = Far Restaurant   ; any unique FARCARDS customer name
Server1 = 192.168.0.99     ; IP address of the remote card server
Port1 = 3456               ; remote card server port for TCP/IP connection

; Sections with link libraries parameters

[RNBOpen]
Server = AServ

[RLocal]
port=1

[pds_netk]
NetServerName=FarCards (PDS Server name — interface added to the cash server)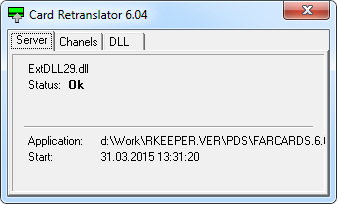
ininame=netk.iniAfter starting FARCARDS in the Type = 0 mode, the status of the connection to the card server is displayed in the graphical interface on the Server tab: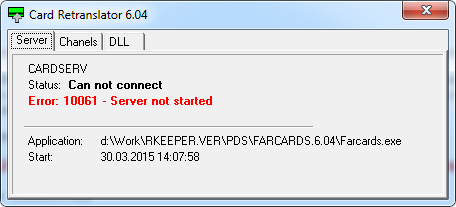
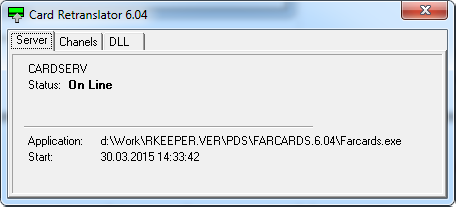
If FARCARDS is successfully connected to the card server, the connection will be displayed in the graphical interface of the card server on the Connects tab, in case the CloseMins parameter is non-zero, otherwise, the connection will be short: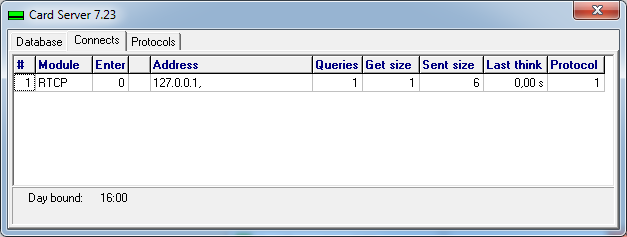
Type = 1 Mode
In this mode, FARCARDS passes the requests of its clients to the connected interface library and returns the result of its work to the clients.
In Type=1 mode, FARCARDS acts as a server, similar to CARDSERV, but the logic for working with personal cards is implemented in the interface library and/or in an external system accessed by the interface library.
This mode is usually used to connect the r_keeper cash system with third-party software.
An example of using the Type = 1 mode:
- The customer has his own information system for managing the personal data of employees and/or guests. It can be either a simple loyalty system or an ERP-class enterprise management system
- The customer needs to use the existing system along with r_keeper cash software
- The specification for the development of the interface library (Extdll.txt) and the FARCARDS distribution kit are transferred to the customer
In the Type=1 mode, only the r_keeper 7 cash system and the CARDINFO utility can be FARCARDS clients.
In addition to the connection with third-party systems, FARCARDS in Type=1 mode is used to connect the r_keeper cash system with other r_keeper software:
- r_keeper CRM — a customer interaction strategy management system
- Shelter PDS — a discount system based on Shelter software
- Subscription — a universal management system
- Premiere — a cinema automation system
An example of FARCARDS.INI settings for mode Type = 1:
[FarServer]
Type = 1
DLL = ExtDLL29.dll ; interface library name
gate=1
log = 3
XMLCP=1251         ; setting the code page for XML data

[LinkDLL]
1=RTCP
2=RNB Open
3=pds_netk


; sections with link libraries parameters:

[RNBOpen]
Server = AServ

[RLocal]
port=1

[pds_netk]
NetServerName=FarCards
ininame=netk.iniIn addition to editing the FARCARDS.INI configuration file, it may be necessary to set the parameters of the interface library — see the documentation supplied with the library
After starting FARCARDS in Type = 1 mode, the status of the connected interface library is displayed in the graphical interface on the Server tab: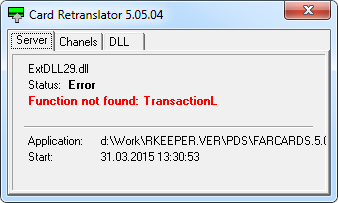
FARCARDS Launch
Running FARCRDS is possible both as an application and as a service. No security key and/or license is required.
When using the Type =1 mode, FARCARDS launch may depend on third-party components — see the requirements for the interface library
The launch mode is determined by the key:
- /DESKTOP — to launch the repeater as an application
- /INSTALL — to install the repeater as a service. When installing the card repeater in Windows 7 and higher as a service, the icon will not be displayed in the system tray
- /UNINSTALL — to remove the installed repeater service
Several repeaters with different settings can be running simultaneously on one computer.
After launch, the repeater icon should appear in the system tray. By double-clicking it, you can open the FARCARDS graphical interface and check the status of the work:
- Server tab — general information
- Chanels tab — list of connected clients
- DLL tab — a list of link libraries with parameters and status. If the repeater is launched as an application, a Shutdown popup menu will be available on this tab.
Distributed PDS
General Information
Distributed PDS is a configuration option for a standard PDS. It allows the autonomous work of card servers and periodic data synchronization between servers.
Possible areas of application:
- Chain of restaurants with a single database of personal cards
- Geographically dispersed network of public catering points within one enterprise
- Off-site autonomous food outlets with personal card service
Benefits of using:
- No permanent connection between the restaurant and the main card server is required
- All information is duplicated — in each remote restaurant, a quite up-to-date backup copy of the head base is created
- In case of a breakdown of any database and restoring it from a backup archive, all changes and transactions created since the backup archive creation will be sent to the database after synchronization
Distributed PDS support has been implemented since the CARDSERV 7.01 card server version
Scheme of Work
In a distributed PDS configuration, there is always one head — central — card server and one or more local — subordinate — servers.
The head server, as a rule, is located in the central office, and the local servers are located at remote sites. Synchronization between servers is carried out via the TCP / IP protocol, and it does not matter how the network channel is implemented: a sufficient condition for synchronization is the possibility to connect to the head or intermediate server by IP address and port.
Standard Scheme of Work:
Cash desk ⇔ LAN ⇔
Local CARDSERV ⇔ LAN
⇔
SYNCARD ⇔ WAN (INTERNET) ⇔ Head CARDSERV
Additionally, you can include intermediate card servers in any quantity, for example:
Cash desk ⇔ LAN
⇔ Local CARDSERV
⇔LAN
⇔ SYNCARD ⇔ WAN (Mobile 3G INTERNET) ⇔ Intermediate CARDSERV
⇔LAN
⇔ SYNCARD ⇔ WAN (ISP INTERNET) ⇔ Head CARDSERV
Distributed PDS Configuration
The distributed PDS configuration includes standard PDS modules — card server, card editor — and an additional SYNCARD utility for synchronizing card servers.
The card server CARDSERV can operate in four modes:
- Single
- Head
- Local
- Intermediate — local + head.
The server operation mode depends on the tag in the CARD.UDB database. The tag is specified when the SYNCARD synchronizer is connected for the first time. If SYNCARD is not used, there are no tags in the database — a single server.
Once specified, the tag remains in the database FOREVER
Tag Conversion Options:
- A single server can be made head, at any time
- A single server can be made local — subordinate — only if its database is empty
- A local server can be made intermediate, i.e. local + head
- A head server cannot be made Intermediate.
Thus, you can grow the server tree one by one, connecting a new server as local to the running head, intermediate, or local (then it will become Intermediate) server.
If necessary, you can connect to any of the servers using the PCARDS card editor.
You can edit data using the PCARDS card editor only on servers in single or head mode. On the local and Intermediate servers, only viewing data and reports is possible.
You can find out what mode the card server works in from the PCARDS application: go to Help > About > Access: Full, Head, Lower, Transit. The server operation mode is also displayed at the card server icon: H — head, L — local
Invalid Actions
The table below describes invalid actions with the card server database, the consequences to which they lead, and ways to resolve them:
| Actions | Consequences | Solution |
| Copying the card server database from one local restaurant to another and connecting them to one common Head server | Complete data desynchronization! |
|
| If you try to use a non-empty database that is not local in a local restaurant, SYNCARD will not work with it | Error message: "Can not mark [Local] as Local DB because it is not empty" |
|
| If you copy an empty database of the head server to a local restaurant, SYNCARD will not work with it | Error message: "Can not mark [Local] as Local DB because it is Head DB" |
|
| If you copy the local database from the restaurant to the head server, SYNCARD will not work with it. In addition, the PCARDS card editor will not allow editing data in this database. | Error message: "Can not mark [Head] as Head DB because [Local] DB is not empty" |
|
*The card server automatically creates archive copies of the CARD.UDB database once a day
Installing SYNCARD
Before installing SYNCARD, the following conditions should be met:
- The working configuration already has a head or single card server
- There is a connection via TCP/IP between the local and head or single servers. For example, a VPN with the ability to connect by IP address and port to the computer on which the head server is running
The SYNCARD synchronization utility is usually installed on the same PC where the local card server is installed or planned to be installed, or on another PC of the same local network.
To install SYNCARD, do the following:
- Install a local card server. if the card server was installed earlier and has already been used, you must install an empty CARD.UDB database
- Download the distribution kit of the SYNCAD current version from FTP ftp://ftp.ucs.ru/r-keeper/versions/PERSCARD/SYNCARD. The version history can be viewed in the HISTORY.TXT file
- Unpack the contents of the archive, for example, to the \UCS\PDS\SYNCARD directory
- Copy the RTcp.DLL link library to the same directory. The built of the current versions of link libraries can be found at FTP ftp://ftp.ucs.ru/r-keeper/versions/PERSCARD/netdll.7z
Considering the note regarding the RLOCAL.DLL library, only RTcp.DLL must be used for connection between SYNCARD and the local card server, even if both servers are on the same PC.
Next, you need to edit the main configuration file SYNCARD.INI:
[Options]                - General parameters section
Period = 10              - Synchronization period in minutes — in how many minutes after a successful exchange the next communication session will happen

[Local]                  - Section of settings for connection with the local card server
DLL = RTcp               - DLL for connection with the local card server
Gate = 1                 - number of parameters of DLL connection

[Head]                   - Section of settings for connection with the head card server
DLL = RTcp               - DLL for connection with the head card server
Gate = 2                 - number of DLL connection parameters
Modem = 0                - a modem usage — more precisely, establishing a connection through a Windows connection: 0 - do not use, 1 - always use, 2 - use only if there is no direct connection
TryLink = 1              - only works if Modem = 2 — number of unsuccessful direct connection attempts before dialing via modem

[Modem]                  - Section of modem connection settings
PBEntry = 3GMobile       - connection name created in Windows
User =                   - specifying the user for authentication
Psw =                    - specifying password for authentication
Domain =                 - specifying the domain for authentication

[Rtcp]                   - Section for link library parameters
Client1 = SYNCARD        - unique client name to connect to the head card server
Server1 = 192.168.0.1    - IP address to connect to the head card server
Port1 = 5555             - port for connecting to the head card server

Client2 = SYNCARD        - unique client name to connect to the local card server
Server2 = 127.0.0.1      - IP address to connect to the local card server
Port2 = 4444 - port for connecting to the local card serverSYNCARD.EXE can be launched with the following keys:
- /INSTALL — to install as a service — recommended
- /UNINSTALL — to remove an installed service
- /DESKTOP — to launch as an application
After the first launch of SYNCARD, the databases will receive all the necessary tags automatically, and if there is a connection between the servers, the data will be synchronized.
Additional Applications
CARDINFO — Card Information
The CARDINFO application is used to obtain basic information on a personal card without launching a card editor and/or cash station.
It can be used along with the PCards card editor or as a standalone application as part of the PDS, no additional license or security key is required.
Since CARDINFO 1.10, work with a card reader is supported, setting is similar to PCARDS
Usage with PCards
For using CARDINFO along with the card editor, do the following:
- Copy the distribution kit of the current version of the application from FTP ftp://ftp.ucs.ru/r-keeper/versions/PERSCARD/CARDINFO and unpack its contents into the PCards working directory
- Create a desktop shortcut for the application launch
- If necessary, connect a card reader, the setting is similar to PCARDS
The CARDINFO card reader application uses the same drivers as PCARDS — if PCARDS is already configured to support the card reader, no additional SYNCARD configuration is required.
Using CARDINFO as a standalone application
To use CARDINFO as a separate application being a part of the PDS, do the following:
- Copy the distribution kit of the application current version from FTP ftp://ftp.ucs.ru/r-keeper/versions/PERSCARD/CARDINFO
- Unpack the contents of the archive, for example, to the \UCS\PDS\CARDINFO directory
- Copy the link library to the working directory of the application — it is recommended to use RTCP.DLL
- If it is necessary to display the name of discounts, copy the corresponding PCGET.DLL library and the libraries necessary for its operation to the application working directory — see the description of the PCARDS settings
Create or copy the RKEEPER.INI file and configure the settings — similar to PCARDS:
[PCards] CSLinkDLL = RTcp - link library name CSLinkGate = 1 - client number, added to link library parameters [RTCP] Client1 = CARDINFO - unique client name to connect to the card server Server1 = 127.0.0.1 - card server IP address Port1 = 3030 - TCP port for connecting to the card serverCODE- Create a shortcut on the desktop to launch the application
- If necessary, connect a card reader, the setting is similar to that of PCARDS.
Cards List Import
The CARDIMP application is used to upload a list of cards from a text file in the specified format to the card server.
The text file format is exactly the same as that for importing a list of cards in the PCards application
To install CARDIMP, do the following:
- Download the distribution kit of the application current version from FTP ftp://ftp.ucs.ru/r-keeper/versions/PERSCARD/CARDIMP
- Unpack the contents of the archive, for example, to the \UCS\PDS\CARDIMP directory
- Copy the link library to the working directory of the application — it is recommended to use RTCP.DLL
- Create a CARDIMP.INI file and configure the settings:
[options]
LinkDLL = RTcp    - link library name

[RTcp]
Client1 =         - unique name of the client to connect to the card server
Server1 =         - card server IP address
Port1 = - TCP port for connecting to the card serverThe application does not require a security key and/or additional license.
The application does not have a user interface and is launched from the console — command line — with the following parameters:
Cardimp.exe Login Password FileNamewhere
- Login — username for authorization on the card server
- Password — user password for authorization on the card server
- FileName — name of the imported file with the list of cards
Database Maintenance
If the card server database file CARD.UDB is too large, you can use the DATACUT application to group old transactions that do not need detailed reporting.
The principle of the application work:
- Transactions in the deleted period that change the balance of funds will be summarized in one transaction for each account
- Other transactions of this period will be deleted
- All other information in the database will remain unchanged
- After creating a new database, the old database is not deleted, but renamed to a BEFORE_CUT_yyyy-mm-dd file, where yyyy-mm-dd is the date before which transactions were deleted
The application does not allow deleting transactions in the database for the last 90 days.
When using a distributed PDS — SYNCARD, before deleting transactions, all databases of the server tree must be synchronized — the last synchronization should happen no more than 90 days ago.
To use the application, do the following:
- Download the distribution kit of the application current version from FTP ftp://ftp.ucs.ru/r-keeper/versions/PERSCARD/DATACUT
- Unpack the contents of the archive into the working directory of the CARDSERV card server
- Stop the CARDSERV card server
- Run the application and wait for successful database processing
- Start the CARDSERV card server and check the operation.