Setup of Cash Station
Introduction
Wincash.bat is the cash station executable file by default.
The default cash station configuration file is Wincash.ini.
When installing the software from a distribution kit (FTP archive, folder ftp://ftp.ucs.ru/rk7/versions/7_05_03/STANDALONES/), the Wincash.INI file should be copied from the \bin\win\ini\ folder to the \bin\win\ working folder, where Wincash.bat is located.
When installing the software via the installer, the cash instance with its configuration file can be found in the following folder: [installation path\instance name\Rk7Cash].
Licensing
It is not required to license the cash station, but when it is launched, the relevance of its cash server license is checked. The number of stations belonging to the «Cash station» type is limited by the cash server license.
Configuring Windows-based Cash Station
Before launching a cash station, you should create it at the manager station in the «Service – Stations and devices» reference.To launch the cash station, perform the following:
- At the manager station, in the «Service – Stations and Devices» reference, create a cash station for your previously created cash server. Assign a unique network ID to it, f.ex. RK7CASH3001_01. You can also leave the name generated automatically by the system.
- In the «OS type» field, select Windows; in the «Station type» field, select «Cash station». Save the changes.
- Add a video driver on the «Drivers» tab (right-click) -> Drivers list -> Videodriver -> Windows Video Driver (Window Mode). Set the station as active and save the changes.
Connect a printer to the cash station. In the «Printer destinations» field, select a printer for bills and receipts.
 If the «Printer destinations» field is inactive, it means that printers have already been assigned at the restaurant level.
In Wincash.ini, specify the following parameters in the [Config] section:
Station = RK7CASH3001_01 ; the cash station network ID, according to item 1 Server = MIDSRV3001 ; the cash server network IDDELPHILaunch the cash station — use Wincash.bat.
Cash station INI file parameters
[Config] — the main section
In the case of a server at the cash register, the server parameters are also specified here.
Station = RK7CASHDOS3001_01 ; the station network ID

Server = MIDSRV3001 ; the cash server network ID

ERRORLOG = cash.stk ; the log file

DEBUGKBD = 1 ; the keyboard without key bindings, debug mode, Windows-specific by default

NoGradButtons = 0 ; at 1, all gradient buttons are displayed in 3D

NoSetSysTime = 0 ; do not set system time based on server (not recommended)

ShortTimeout = 20000;

LongTimeout = 100000; the maximum time of network operation execution over a collection
DriversPath = ("") ; the path for driver search (except for the current folder). It should not match the current directory

TempFilesPath = ("") ; the path, where the hall layouts are stored (with enabled caching). If left empty, this is a temporary Windows path

SimulateMCR=M ; when Ctrl+Alt+M is pressed at the cash register, the MCR algorithm simulation window opensFor solving the paybindings.uni duplication problem, the following settings are provided:
NoUdbPacketMode ; disable the batch mode when writing into work.udb. Implemented in 7.5.5.095, 7.5.6.037, 7.5.7.011

NoReuseUNI ; disable the reuse of UNIs released during the order calculation. Implemented in 7.5.5.095, 7.5.6.037, 7.5.7.011

ExceptOnCheckUNIFor solving the problem of terminating the console tasks execution after clicking them:
UseConsoleOutput=1 ; can take the value of 1 or 0. 1 — console output enabled, 0 — disabled. Version 7.6.4.186 and higher only.

[UPDATE]

NoUpdate = "1" ; Do not update this module and its dependent objects (dll, etc.).

[NETKERN] ; possible protocols are: nbhdup.dll, SPXSOC.dll

Protocols=.\TCPSOC.dll

[TCPSOC]

LISTEN=0

[TCPDNS]

MIDSRV3001 = 127.0.0.1:2350 ; an optional parameter; hovewer, if it is set, the connection will be faster. It should be specified if broadcast messages cannot pass.Display configuration
The image displayed at the cash register can be configured in the cash station properties.
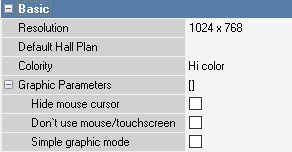
Here, you can configure the following:
- Colority
- Resolution
- Whether to show the mouse cursor
- Disable mouse and touchscreen
- etc.
Connecting external devices to the cash station
Below, some summarized information is provided for understanding the principles of connecting external devices (printers, fiscal registers, scales, barcode scanners, etc.) to the cash station.
Almost every data input device in the manager station is physically and logically connected to a port — either the COM or the Print to TCP/IP.
Thus, you should proceed as follows:
- First, connect the device physically. If it is a connection via the COM port, you should find out the port number.
- At the manager station, in the «Service – Stations and Devices» reference, add a port from the list of drivers to the device tab of the cash station (I/O port = COM for Windows). Specify the port number in the «Device Name = COMX» property, where X is the port number.
- Assign the required device from the driver list (f.ex., a printer from the «Printer» group) to the selected port by drag-and-dropping it from the driver list to the required port. Before linking, a connector icon appears against the port, where the device is connected to.
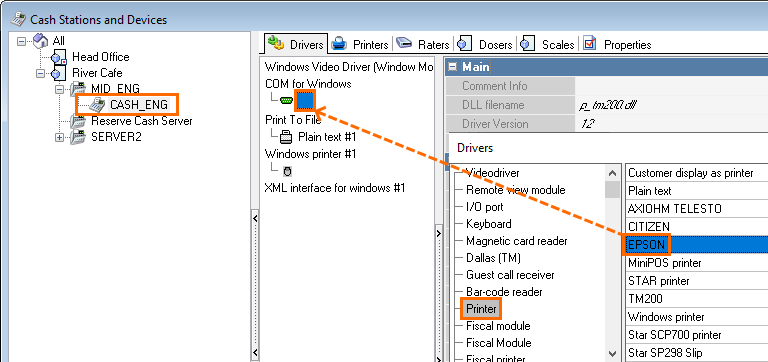
- Then, the system will suggest you adding a logical «Printer» device, which will further take part in the bill and receipt printing configuration. Click OK.
Make the logical printer active, and rename it (optionally). Logical printers are listed on the «Printers» tab. The link with the printer driver from the «Devices» tab is specified in the «Basic – Module» field.
 Multiple logical printers can have the same module. This feature can be useful in further operation, f.ex., for separating the printing of different document types at the same cash register.
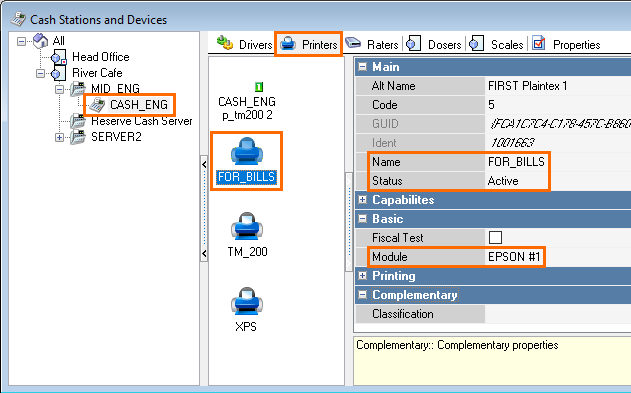
- Do not forget to save all the changes.