Setup of MenuBoard
Introduction
Files
The distribution kit is available at FTP: ftp://ftp.ucs.ru/rk7/INSTALL/RK7_MenuBoard/
We also recommend getting familiar with the user manual: ftp://ftp.ucs.ru/books/menuboard_RK7_user_manual.pdf
Requirements
Video card — VGA Matrox M9140 512MB or compatible, with 4 video outputs
CPU — Intel Core i5
RAM — 8 GB
HDD — 250 GB
OS — Windows 7 Pro
M\B — enough free PCI-E ports intended for video cards connection. Calculated as 1 card (4 monitors) per 1 port. An extended desktop is used.
Output panels (TV): LCD panel, width 1920x1080 FullHD, DisplayPort, HDMI
Some details of the hardware requirements are described on the tracker: http://tracker.ucs.ru:8080/redmine/issues/36015?tab=history_comments.
The MenuBoard technology is supported starting from version 7.5.2.3XX for local use, i.e. when a reference server is available for connections locally at the restaurant.
In the case of a chain restaurant, if only the reports server is available for connections, MenuBoards operate with version 7.5.3.ХХХ.
MenuBoard Setup for Single Restaurant
Executing MenuboardCreate.sql Script
In the base powered by MS SQL server, tables and procedures are created with the use of the MenuboardCreate_1.0.7.sql script. Do not forget to specify the name of your base: USE [DB_name], f.ex., USE [rk7]. The script can be executed in SQL Server Management Studio. Execute the script on the current RK7 database, used by the restaurant reference or report server.
At the moment, it is impossible to upgrade from version 1.0.7.0+ to 1.0.9.0+ so far. The possible solution is to delete SQL tables with the "MB_" prefix and then recreate them using the MenuBoardCreate 1.0.9.0.sql script, available at FTP:ftp://ftp.ucs.ru/rk7/INSTALL/RK7_MenuBoard/MenuBoard 1.0.9/. Please, note that the previous plugin configurations will be lost.
Configuring and Launching Common Server
Download the distribution kit from FTP ftp://ftp.ucs.ru/rk7/other/UCS_CS/CSSetup.exe and install Common Server.
The address and port, requested when installing the Common Server, should be available on the PCs running the Feature Server. Later, you will be able to change the server port in its INI file — CS_Service.ini in the Common Server installation folder.
Configuring and Launching High-Level Feature Server
FS_High_Level.exe or high-level Feature Server is required for the plugin operation at the manager station.
The server working directory is FS_high_level. It is located in the MenuboardFS_1.0.7.2.zip archive.
In this folder, edit FS_high_level.ini and MSSQL_FS.udl, and only after that launch the FS_high_level.exe file.
Example of FS_high_level.ini:
[FS_CONNECTION]
url = http://127.0.0.1:8890/soap/IStructuresInfo
urlSSL =
start_port = 8890
DB_Connect_Count = 2
[CS_CONNECTION]
url = http://192.168.1.1:7007/soap/UCSCommonWS
urlSSL = FS_high_level.ini parameters description:
[FS_CONNECTION] section, URL or URLSSL parameter — here, specify the high-level Feature Server address, which will be registered at the Common Server depending on the selected connection type.
[FS_CONNECTION] section, start_port parameter — here, specify the port, which will be used for the Feature Server operation.
[CS_CONNECTION] section, URL or URLSSL parameter — here, specify the Common Server address.
If the Feature Server is installed on another PC as compared to the Common Server, this address should be visible for the Common Server.
Editing MSSQL_FS.udl
In the MSSQL_FS.udl file, configure the connection to the r_keeper 7 database for the SQL Server.
Double-click or use Notepad to open this file and set the following parameters:
User ID=(user_name); Password=(password); Initial Catalog=(database); Data Source=(server_IP_address), (server_port)\(server_name)To find these parameters at the manager station, go to Service > Data Export > External Database Configurations.
FS_high_level.exe should be launched only after FS_high_level.ini and MSSQL_FS.udl have been edited!
Configuring and Launching Low-Level Feature Server
The working directory of FS_Low_Level.exe is FS_low_level. It is located in the MenuboardFS_1.0.7.2.zip archive.
Editing FS_low_level.ini
Example of FS_low_level.ini file:
[FS_CONNECTION]
url =  http://127.0.0.1:8891/soap/IStructuresInfo
urlSSL =
start_port = 8891
FSGuid={7BF6D21E-1D1D-4DB2-A877-DB047028B212}
[CS_CONNECTION]
RemoteURL = http://192.168.1.1:7007/soap/UCSCommonWS
RemoteURLSSL =
LocalURL = http://192.168.1.1:7007/soap/UCSCommonWS
LocalURLSSL =
[XMLInt]
RefServAddress = 127.0.0.1:18881
CashServAddress = 127.0.0.1:17771
CashServPassword=
RestaurantCode=39
StationCode = 1
ImageForMissing = image_for_missing.pngFS_low_level.ini parameters description:
[FS_CONNECTION] section
url=http://127.0.0.1:8891/soap/IStructuresInfo or URLSSL — the address, which will be used for the selected Feature Server registration at the local Common Server.
start_port=8891 — the port, which will be used for the selected Feature Server operation.
If the Feature Server is installed on another PC as compared to the Common Server, this address should be visible for the Common Server.
FSGuid — the unique identifier of the selected server intended for client requests.
[CS_CONNECTION] section
RemoteURL=http://192.168.1.1:7007/soap/UCSCommonWS or RemoteURLSSL — the Common Server address at the head office, where the low-level server will connect to in order to retrieve settings if the high-level and low-level servers are running on different PCs.
LocalURL=http://192.168.1.1:7007/soap/UCSCommonWS or LocalURLSSL — the Common Server address at the local restaurant, where the selected Feature Server should register. For a single restaurant with one CS, it matches the previous RemoteURL.
Example: the PC, where the MenuBoard application is launched, can have no access beyond the restaurant network. MenuBoard requests the settings from the local CS via LocalURL, where the LowFS is functioning. The LowFS, in turn, requests the settings from the remote CS via RemoteURL, where the High_FS is running. Technically, if such access separation is not required, LocalURL and RemoteURL can be identical, i.e. you can use a single common CS.
[XMLInt] section
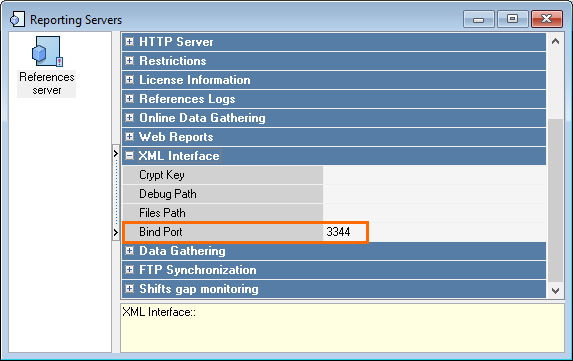
RefServAddress=127.0.0.1:18881 — specify the address:port of the reference server XML interface. You can check the XML interface functionality with the utility from FTP: ftp://ftp.ucs.ru/rk7/ForDealers/XMLInterface/. Find the port in the reference server properties at the manager station. Starting from version 7.5.3.214, you can specify the cash server address:port for this parameter instead of the address and port of the reference or reports server.
CashServAddress=127.0.0.1:17771 — specify the address:port of the cash server XML interface. You can check the XML interface functionality with the untility from FTP: ftp://ftp.ucs.ru/rk7/ForDealers/XMLInterface/. Find the port in the cash server properties at the manager station.
RestaurantCode=39 — specify the code of the restaurant for which FS should retrieve settings from the head office and the cash server. It is the Code property from the r_keeper 7 manager station, not to be confused with the full code.
StationCode=1 — specify the code of the station for which you will retrieve the list of dishes, prices, current business period, etc. via the XML interface. Find the value in the Code property from the r_keeper 7 manager station.
ImageForMissing=image_for_missing.png — specify the image that will be used for dishes with missing images. The file should be located in the folder containing dish pictures, specified at the manager station.
Now, you can launch FS_Low_Level.exe.
Before the server startup, make sure that the reference server and the cash server have been launched.
Manager Station Settings
- Copy the plugin to the manager station:
- In the manager station folder, create the plugins folder and unzip the MenuboardPlugin_1.0.Х.zip archive there, keeping the file structure.
- In the menuboard_settings.ini file, under the [CS_CONNECTION] section, specify the Common Server address for the WSDL parameter, f.ex.: WSDL=http://192.168.1.1:7007/soap/UCSCommonWS.
menuboard_settings.ini should be located in the plugins\menuboard_settings folder, while menuboard_settings.dll — in the plugins folder. Add the XML interface to the Devices tab for the cash server, and specify the port. Then, link this interface to the logical interface.

It is recommended to create the new interface for MenuBoard as a copy of the pre-installed XML interface in the Service > Interfaces reference.
To imply the changes, restart the cash server!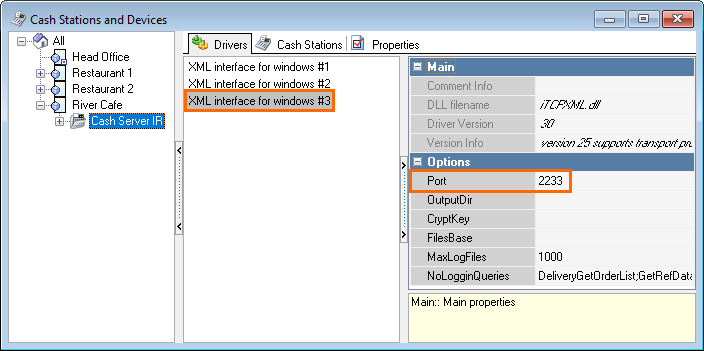
Specify the port for the reference server XML interface.
Specify the path to the images folder in r_keeper 7 parameters in Options > Parameters > Installation > Large images path. Place the dish images in the .png format and the image_for_missing.png file for those dishes without an image into this folder.
Enable the following parameter: Options > Parameters > Options usage > Self-Service/Web Orders.
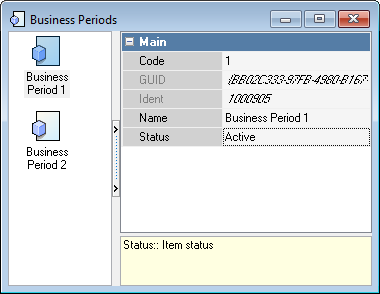
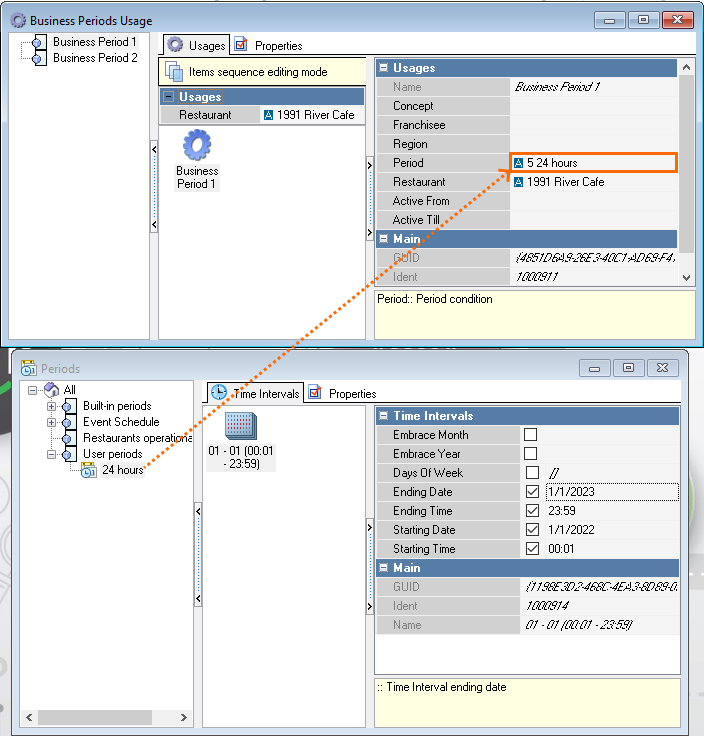
Go to Options > Head office > Business periods and create business periods. Configure the business periods usage and, if necessary, time intervals in the Order > Periods reference.
Prior to performing the following operations, make sure that the Common Server and both Feature Servers, HIGH and LOW, have been launched.
Go to Extensions > MenuBoard configuration, and configure the required MenuBoard display variants in the plugin.
Create a new setting by right-clicking the plugin configuration tree and selecting Add setting.
On the Basic Properties tab, in the created setting properties, specify the coordinates of the desktop point, from which the screens with dishes will be drawn.
By default, the setting is created with a single screen. You can create additional screens: right-click the configuration tree and select Add screen. For each screen, coordinates, height, and width should be set. Each screen corresponds to a separate monitor connected to the video card.Configure the use of these variants for restaurants according to business periods in Extensions > MenuBoard using.

For detailed information about the MenuBoard configuration via the plugin, see the user manual:ftp://ftp.ucs.ru/books/menuboard_RK7_user_manual.pdf
Configuring and Launching MenuBoard (AIR application)
MenuBoard is an Adobe AIR application. Therefore, before the launch, you need to install Active-X components for Windows.
Unzip the contents of the MenuboardApp_1.0.7.6.zip archive and edit the Settings.xml file:
In the paths, use the forward slash — /.
<Application>

<Settings
WSDLServer = "http://192.168.1.1:7007/wsdl/UCSCommonWS"
ServiceName = "UCSCommonWSservice"
ServicePort = "UCSCommonWSPort"
FSGuid = "{7BF6D21E-1D1D-4DB2-A877-DB047028B212}"
RequestInterval = "10000"
AssetsDirectory = "D:/UCS/RK7_MenuBoard/MenuboardApp/assets/"
>

</Settings>
<Log
Enable = "0"
Size = "25000000"
Name = "log"
Dir = "D:/UCS/RK7_MenuBoard/MenuboardApp/Log"
>
</Log>
</Application>WSDLServer — the path to the local Common Server. The Common Server address should be available from your PC.
AssetsDirectory — the path to the folder containing design files. Usually, it is as follows: [the folder, where the archive contents have been unzipped]/assets/.
RequestInterval — the frequency of the settings update request, ms.
FSGuid — GUID of the required FS_low_level, might have been empty in early versions.
Launch MenuBoard.exe.
Design Files Synchronization Logic
- If everything is launched on the same local computer, the path in settings.xml should be as follows: [path to the plugins folder]/menuboard_settings/assets/.
In this case, when you select an image or a video for advertisement and gallery design at the manager station, these files are automatically copied to the Advert subfolder. - If the MenuBoard app is located on another PC, check the following:
- The path to the assets folder in settings.xml
- The assets folder should contain the Advert, Dish, Interface folders and their contents should correspond to the same folders in /plugins/menuboard_settings/assets/ for the manager station at the reference server
Then, create a directory according to the Path to the images folder parameter at the manager station, keeping the folder structure, and copy the dish pictures there without changing their names.
- Alternatively, the path in settings.xml can be random in both cases. The main requirement is that the folder should contain 3 subfolders — Advert, Dish, Interface — the contents of which correspond to the following: [path to the plugins folder]/menuboard_settings/assets/.
- If the MenuBoard app is launched on a remote PC, design files should be synchronized either individually, considering the folder arrangement logic mentioned above, or with the use of the Synchronizer utility from FTP: ftp://ftp.ucs.ru/rk7/INSTALL/RK7_XMLSecondScreen/Synchronizer.rar. Find the configuration description in ReadMe.txt in the archive.
Recommendations on Image Formats Use
- If you need a transparent background for dish images, use .png, if not — use .jpg
- Do not use .bmp, it may cause problems during the visualization and loading, since the files of such type are usually quite large
- The dish image size is ~1280 on the larger side. This is because such images can be used for advertising purposes
- The main background size is 1920x1080;
- Videos should have .flv (vp6) format, 1920x1080. High bitrate is not recommended.
MenuBoard operation principles for multiple restaurants

The implementation of MenuBoard operation in chain restaurants is possible only for RKeeper version 7.5.3.ХХХ and higher.
At the head office, the Common Server and FS_High_Level.exe should be installed and always launched. Moreover, you should correctly configure the MenuBoard usage variants for restaurants according to business periods.
The local restaurant should have a local Common Server and FS_Low_Level.exe installed and launched. Configure the reports server and the cash server XML interface. The head office Common Server address should be available on the PC running the FS_low_level.
Upon the MenuBoard (menuboard.exe) launch:
- The application requests the display data from the local Common Server, specified in settings.xml, and the latter redirects the request to FS_low_level
- FS_low_level, based on the settings from the .ini file and the current business period, forwards the request for settings to the head office Common Server
- The head office Common Server forwards the request to FS_high_level
- FS_high_level selects the design matching the specified restaurant and business period, and returns the result to the head office Common Server;
- The head office Common Server returns the obtained result to FS_low_level
- FS_low_level complements the received setting with current prices and dish images, acquired via the XML interface, and transmits the response to the local Common Server
- The local Common Server returns the relevant design setting to the MenuBoard, which displays it on the panel
- After the interval specified in settings.xml, the chain of actions repeats, since the settings might have changed.
After each request, FS_low_level saves the settings received from the head office along with the data acquired via the XML interface. Therefore, if the communication between it and the head office Common Server is interrupted, FS_low_level will provide the AIR application with cached data.
If graphical design files change at the head office, you should synchronize the assets folder at the head office and at every restaurant.
In the case of making all settings on a single PC, there can be one Common Server, but the Feature Server ports should not match.
r_keeper 7 should be configured for online sales data collection for the purpose of discount calculation.