r_keeper 7 XML Interface
Introduction
The XML interface is the most convenient way of getting information about the r_keeper 7 system and saving data in the r_keeper 7 databases, as well as performing different operations.
There are three kinds of interfaces in r_keeper 7:
- For cash stations
- For cash servers
- For reference or report servers.
Each type of interface supports a different set of commands.
The XMLinterface enables the following:
- Viewing data from references and collections — true for all kinds of interfaces
- Creating new reference elements and editing the attributes of existing ones — true only for reference servers
- Getting information on current orders, creating and managing existing orders, performing any cash register operations — only for the cash server
Examples of operations: - Close common shift
- Report printing.
The overall interaction scheme is given below: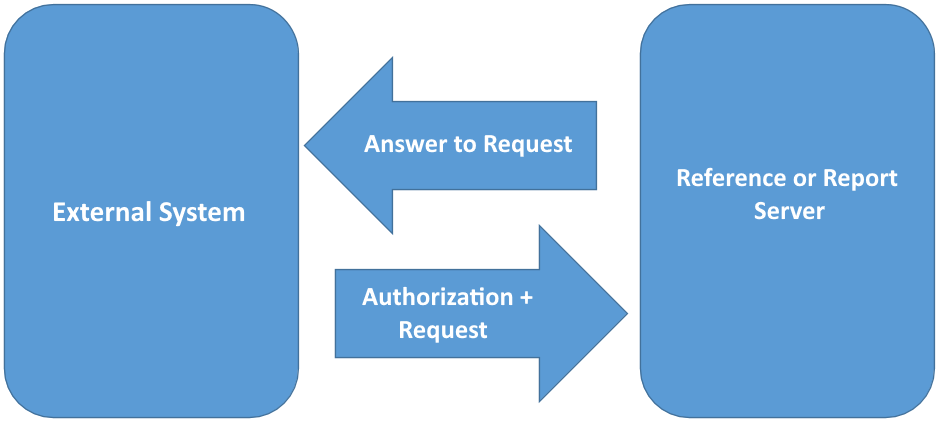
Such software products as Mobile Waiter, sellf-service Kiosk, Kiosk PRO, etc. operate based on the XML interface.
Possibilities of Reference Server Interfaces
- Viewing reference elements
- Editing the attributes of existing reference elements
- Creating new reference elements.
They are usually used for the following:
- Integrating with the restaurant's website – unloading the menu
- Unloading the menu, prices, and other parameters to an external delivery service
- Unloading the range to external accounting systems, for example, 1C
- Unloading the menu, prices and other parameters to the reference server.
Possibilities of Cash Server Interfaces
- Reading the references
- Reading the information on current orders
- Creating and editing orders
- Performing cash register operations.
They are usually used for the following:
- Integrating with the restaurant's delivery service – the full cycle from creating an order to payment
- Integrating mobile apps, self-service, delivery systems, etc.
- Monitoring the current sales status and other issues
- Integrating with loyalty programs
- Integrating with video surveillance systems.
Possibilities of Cash Station XML Interface
- Adding a dish to an open order
- Viewing the items that are part of an open order at the cash station
- Performing cash register operations — swiping the card, requesting card information
- Paying for the current order.
Licensing
There are two options for licensing the XML interface:
- LifeTime — RKeeper 7 Write XML Order — a license is purchased once for a specific object and does not imply any restrictions on requests within this object.
After purchasing a license, you need to generate a license key and add it to the restaurant properties in the manager station - Subscription based — a license for the integration of external applications for 1 or 12 months. SaveOrder, PayOrder, MakeRetunGoods requests must be signed and verified by the licensing system. For more information, see Using XML Interface by Subscription.
Methods of Data Exchange with XML Interface
There are two ways to exchange data with the XML interface:
- Using the HTTPS protocol — available from r_keeper version 7.05.03 and later
- Using rk7xml.dll — in this case, you need to add an XML interface to the cash server, data exchange will be performed through the port specified in the server properties. To test the process, you may use the special utility XMLTEST.exe. Read more about the settings below in the Configuring XML Interface Using rk7xml.dll section.
Configuring XML Requests Work via HTTPS
Using HTTPS for XML requests is possible only for r_keeper version 7.05.03 and later.
In the manager station, you need to configure access to the cash server via HTTPS. To do this, you need to create a worker with the appropriate privilege. Current versions of r_keeper have a pre-installed HTTPS Access right created specifically for this purpose, and we recommend using it.
If you already have a role and an employee with the HTTPS access privilege, you just need to give access to the cash server. To do this:
- Go to Service > Stations and Devices
- Select a required restaurant and go to the cash server
- In the server properties:
- Specify a free port in the HTTP Data Port field. Optionally, enable the Use Free Listen Port setting to make the server choose a different port when the port specified in the HTTP Data Port property is busy.
- In the HTTP Rights section, select the HTTP Access privilege in all fields

- Save the changes
- Restart the cash server.
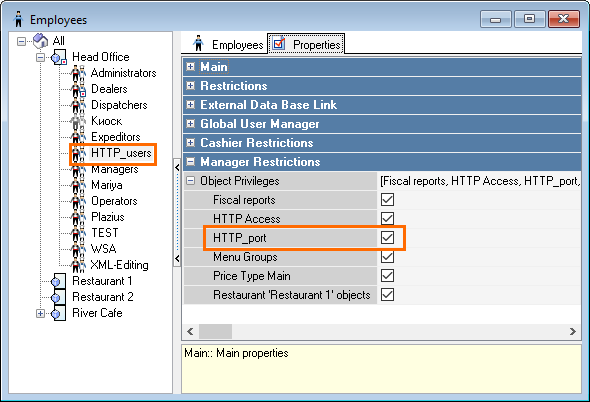
If you need to create a separate privilege and role with HTTPS access right, click below.
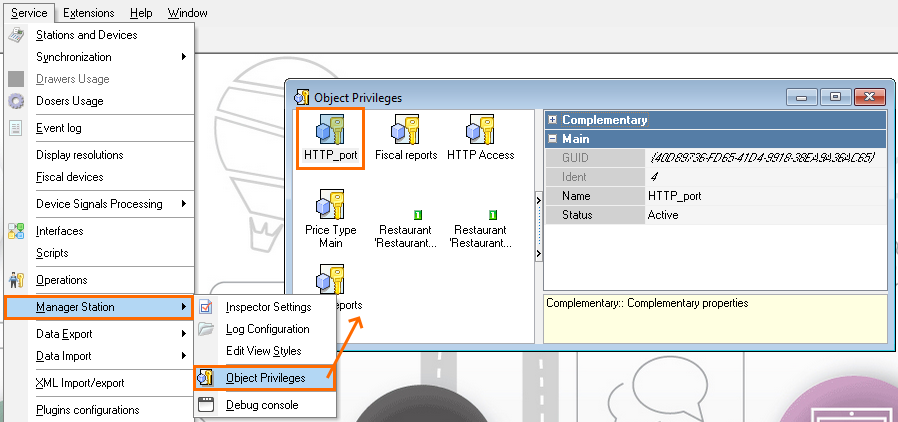
- Go to Service > Manager Station > Object Privileges
- Add a new privilege, for example HTTP_port
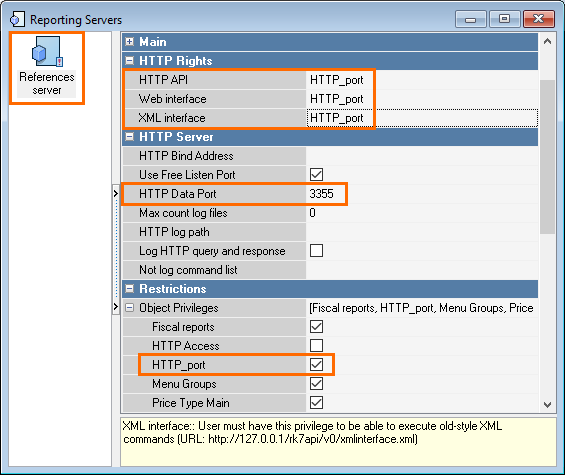
- Go to Options > OLAP Reports > Reporting Servers
- Select the required reference server
- In the server properties:
- In the HTTP Server section, find the HTTP Data Port field and enter a free port.
Check the Use Free Listen Port box to make the program select a different port when the port specified in the HTTP Data Port property is busy.
To access the web interface of this server, you can use:- The port specified in the reference server properties in the manager station — HTTP Data Port
- The port specified in the [TSPSOC] section of rk7srv.ini — the port parameter
- In the HTTP Rights section, select the created privilege in all fields
- In the Restrictions section, include the created privilege in the object privilege
- In the HTTP Server section, find the HTTP Data Port field and enter a free port.
- Save Changes
- Restart the server
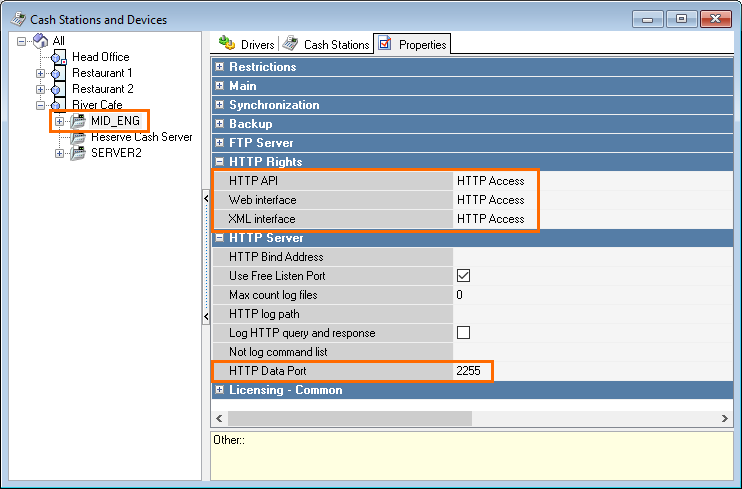
- In the manager station, go to Service > Stations and Devices
- Select a required restaurant and go to the cash server
- In the server properties:
- In the HTTP Server section, find the HTTP Data Port field and specify a free port.
Enable the Use Free Listen Port setting to make the program select a different port when the port specified in the HTTP Data Port property is busy.
To access the web interface of this server, you can use:- The port specified in the reference server properties in the manager station — HTTP Data Port
- The port specified in the [TSPSOC] section of rk7srv.ini — the port parameter
- In the HTTP Rights section, select the created privilege in all fields
- In the HTTP Server section, find the HTTP Data Port field and specify a free port.
Create a role with rights to the created privilege

When authorizing HTTPS requests, only the roles of the current restaurant and the head office are used.
- For the created role, add an employee, set a password for him.
The name and password of this employee will be used for authorization on the server via HTTPS.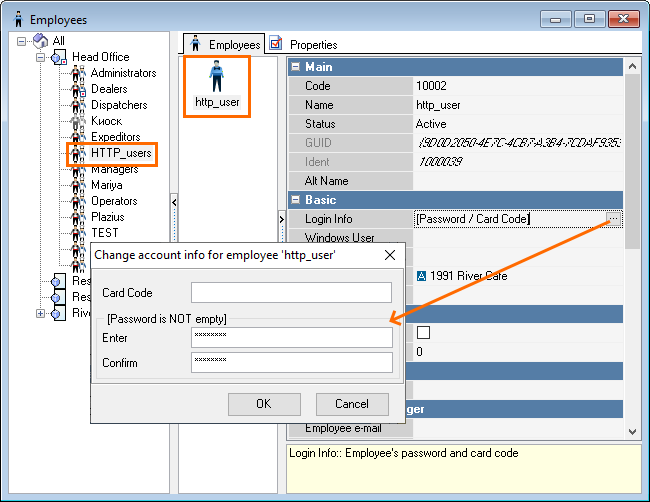
Requests to the cash server should be sent to the following URL:
https://*IP:HTTPDataPort*/rk7api/v0/xmlinterface.xmlYou need to specify your own IP:HTTPDataPort.
To access the interface, you need to send a login and password — the name and password of an employee — of the Basic Authorization type when sending each request.
Data exchange with the cash server should be performed in UTF-8 encoding.
Testing XML Interface with Built-in Utility
To test the XML interface via the HTTPS interface:
- Visit https://ip:port/webgui/iserxmltest.htm. For example, https://127.0.0.1:13665/webgui/iservxmltest.htm
- Enter the login information of the created employee: the username and the password
- Enter the text of the XML request to execute
- Click the Execute button
The result should be like the picture below: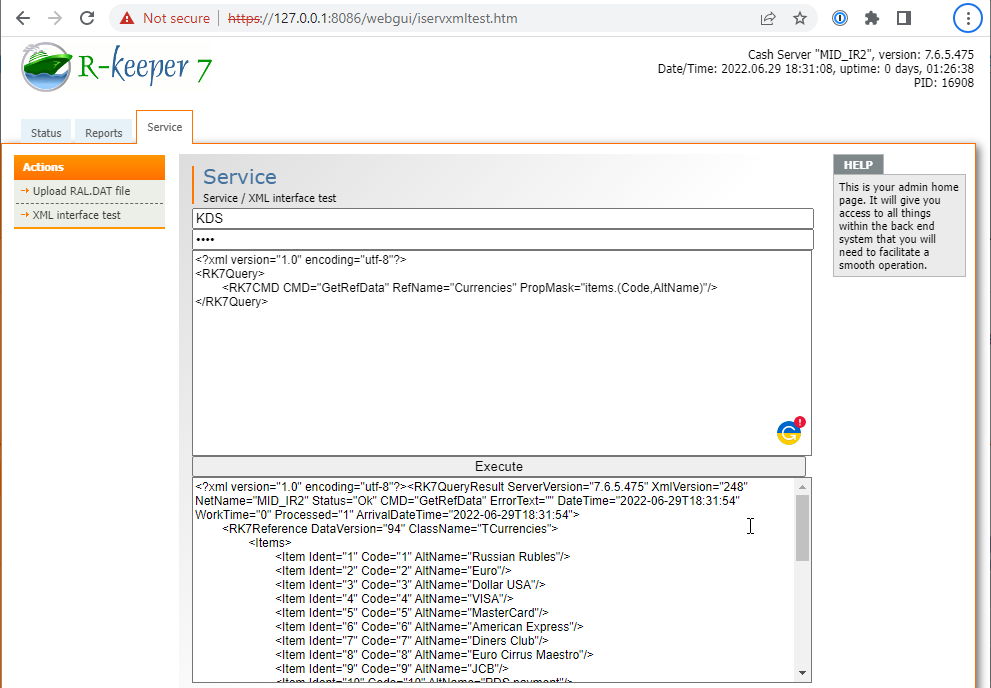
Authentication and Request Execution
For authentication and authorization, the name and the password of the employee from r_keeper 7 are used.
The WEB interface at the time of this writing has the following limitations:
- New WEB interface: https://ip:port/webgui/, for example: https://ip:port/webgui/index.htm
- API version 0 — the XML interface and r_keeper 7 internal procedures: https://ip:port/rk7api/v0, for example: https://ip:port/rk7api/v0/xmlinterface.xml
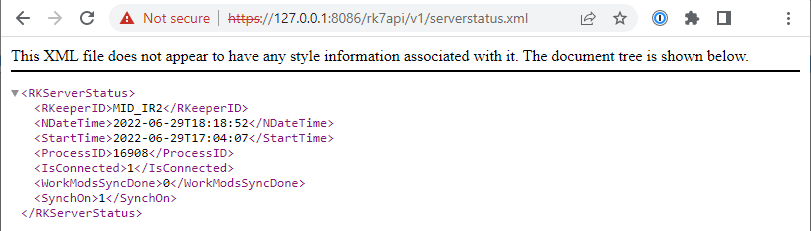
- API version 1 — new functions for interacting with r_keeper 7: https://ip:port/rk7api/v1, for example: https://127.0.0.1:13665/rk7api/v1/serverstatus.xml
After specifying the right and assigning it to the corresponding role, you can check the correctness of the settings by opening the corresponding pages in the WEB interface.
Enter one of the variants in the address bar, an authorization window will appear — enter the employee's name and password. Please note that you need to enter your own IP and port.
- The WEB interface is available at: https://ip:port/webgui/
- https://ip:port/rk7api/v1
- https://ip:port/rk7api/v0

Executing Request via wget
An example of making a request using the wget utility:
wget.exe --secure-protocol=TLSv1 --no-check-certificate --header="Content-Type: text/xml" --http-user=9006 --http-password=9006 --post-file=requestData.xml https://127.0.0.1:20001/rk7api/v0/xmlinterface.xmlRequest parameters:
- User: --http-user=9006
- Password: --http-password=9006
- Request file: --post-file=requestData.xml
After executing such a request, its result will be saved to the xmlinterface.xml file.
Configuring XML Interface Using rk7xml.dll
Attention!
This way of interacting with the XML interface is not recommended due to lack of authorization.
The XML interface works via the iTCPXML.dll driver. When working with the XML interface via rk7xml.dll, in addition to the settings described above, you must manually add the interface to the cash server:
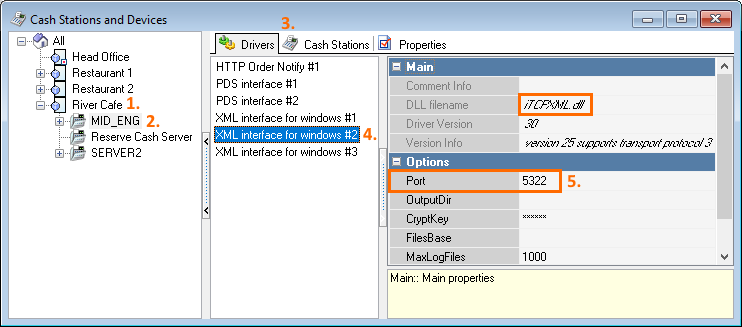
- Go to Service > Stations and Devices
- Select a required restaurant and go to its cash server
- On the Drivers tab, add the XML Interface For Windows driver
- Write the port in the Port parameter
- Bind the added interface to a logical interface in the Service > Interfaces reference.
By default, the system already has a pre-installed XML interface with code 104. For each external application, you can make a copy of this interface and bind it with the driver on the cash server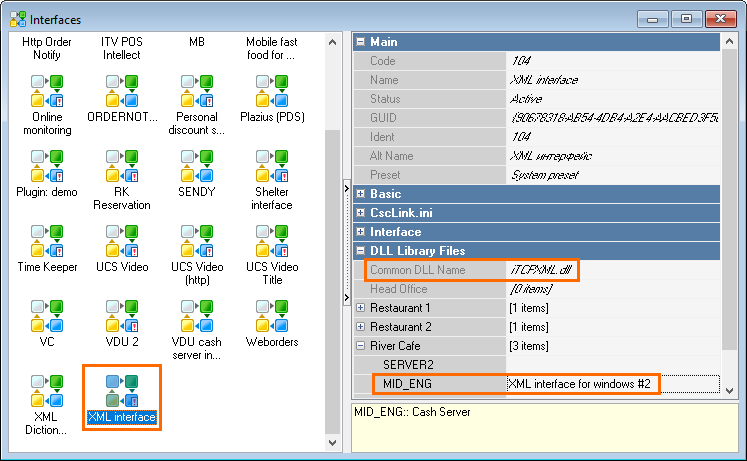
- After binding the interface, restart the cash server. Check that the interface is loaded in the cash server properties
- Start the cash server with the /desktop parameter and open its interface by double-clicking on its tray icon.
The loaded interface should be visible on the Interfaces tab - Functions are called via RK7XML.dll, an interface module:
- CallRK7XMLRPC function
Parameters:- AddressName — address:port
- Request — XML request
- RequestSize — XML request length
- ResultFile — the name of the file where the result is written
- ErrorBuf — the place where connection errors are written
- ErrorBufSize — ErrorBuf size
- CallRK7XMLRPCToStream function — similar to the function above, but its result is written to the IStream stream
Parameters:- AddressName — address:port
- Request — XML request
- RequestSize — XML request size
- ResultStream — IStream — the stream where the result is transferred
- ErrorBuf — the place where connection errors are written
- ErrorBufSize — ErrorBuf size
- The SetUseTempFileLimit function sets the file size limit if the result return time exceeds the threshold. The default value is 1000000ms
- GetDLLVersion function — returns the DLL version
- SetCryptKey function — sets the encryption key. It can be different for different cash servers, it is specified in the properties of the XML interface.
- CallRK7XMLRPC function
The current protocol version 2 assumes control over the execution of commands by the server. In the previous version, it was impossible to know if the last request is completed in case there was a disconnect after the request started processing.
For this purpose, now there are new functions — GetLastXMLResult and GetLastXMLResultToStream. If the response could not be sent after the request was completed, it is stored on the server until a special request is made when calling these functions or until the next request. If the response was successfully sent, it is not stored on the server. In any case, you can always find out the number of the last executed request for a particular ConnectName.
ConnectName — an arbitrary Null-terminated string, a connection identifier
RequestNum — a sequential number of the request, maintained for each connection identifier separately. You must pass 0, otherwise the passed request number will be used.
function CallRK7XMLRPC2(AddressName: PChar; ConnectName:PChar;
Request: PChar; RequestSize: integer;
var RequestNum: DWord; //round trip. If 0, then generated by the server.
ResultFile: PChar;
ErrorBuf: PChar; ErrorBufSize: integer):BOOL;stdcall;
function CallRK7XMLRPCToStream2(AddressName: PChar; ConnectName,
Request: PChar; RequestSize: integer;
var RequestNum: DWord; //round trip. If 0, then generated by the server.
ResultStream: IStream;
ErrorBuf: PChar; ErrorBufSize: integer):BOOL;stdcall;
function GetLastXMLResult(AddressName: PChar; ConnectName:PChar;
out RequestNum: DWord; //always returns the number of the last executed request
ResultFile: PChar; //result is filled if there was a result data transmission error, after successful transmission it is cleared
ErrorBuf: PChar; ErrorBufSize: integer):BOOL;stdcall;
function GetLastXMLResultToStream(AddressName: PChar; ConnectName: PChar;
out RequestNum: DWord; //always returns the number of the last executed request
ResultStream: IStream; //result is filled if there was a result data transmission error, after successful transmission it is cleared
ErrorBuf: PChar; ErrorBufSize: integer):BOOL;stdcall;Testing XML Requests with TESTXML.exe
To check the request when using rk7xml.dll, use the XMLTEST.exe utility, which can be downloaded from the link or from the FTP server at: ftp://FTP.ucs.ru/rk7/ForDealers/XMLInterface/.
Please note that when run without parameters, the utility displays usage information:
xmltest.exe 127.0.0.1:1122 xmlquery.xml response.xml /pass:passwordParameters description:
- 127.0.0.1:1122 — IP address and port to which the XML interface is configured in r_keeper 7
- xmlquery.xml — file name with XML request
- response.xml — the name of the file where the response should be written
- /pass:password — the password set in the XML interface in r_keeper 7
After execution, the utility will save the response from the r_keeper 7 XML interface to the response.xml file. To check the functionality and correctness of the settings, you can use the following query, which should be saved to the xmlquery.xml file:
<?xml version="1.0" encoding="UTF-8"?>
<RK7Query>
<RK7CMD CMD="GetSystemInfo"/>
</RK7Query>For convenience, there is a utility with a graphical interface TestXML.zip.
Request Logging
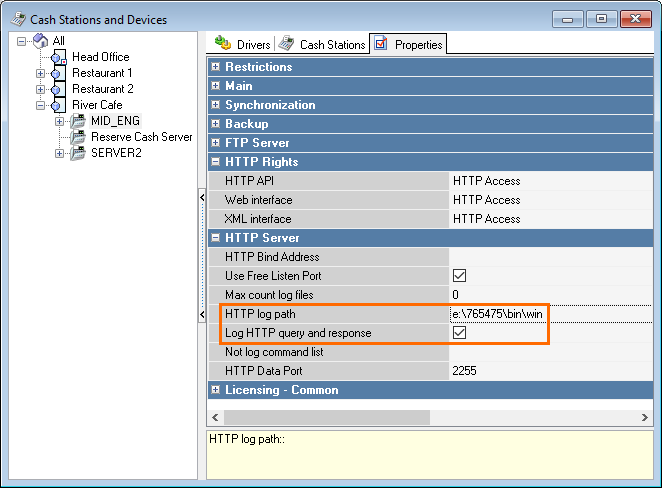
- Go to Service > Stations and Devices
- Select a required restaurant and go to its cash server
- In the cash server properties, in the HTTP Server section, specify the HTTP Log path and check the Log HTTP query and response checkbox:
- Go to Service > Stations and Devices
- Select a required restaurant and go to its cash server
- On the Drivers tab, select one of the XML Interface For Windows drivers
- Expand the Options section and fill in the OutputDir parameter
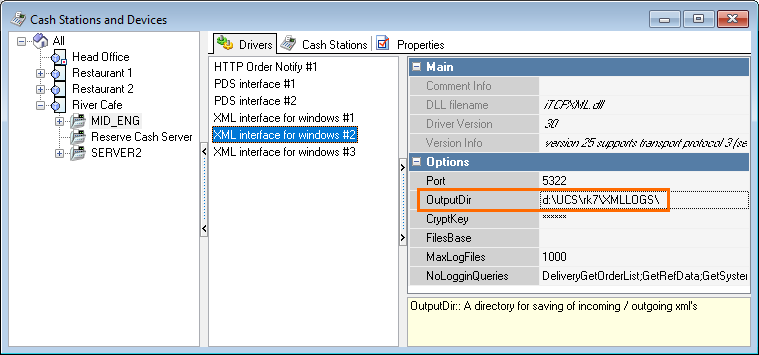
Be sure to restart the cash server after the changes have been made.
Requests will be paired — INxxxxx.XML and OUTxxxxx.XML.
Additionally, you can enable the NoLogginQueries parameter — it is responsible for disabling logging of the queries specified in the parameter. Specify the required requests in the field.