...
- Open Windows Features:
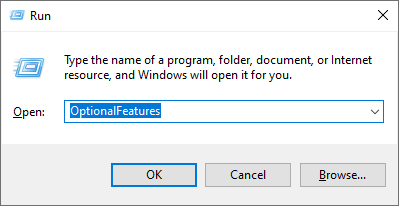
- For Windows 10: press Win+R and enter OptionalFeatures in the window and click OK
- For earlier Windows versions: Start > Control Panel > Programs > Turn Windows features on or off.
- For Windows 10: press Win+R and enter OptionalFeatures in the window and click OK
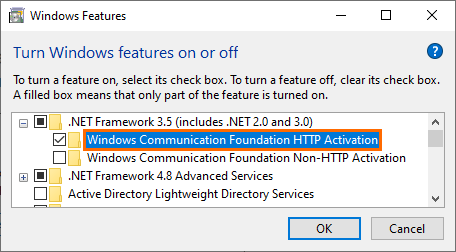
- Enable Windows Communication Foundation HTTP Activation.
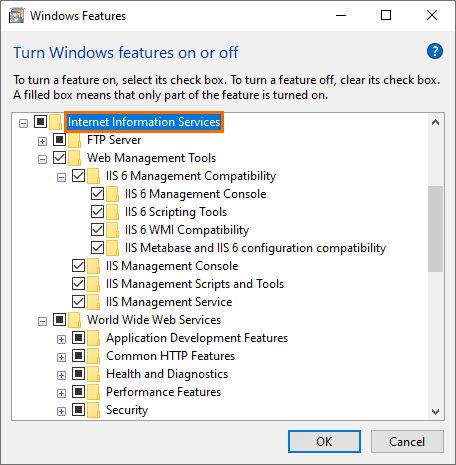
- Then, enable all the Internet Information Services.
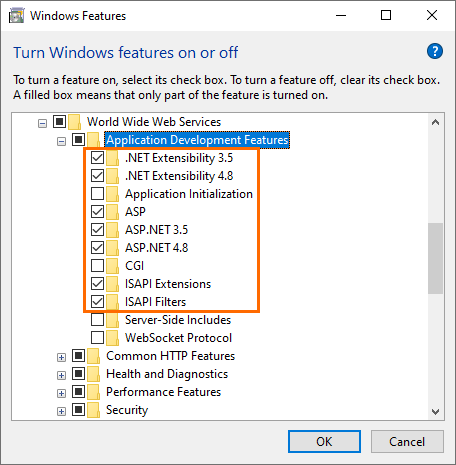
- Be sure to enable the following components of Application Development Features:
- .Net Extensibility
- ASP
- ASP.NET
- ISAPI Extensions
- ISAPI Filters
- Click OK. Let the system download the files if needed.
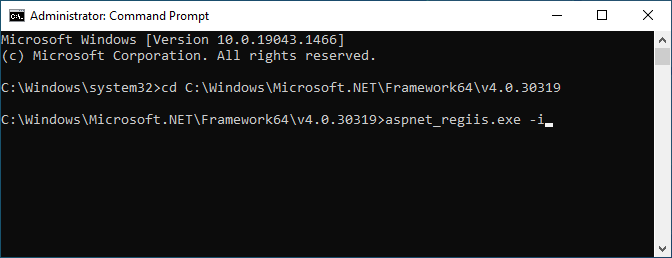
- Now, you need to register IIS for ASP.NET. You can do it using aspnet_regiis.exe registration program. It is located in the NET Framework 4.0 folder, the usual path is: C:\Windows\Microsoft.NET\Framework64\v4.0.30319. See more details on the program on the official site.
Run aspnet_regiis.exe via the Command Prompt with the -i parameter.
2.2.4 IIS registration for ASP.NET
With the use of registration program (aspnet_regiis.exe), available in the NET Framework 4.0 folder (usually, C:\Windows\Microsoft.NET\Framework64\v4.0.30319).
(You can also get familiar with it here: http://msdn.microsoft.com/ru-ru/library/k6h9cz8h(v=vs.100)).
For this purpose, launch aspnet_regiis.exe in the console with the specified parameter –i (see Fig. 5):
...
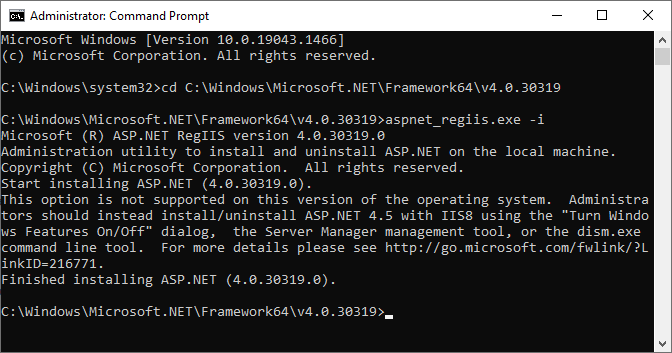
The following error may appear:
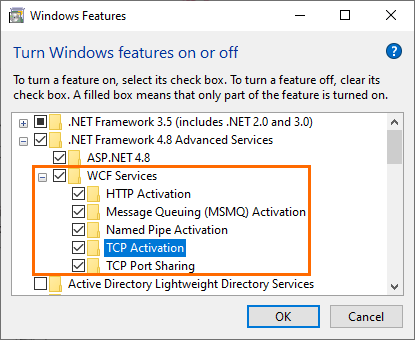
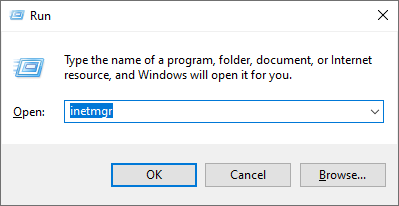
In this case, check all the boxes in the WCF services section in Windows Features.- Launch the IIS manager via the Run dialog: press Win+R, enter inetmgr and click OK
If an error appears (see Fig. 6), use the add role and component wizard under the "WCF services" section to select the checkboxes in accordance with Fig. 7.
Fig. 6. Error during writing
Fig. 7. Add component wizard
This is used when installing the selected ASP.NET version and updating the IIS configuration at the root level for the purpose of using this version of ASP.Net.
2.2.5 Launching the IIS services manager from the execution dialog
To do this, proceed as follows:
1) From the "Start" menu, select sequentially "All programs", "Standard" and "Execute".
2) In the "Open" field, enter "inetmgr", and click "OK" (see Fig. 8).
...
- In the IIS manager, the application pool should generate a
...
- new pool
...
- — UCS_AppPool
...
- and use the .Net Framework 4.0
...
- or
...
- later environment.
- If you need to install
Fig. 9. IIS services manager application pool
...
- Framework 4.0
...
Fig. 10. Installing Framework version 4 for IIS
2.2.7 Configuring compatibility settings
...
- or later, click on your PC name in the left panel. In the right-most menu, click Change .NET Framework Version and select the required version.
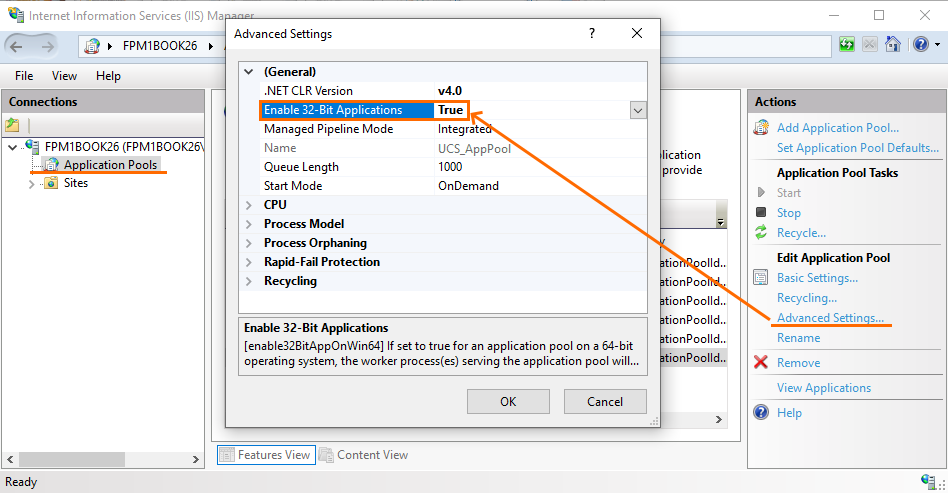
- If you have x64 OS, configure compatibility with 32-bit
...
- apps in the Advanced Settings of the pool
...
- .
- Make sure that UCS_AppPool
Fig. 11. Setting the 32-bit application compatibility flag
...
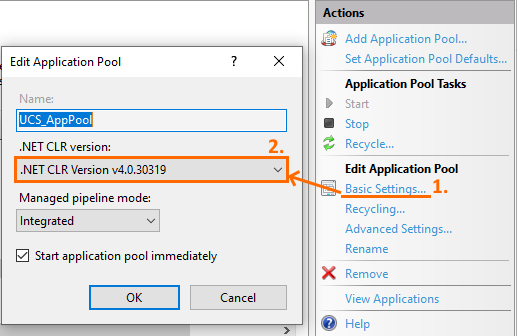
- also has Framework 4.0
...
(see Fig. 12)
Fig. 12. Verifying the Framework 4 installation
2.3 RK7 manager station settings
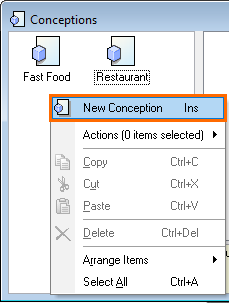
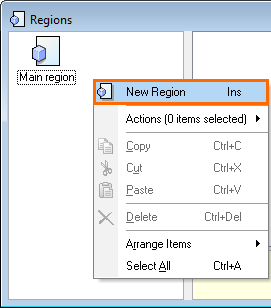
2.3.1 For the purpose of correct r_keeper_Dashboard widget functioning, concepts and regions should be configured on the RK7 manager station. For this purpose, specify concepts and regions in the "Settings" – "Head office" directory (see Fig. 13, 14).
Fig. 13. Creating a new concept
Fig. 14. Creating a new region
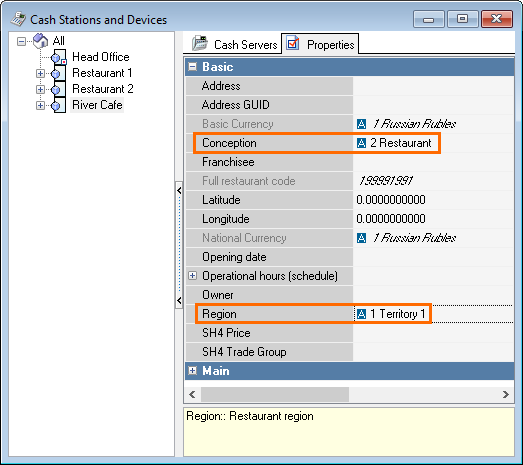
2.3.2 Specify created concepts and regions in the restaurant properties ("Service" – "Stations & devices" directory) (see Fig. 15).
Fig. 15. Region and concept in the restaurant properties
2.4 WebInterface installation steps
...
- or later set in the Basic Settings.
Manager Station Settings
For the r_keeper Dashboard widget to work correctly, configure conceptions and regions in the manager station. To do this:
- Go to Options > Head Office > Conceptions and create a new conception
- Open Options > Head Office > Regions and create a new region
- Go to Service > Stations and Devices and select the newly created conceptions and regions in the restaurant properties
WebInterface Installation
- Download the latest installer version from FTP: ftp://ftp.ucs.ru/rk7/other/
...
- webreports/
- Launch the WebReportsSetup.exe installer.
...
- Select the language to use during installation
...
Fig. 16.
...
- Accept the license agreement
...
Fig. 17.
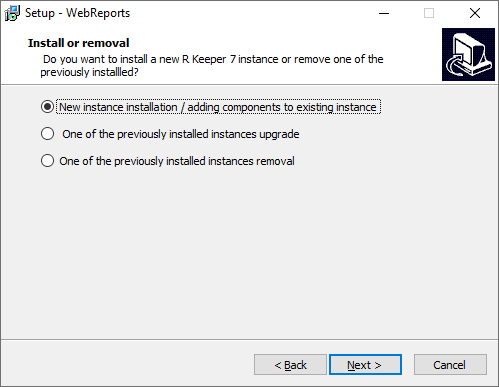
2.3 Select "Install":
Fig. 18.
2.4 Select the parent directory:
Fig. 19.
If you want to choose another folder, click "Browse", and the following window appears:
Fig. 20.
You can also assign another instance name:
Fig. 21.
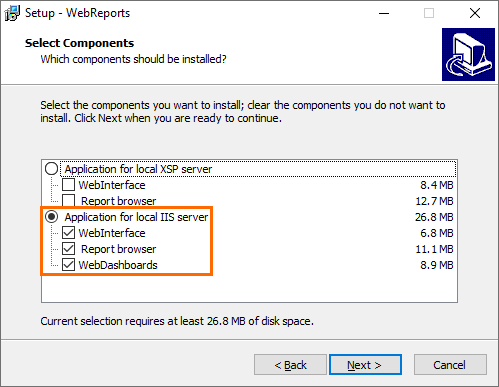
2.5 Select components (application installation for the IIS server):
Fig. 22.
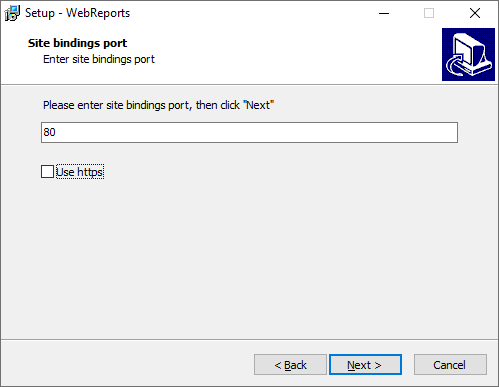
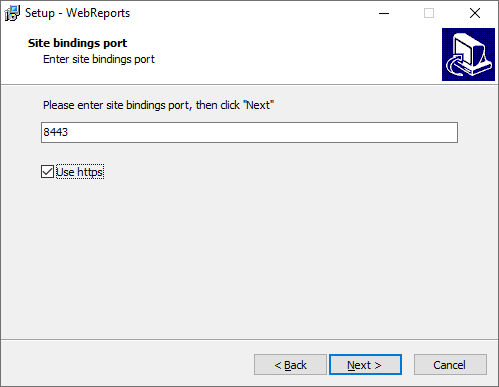
2.6 Set the website association port:
Fig. 23.
...
- Select New instance installation
- Specify the parent folder for WebReports instance and the instance name
- Select the Application for local IIS server components
Specify the site binding port
Note Do not use port 80 if Skype is run.
Check Use https box if you want to use a secure connection
...
Note: do not use port 80, if you have Skype running.
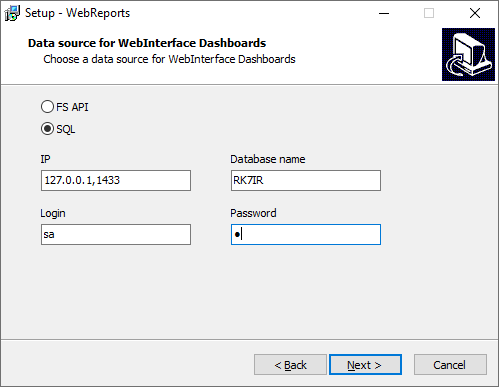
2.7 Select the data source:
Fig. 24.
"IP address" — the database location IP address;
"Database name" — the name of the database;
"Login" — the database login name;
"Password" — the database access password;
"Restaurant code" — the corporate code (1 to 5 digits), and the object code (4 digits).
"Check the database connection":
Fig. 25.
Possible errors:
- database name error:
Fig. 26.
- incorrect password:
Fig. 27.
- incorrect IP address:
Fig. 28.
- no SQLNCLI11.1 provider installed:
2.8 Enter the Common Server settings:
Fig. 29.
"IP address" — Common Server IP address;
"HTTP port" — Common Server port.
Common Server connection error, report function server not found:
Fig. 30.
2.9 Select the report function server:
Fig. 31.
"Report function server" — the name of the database, where the report function server is connected to.
If the report function server version 1.25.1.0 or lower is selected, the "Next" button is inactive.
2.10 Select the shortcuts to be created on the desktop:
Fig. 32.
2.11 Install the Program on your computer:
Fig. 33.
When the following window appears, press any key:
Fig. 34.
2.12 The Program has been installed, click "Finish":
Fig. 35.
3 Updating WebInterface
WebInterface update steps:
- Download the latest installer version from ftp://ftp.ucs.ru/rk7/other/dashboard/.
- Launch the WebReportsSetup.exe installer.
2.1 Select the installation language:
Fig. 36.
2.2. Accept the license agreement terms:
Fig. 37.
2.3 Select "Update":
Fig. 38.
2.4 Enter the settings of the Common Server, previously installed by UCS:
Fig. 39.
2.5 Select the required report function instance:
Fig. 40.
2.6 The following window appears:
Fig. 41.
2.7 The Program has been updated, click "Finish":
Fig. 42.
4 Uninstalling WebInterface
WebInterface deinstallation steps
- Launch the WebReportsSetup.exe installer.
2.1 Select the installation language:
Fig. 43.
2.2. Accept the license agreement terms:
Fig. 44.
2.3 Select "Uninstall":
Fig. 45.
2.4 The following window appears:
Fig. 46.
2.5 The Program has been uninstalled, click "Finish":
Fig. 47.
5 Accessing the WebInterface application
The access to the WebInterface application is granted to:
1) Dealers using the Dealer ID/password;
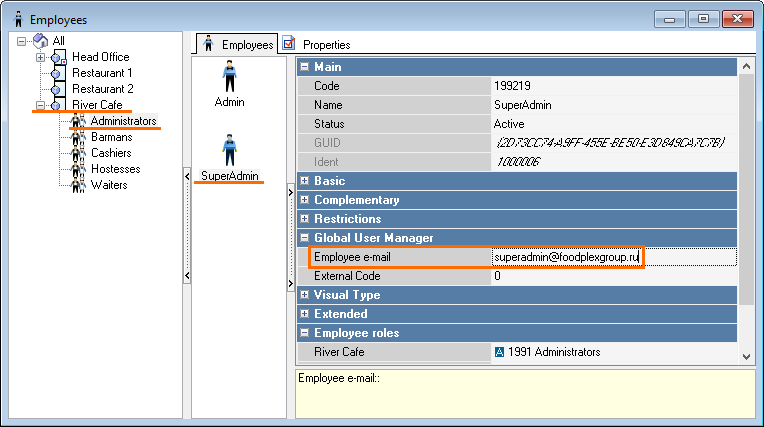
2) r_keeper users with a specified e-mail in the user card:
Fig. 48.
6 Launching website with a web interface
6.1 A website with a web interface can be launched as follows:
- by means of shortcuts;
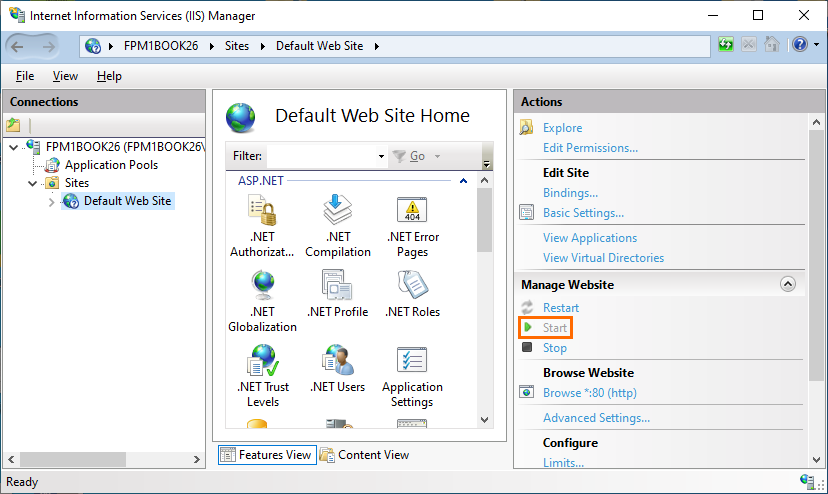
- via the IIS manager (see Fig. 49).
Fig. 49. Launching website from the IIS services manager
6.2 The following page appears:
Fig. 50. Application display in browser
...
- Select a data source and specify the settings:
- Specify the settings of the previously installed Common Server
- Select the Feature Server
- Select the components for which shortcuts will be created on the desktop
- Click Install
- When the cmd window appears, press any button and then click Finish
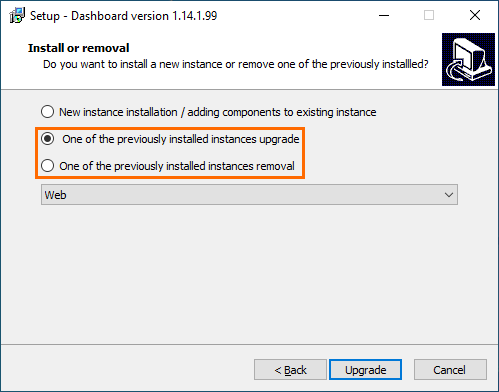
- If you need to update or delete WebInterface, run the installer, select a required item and follow the installer's instructions:
Access to WebInterface
The WebInterface application can be accessed by:
- Dealers using the dealer's ID and password
- r_keeper users with email addresses specified in the properties.
To specify the address, open the manager station go to Personnel > Employees.
In your restaurant, select an employee and write an email address in the Global User Manager section.
Launching Website with WebInterface
There are two ways to launch a site with WebInterface:
- by means of shortcuts
- via the IIS manager
The authorization page will open:
Specify the following data:
- E-mail — Dealer ID, or an r_keeper user e-mail
...
...
- Password
...
- — Dealer password, or an r_keeper user e-mail.
6.3 After all the configuration is completedsettings, WebInterface will display a link intended for the navigation to Dashboards.
6.4 When opening the WebInterface application, a list of sections appears:
Fig. 51.
6.5 When navigating to the Dashboard reports, the following window appears:Fig. 52welcome window will appear.
7 Installing r_keeper_Dashboard without
...
Installer
Software requirements: RK7
- r_keeper version 7.5.4.166 or
...
- later — if using the
...
- reference server
...
- r_keeper version 7.5.4.180 or
...
- later — if using report servers for the data
...
- transmission
- FS version 1.25.1 or
...
- later
- WebInterface version 1.2.10 or
...
- later.
...
- Edit WEB.config:
...
- (<add key="restaurant_code" value="XXXXX 0000 ") — corporate code (1 to 5 digits), and object code (4 digits) for license generation
...
...
- (<add key="TimeOutQueryDb" value="700" />) — database request completion time
...
- , s
...
...
- (<add key="AjaxTimeOutError" value="150000") — timeout of a widget request to the server
...
- , ms
...
...
- (<add key="getLicensePeriod" value="180000" />) — license verification request timeout
...
- , ms
...
...
- default_lang — default dashboards language [ru, en];
...
- fs_alt_lang — alternative r_keeper language [ru, en]
...
- enable_google_analytics — activation of Google Analytics
...
- Edit IRReportsDLL.dll.config in the
...
- bin
...
- directory:
...
- specify the databse connection string: <add name="connection_string" connectionString="Initial Catalog=SQL database name;User ID=**;Password=***;Data Source=ip address, 1433;Max Pool Size=1000" />
...
- specify <add key="instance_name"
...
- > — the application instance name
...
- . It should be the same both in r_keeper_7_Dashboard settings, and in WebInterface
...
- specify the paths to FS and CS, as well as report function server plugin version
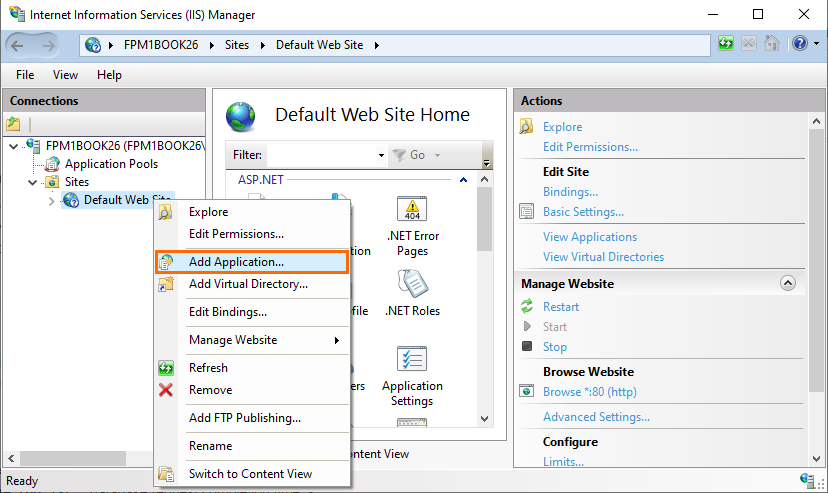
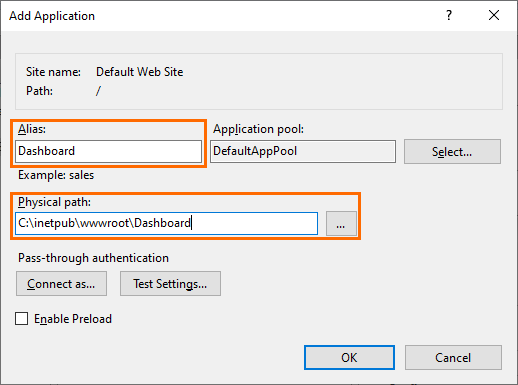
- Add the new application in the IIS services manager, specify the relevant alias and path (see Fig. 53, 54).
Fig. 53. Adding an application
Fig. 54. Application properties
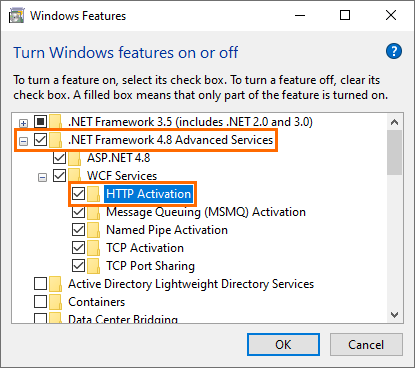
- Configure the web server role: IIS component ".NET Framework 4.5 functions" - "WCF services" - "HTTP activation" (see Fig. 55). *
This component is mandatory (starting from Windows 8)!
Fig. 55. HTTP activation
...
- physical path
Enable the HTTP Activation component of .NET Framework > WFC Services
Info This component is obligatory since Windows 8
- After all the settings, WebInterface will display a link for Dashboards.
- By default, the"WebDashboards"report Webdashboards reports group is hidden not visible in the "IA reports" menu (IA Reports menu, because the group visibility flag is not set).
Fig. 56.
Navigate to the Dashboard reports.
...
- .
