As an alternative to Sipek telephony, you can install and configure MicroSIP.
Before you start installing and configuring the SIP client, check your equipment. You will need a PBX to work: make sure everything is set up in advance, as you will need the login and password of the telephony user.
Setting up MicroSIP
Launch MicroSIP on your computer. To do this:
- Download the portable version of MicroSIP from the official website
- Run the file microsip.exe
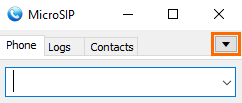
- Set up a MicroSIP connection to your provider. To do this, in the MicroSIP window, click the down button and select Add Account
- Fill in the fields. The data can be obtained from the sip-telephony provider:
- SIP Server and Domain — specify the domain of the sip-telephony provider
- Username and Login — enter your telephony login
- Password — enter your phone password
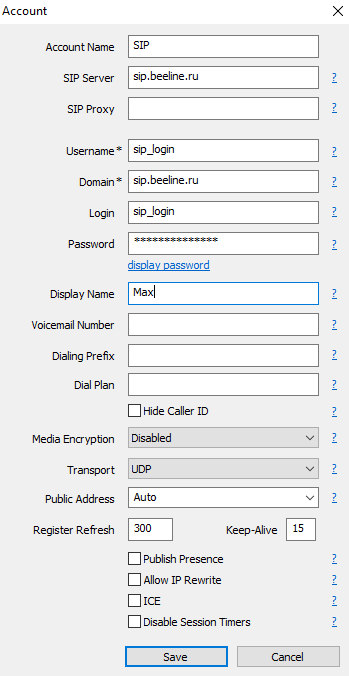
- Save the changes by clicking the Save button
- If everything is set up correctly, a green icon with the inscription Online will appear in the lower left corner of the client. If the icon does not appear, check the connection settings
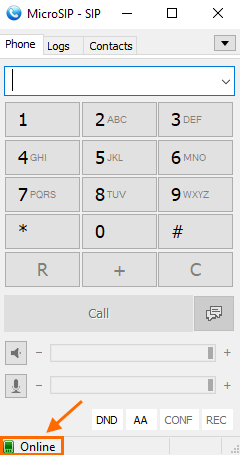
- Check that your audio codec is included in the list of enabled ones. To do this, in the MicroSIP window, click the down button and select Settings
- Check the Enabled Codecs list. If your codec is not there, find it in the Available Codecs column, select it and click the left button
 to move it to the Enabled Codecs column
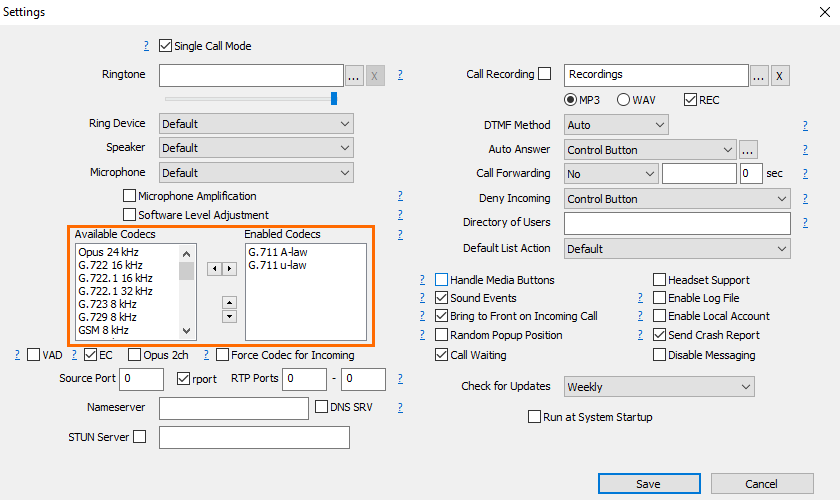
- Save your changes by clicking the Save button.
Done. The client is running and configured.
Setting up integration with r_k Delivery
In order for the page with a new order to open automatically when a call is received by phone in the call center, you need to make additional settings:
- Close the MicroSIP program. Make sure the client is turned off, otherwise further settings will not be applied
- Go to the client folder. Usually its path looks like this: ...\AppData\Local\Temp\[папка с SIP-клиентом]
- Create a file with the .bat extension, for example cmd.bat.
In the name, use only Latin letters without spaces and special characters Open the file in notepad and enter the link to the call center:
CODE
rundll32 url.dll,FileProtocolHandler https:
|
Save the changes.
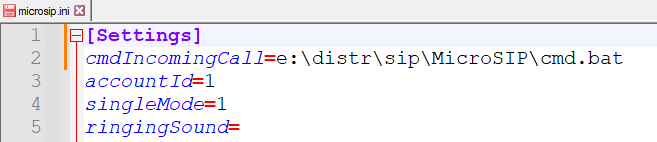
- Open the file microsip.ini. It is located in the same folder
In the [Settings] block, add the following line:
cmdCallAnswerl=full_path_to_bat_file\name_of_created_file.bat ;; triggered when the operator answers
|
or
CODE
cmdIncomingCall=full_path_to_bat_file\name_of_created_file.bat ;; triggered when a call is received, before the phone is picked up
|
Example
Save the changes.
Done. MicroSIP client is installed and configured.
Now, depending on the settings, when a call is received or an operator answers, a new order card will open:
- If the client is new, then only the phone number will be filled in.
- If the client has already ordered from your establishment, then all the basic information about him will be filled in automatically.
Read more: Receiving an order using MicroSIP