StoreHouse Pro Application Interface Description
StoreHouse Pro Application Interface Description
Working with a Window
When working with any program window, you can use either the context menu or the items in the main "Document" and "Edit" menus.
Available items in the "Edit" menu and the main menu item "Document" appear in the main menu only after opening a directory window, a document window, or a list of documents.
We will specifically consider cases of calling the context menu from the table "header", for configuring toolbars, for filling out a report filter or a list of documents, and for working with table values.
Clearing a Field
If you make a mistake while filling out a field, you can press the [Delete] or [Backspace] key on the keyboard.
These keys are also convenient to use when setting filter values. An empty field in the filter means "no restrictions" for that field.
Refreshing Data
When working with multiple windows simultaneously, saving data in one window can make information in another window outdated. For example, if you opened a list of delivery notes or a stock ledger, and then, without closing these windows, created new and corrected old documents in other windows, you can refresh the data according to the changes made by using the "Refresh Contents" item in the main "Document" menu, by pressing the [F5] key, or by clicking the button ![]() on the toolbar.
on the toolbar.
Saving a Document
To save a newly created or edited document, use the "Save Document" item in the main "Document" menu or the button ![]() on the toolbar.
on the toolbar.
Changing Window Size and Position on Screen
Changing the window size is done by dragging the window borders. To do this, move the mouse cursor to the window border—the cursor will change to ↔—then, holding down the left mouse button, change the window size.
Changing the window location is done by dragging the window title area. To perform the drag operation, position the mouse cursor in the window title area, hold down the left mouse button, and move the window.
Working with a Table
Sorting a Table
The column by which the table is sorted is marked with a triangle ( ![]() /
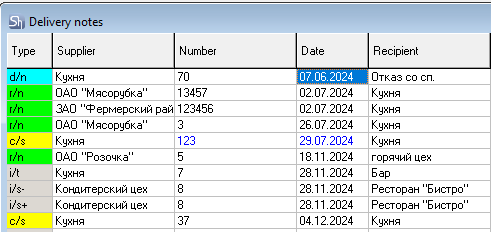
/ ![]() ). In the figure, the table is sorted by the "Date" column.
). In the figure, the table is sorted by the "Date" column.

To select the column to sort by, click the mouse on the column name. If you click the mouse on the name of this column again, the sort order will change (descending/ascending).
Using the Context Menu
For Working with Table Appearance
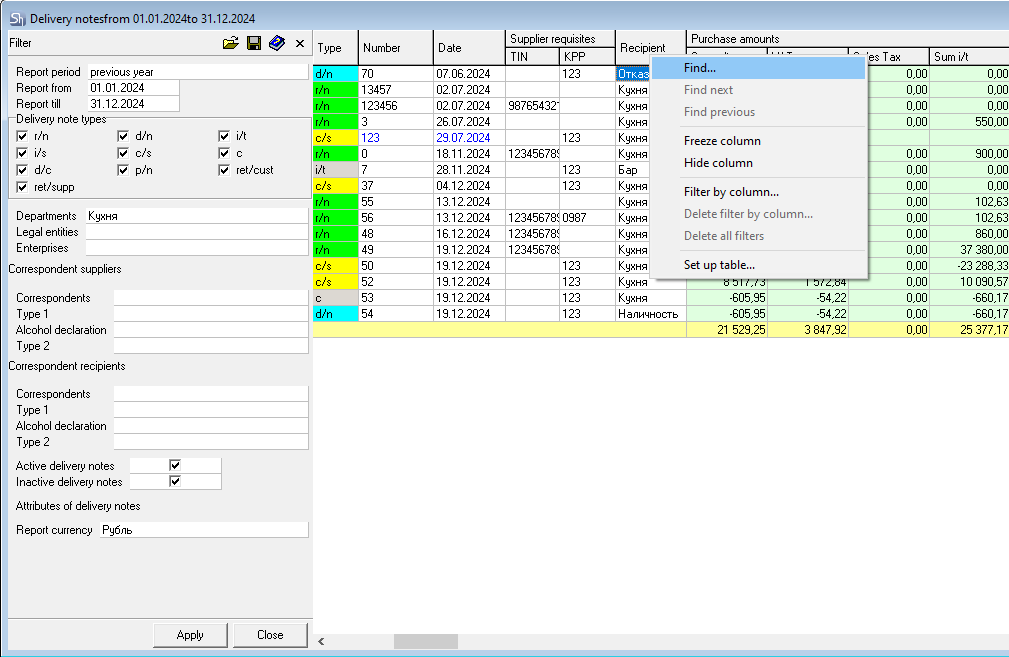
Call the context menu from the table "header" area (column names). The context menu will look like:
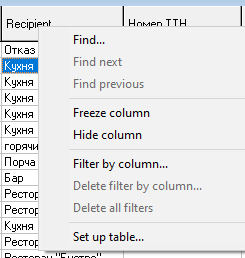 Freeze Column—using this context menu item, you can prevent the column from moving when using horizontal scrolling.
Hide Column—by moving the mouse cursor to any column and selecting this context menu item, you can make it invisible on the screen (except for columns that are defining for this table).
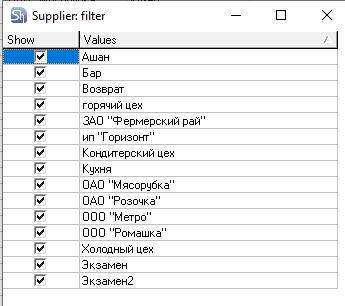
Filter by Column...—using this context menu item, you can filter the table contents by selected values in any column.
To do this, call the context menu from the desired column, then check the boxes next to the necessary values. Example of setting a filter by the "Supplier" column:
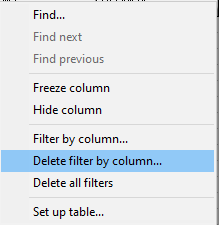
To cancel filtering, call the context menu from the header of this column again and select the "Delete filter by column" item.
If you have set filters for several columns and need to cancel all filters, you can call the context menu from the header of any table column and select the "Delete all filters" item—in this case, all filters for all columns will be canceled, if they were set.
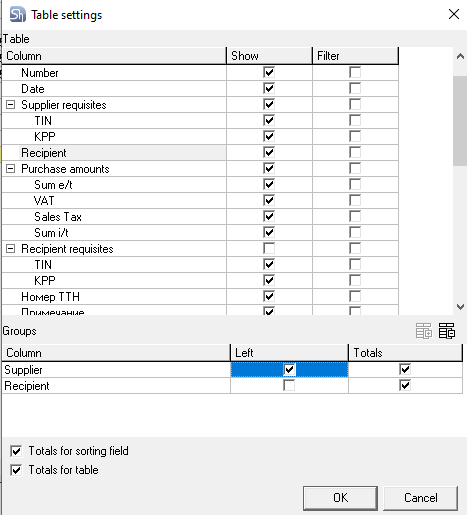
Set up table—this context menu item allows you to configure the data display view of the table. The table configuration window:
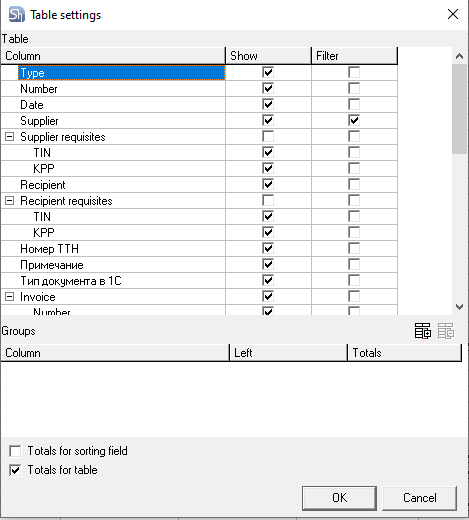
The "Column" column lists all columns of the configurable table.
In the "Show" column, you can select the table columns you want to see or hide on the screen by checking/unchecking the boxes. After setting the checkboxes, press the [OK] button. This setting works similarly to the "Hide Column" context menu item.
If you have hidden several table columns using the "Hide Column" context menu item, you can display them again in the table by using the "Set up table" context menu item, checking the box next to the name of the desired column in the "Show" column, and pressing the [OK] button.
The "Filter" column displays the currently set filters—a checkbox is set next to the name of the column with a filter. The filter is set in the "Filter by Column..." context menu item.
To remove a column filter, uncheck the box next to the name of the desired column in the "Filter" column and press the [OK] button.
Also, in the "Set up table" window, you can select columns for data grouping. To do this, click the mouse on the name of the desired column and press the "Add Group" button. The selected column will appear in the lower part of the window in the "Groups" field.
If you want to remove an incorrectly selected column from the "Groups" field, select it with the mouse and press the "Remove Group" button.
In the Groups field, you can check the "Left" flag to display the selected groups as headers on the left side of the table
and the "Totals" flag to calculate the numerical values of the table for the selected groups.

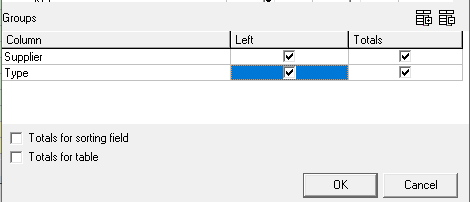
The figure shows a part of the "Set up table" window for the list of delivery notes with the "Left" flags and grouping by the "Supplier" and "Type" columns.
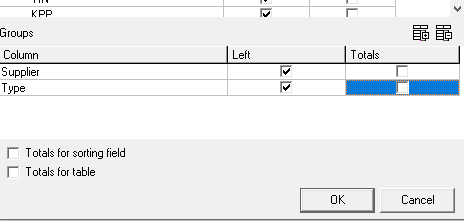
The result of this setting:
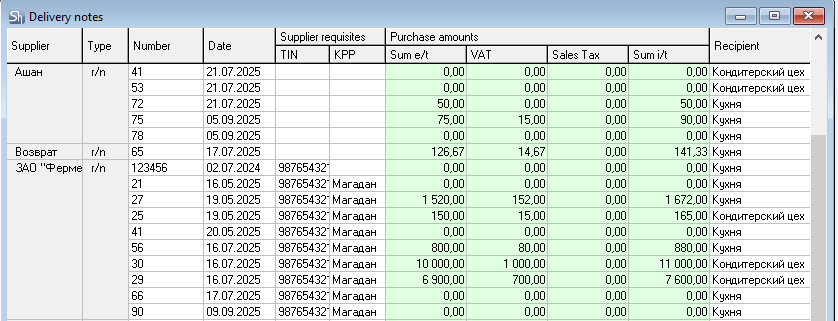
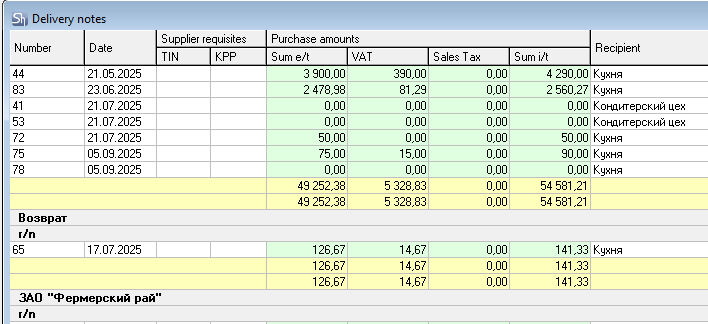
The next figure shows a part of the "Set up table" window for the list of delivery notes with grouping by the "Supplier" and "Type" columns, but with the "Totals" flags.
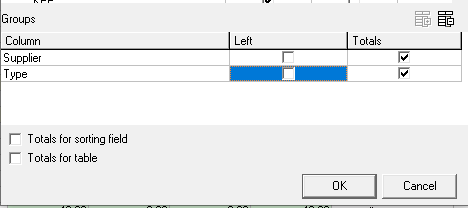
The result of this setting:
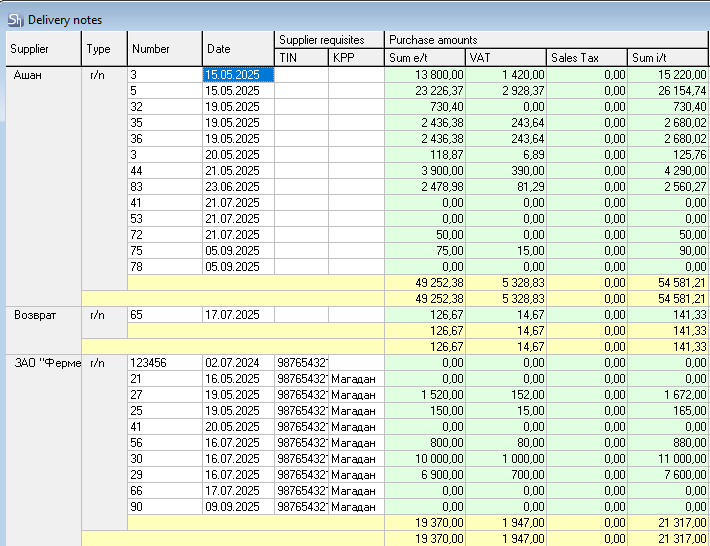
The figure shows both the "Left", and "Totals" flags set for the previous grouping by the "Supplier" and "Type" columns.
The result of this setting:
The "Totals by Sort Field" flag at the bottom of the "Set up table" window is intended for summing the numerical values of the table grouped by the sorted table column. The result of sorting by the "Recipient" field with the "Totals by Sort Field" flag set.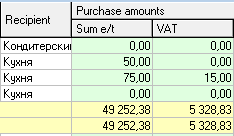
The "Table Totals" flag is intended for summing all numerical values across the entire table.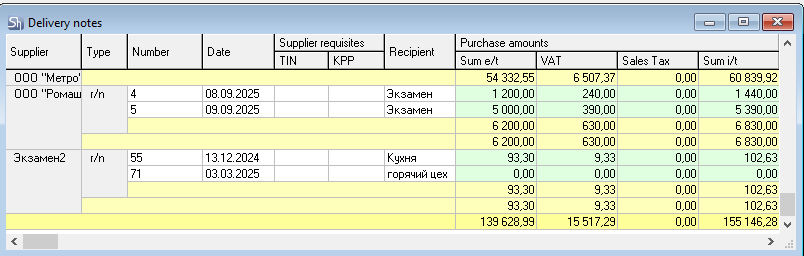
The view that the table takes as a result of applying the "Set up table" context menu item is not available for printing.
For Working with Table Values
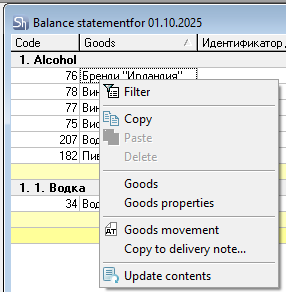
If you call the context menu from within the table area, the menu items will display possible actions for the selected element. For example, the figure shows the context menu for the Balance statement window,
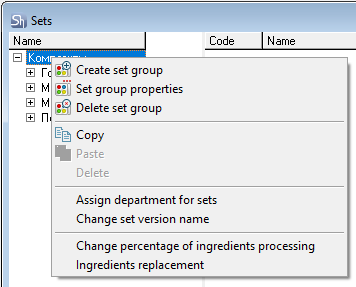
and this figure shows it for the Sets window (set groups).
Many context menu items are also contained in the main menu items "Edit" and "Document". Using the Filter command, you can change the conditions for generating a report or a list of documents. This command is contained in the context menu called from within the table area.
Report Filters
Filters are used to call up lists of documents and to set report parameters.
Filling Filter Fields
The filter occupies the left part of the window; the right part contains the report content or the list of documents for the selected main menu item. Pressing the [Apply] button completes the editing of filter conditions and displays the table with data corresponding to the filter conditions.
The filter window may remain open in the report window or may close when the [Apply] button is pressed. This functionality is controlled by the r_k StoreHouse Pro application setting "Keep filter open after selection". By default, the filter window closes when [Apply] is pressed.
To open the filter again, you can press the button on the toolbar or select the main menu item "Document" — "Filter".
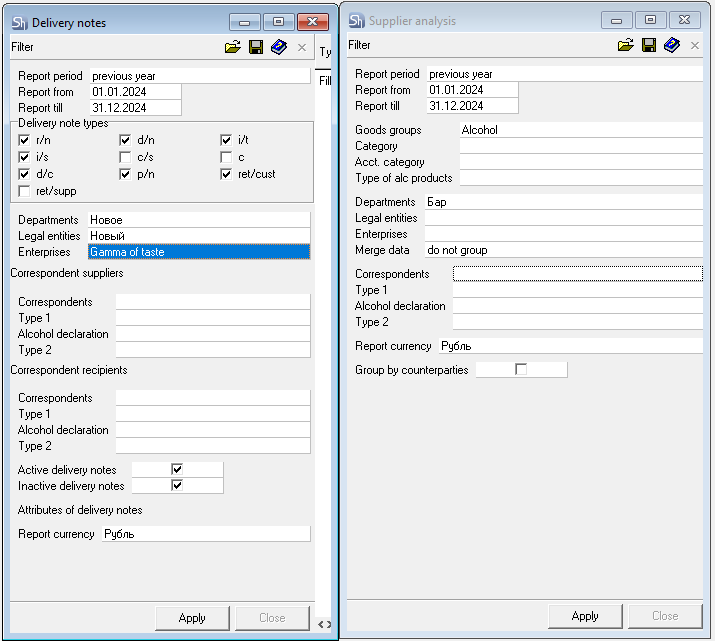
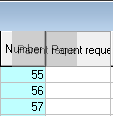
If the filter conditions, as a result of editing, no longer match the content of the right part, an "*" symbol appears next to the word "Filter" (on the "Delivery Notes" filter).
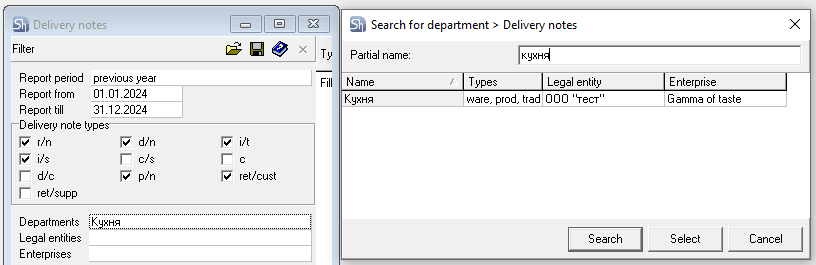
Fields such as "Department" or "Correspondents" in the filter can be filled using the "search" function. Enter part of the department or correspondent name in the field. If the specified part matches only one directory item, the position will be automatically inserted into the filter. If the specified part of the name matches more than one item, the search window will open.
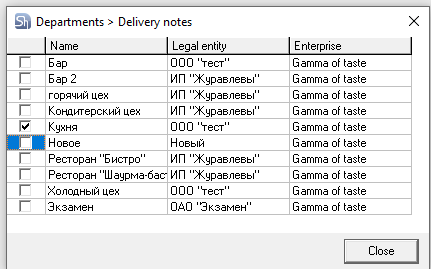
In r_k StoreHouse Pro report filters, you can specify multiple objects from the same directory for report filtering. To select additional directory elements, open the multi-selection window by clicking the button ![]() in the corresponding field. To select objects for the filter, check the boxes next to the required records.
in the corresponding field. To select objects for the filter, check the boxes next to the required records.
If a user's department filters for reports are limited by a "department group", then only the departments accessible to that user will be displayed in the list for department filtering.
If the selection list is large, you can use "Contextual Search within a Table" to find the desired element.
In report filters, you can configure the view for multi-selection of an element (for departments, legal entities, enterprises, correspondents). The figure shows a separate window.
You can also configure selection from a drop-down list. You can edit the view of the multi-selection window in the "Environment Settings" - "Filters" item of the main "Tools" menu.
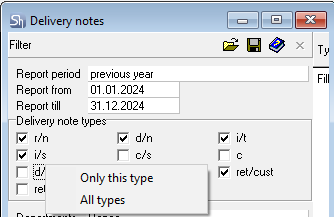
You can set the "Types of Delivery Notes" checkboxes in the filter for opening the list of delivery notes by mouse clicks, or by calling the context menu from the Types of Delivery Notes area. The view of the context menu called from this area: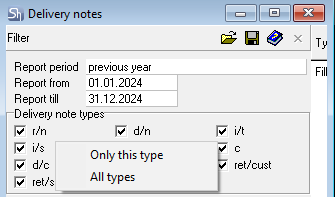 To define the period for the report or list of documents, you need to set the date in the "Report from" and "Report till" fields, using the calendar,
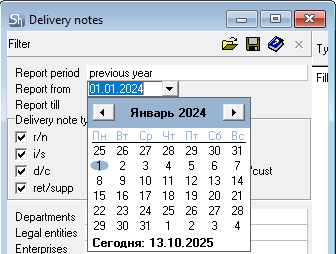
enter the date via the keyboard in the format defined by the Windows settings, or select a value in the Report Period field. Thus, you can specify the desired period or the start of the period, which will be displayed in the "Report from" and "Report to" fields.
By selecting one of the sub-items in the Period item, you can specify the desired period or the start of the period, which will be displayed in the "Report from" and "Report till" fields.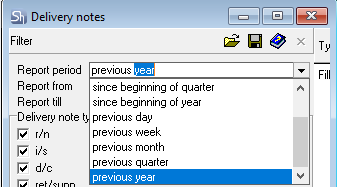
Saving Filters
A configured filter can be saved for reuse without reconfiguring the fields. To save the filter, press the [SaveFilter...] button. The "Save As" window will open.
In the opened window, you can enter the name of the filter to be saved and select a folder for saving it. To save the filter, press the [Save] button; to cancel saving the filter, press the [Cancel] button.
When saving filter settings, you can also save the table data grouping.
To do this, open the filter for the document or list of documents you are interested in, generate the report for clarity, call the context menu from the table "header" area, and select the "Set up table" item.
The "Configure Table" window will open, where you can select columns for data grouping. To do this, select the desired columns and add them to the lower part of the window in the "Groups" field.
To display the selected groups as headers on the left side of the table, you can check the "Left" flag in the "Groups" field, and the "Totals" flag to calculate the numerical values of the table for the selected groups.
For more details on working with the "Set up table" context menu item.
For the data grouping in the table to be saved along with the filter settings, and for the modified table to open when the saved filter is opened, you must perform the table data grouping before saving the filter.
Using Saved Filters
Saved filters and groupings saved with the filter can be opened using the [Load Filter...] ![]() button at the top of the filter, using the [Load from File...]
button at the top of the filter, using the [Load from File...] ![]() button on the toolbar, or the main menu item "File" — "Load from File...". A window will open:
button on the toolbar, or the main menu item "File" — "Load from File...". A window will open:
In the opened window, you can select the necessary filter from the list of previously saved filters. Make sure that the desired folder is selected in the "Folder" field at the top of the window; otherwise, select the required one from the list. Click the mouse on the name of the desired filter and press the [Open] button; to cancel opening the filter, press the [Cancel] button.
When attempting to open a saved filter from the filter window of an already open list of documents or a report of another type (for example, in an open filter for a list of requests, you are trying to open a saved filter for a list of delivery notes), the system will display a message:
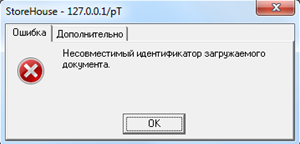
To close the window, press the [OK] button and open the saved filter corresponding to the open window.
Working with Attributes in Filters
Attributes are created in the SdbMan application in the main menu item "StoreHouse" - "Attributes".
To use an attribute in a filter, open the document filter using the main menu item "Documents". In the opened filter, open the context menu from the field to the left of the "Attributes" line (in our example, this is the line Attributes of Delivery Notes) and select the "Add Attribute" item.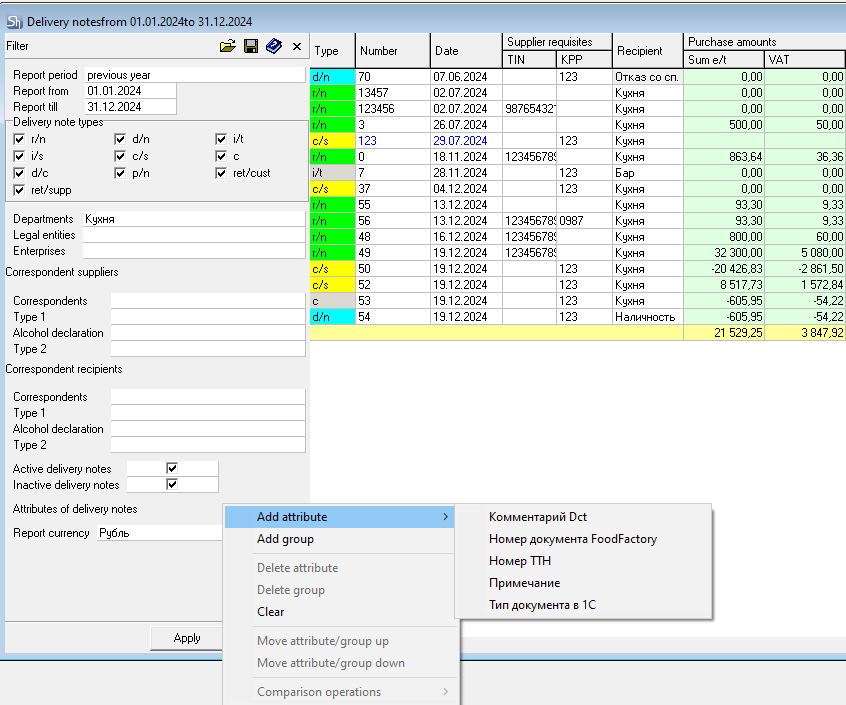
Select the desired attribute by clicking on it with the mouse. After that, it will be displayed in the document list filter.![]() Next, define the attribute value by which you need to filter the report.
Next, define the attribute value by which you need to filter the report.
Enter the value manually (partial or full value) if the report filtering is based on a simple attribute. Or select the attribute value from the list if an enumeration attribute is selected for report filtering.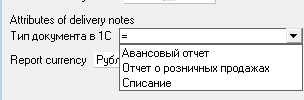 Next, select the operation by which the selection will be performed. To do this, position the cursor on the attribute value field and use the context menu item "Comparison Operations".
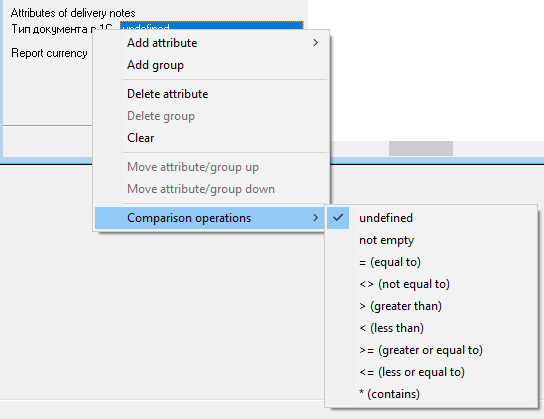
All comparison operations for the selected attribute will be displayed near the black arrow. Select the desired operation by clicking on it with the mouse. After that, it will be displayed in the field next to the attribute in the document filter. By default, the value "not defined" is set.
![]()
In the filter, you can select one of the following comparison operations:
not defined—only those documents where the attribute field is not filled will be displayed in the list;
not empty—only those documents where the attribute field is filled with any value will be displayed in the list;
= (equal)—only those documents where the attribute field is filled with the value you specified after the equals sign, including numbers, signs, and considering case, will be displayed in the list;
<> (not equal)—those documents where the attribute field is filled with any value except the one you specified in the attribute field in the filter, including numbers, signs, and considering case, will be displayed in the list;
- > (greater than)—only those documents where the attribute field is filled with a value greater than the one you specified in the filter will be displayed in the list (relevant for numerical attributes and attributes containing dates);
< (less than)—only those documents where the attribute field is filled with a value less than the one you specified in the attribute field in the filter will be displayed in the list (relevant for numerical attributes and attributes containing dates);
- >= (greater than or equal to)—those documents where the attribute field is filled with a value greater than or equal to the one you specified in the attribute field in the filter will be displayed in the list (relevant for numerical attributes and attributes containing dates);
- <= (less than or equal to)—only those documents where the attribute field is filled with a value less than or equal to the one you specified in the attribute field in the filter will be displayed in the list (relevant for numerical attributes and attributes containing dates);
- * (contains)—those documents where the attribute field contains the value you specified after *, even if you specified only part of a word or number, will be displayed in the list.
The selected filter settings with attributes can be saved and opened from a file.
Color Highlighting
For ease of information perception, the font and fields of the "Delivery Notes" table are highlighted with colors:
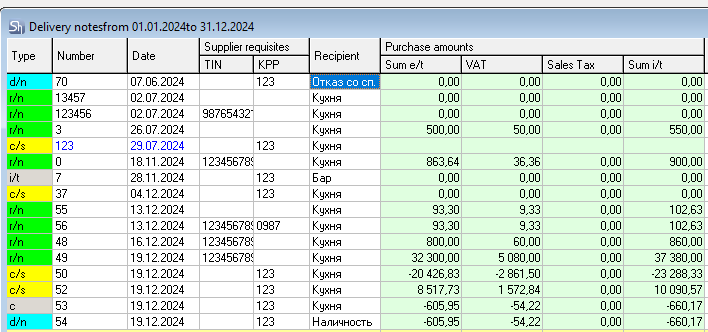
Background of the document Type field:
green—Receipt Notes
blue—Delivery Notes
red— Compensated Entries for the delivery parts of notes
grey—Internal Transfers, Assemblies ("Complectations"), and Decomplectation Acts
yellow—Comparison Sheets
white—Return of Goods to Supplier and Return of Goods from Recipient
Font:
blue—inactive document
black—active document
red in a Delivery Note—goods are written off at a price below cost price.
Bulk Operations
In the r_k StoreHouse Pro application, it is possible to select a number of list items in any order and assign bulk operations to them.
To select several list items in a row, click the mouse on the first item, then, holding down the [SHIFT] key, click the mouse on the last item. All intermediate list items are selected. To additionally select individual items without deselecting the sequentially selected items, click on them with the mouse while holding down the [Ctrl] key.
The selected items can be either documents or directories.
By calling the context menu, as well as the "Edit" and "Document" items of the main menu, you can assign various bulk operations to the list of items selected in an arbitrary order. The choice of operations for selected documents differs from the choice of operations for a set of directories.
The bulk operation "Copy" will place the selected list items in the clipboard. Then, using the bulk operation "Paste", you can paste the items placed in the clipboard into the desired window.
The operation for selected goods in a document "Copy to Delivery Note...".
Bulk operations for automatic creation of Invoices and Payment Documents for delivery notes.
Searching for a Directory Item
Search is performed in the directories: Goods, Sets, Departments and Correspondents.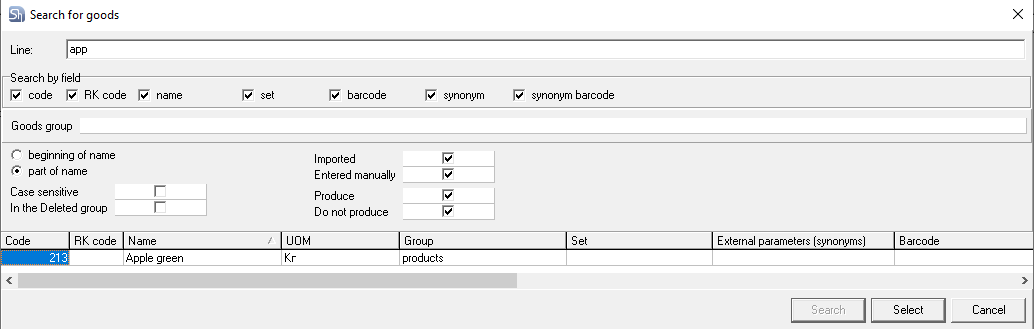
To search for an object across all groups of the tree:
Select any object in the right part of the directory window;
Use the "Find an Item (Set, Correspondent)" item of the main "Edit" menu or the key combination [Ctrl]+[Shift]+[F];
Fill in the search string in the Find an Item (Set, Correspondent) window;
Set the flags depending on which fields you want to search by (The Search by field area is present only in the Goods and Sets directories);
Press the [Search] button. The found positions that meet the search conditions will be displayed in the lower part of the window.
To go to the found object, select it in the lower part of the window and press the [Select] button.
Contextual Search within a Table
You can find any value in a table column using the "Find..." command.
To find a value inside a table column:
Click the left mouse button in the table field where the characteristic by which the element will be searched is located;
Use the main menu item "Edit" — "Find...", or the key combination [Ctrl]+[F], or the button on the toolbar, or the "Find..." command of the context menu called from the area of the column name that contains the desired element;
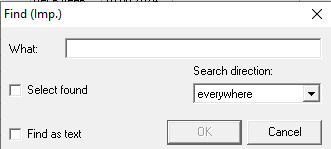
Enter the subject of the search in the "What:" field. The fig. shows the search window for a text field,

The fig. shows the search window for a numerical field; If you uncheck the "Search as text" flag, the "Match case" and "Whole cell" flags are not displayed in the window, because the search will be performed only by numerical values.
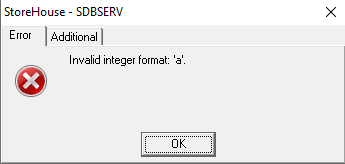
If you enter text in the "What:" field after this, an error window will appear. Press the [OK] button and enter a numerical value in the "What:" field for a correct search.
Select a value from the "Search Direction" list;
Set the flags according to the search parameters you want to set:
Match case—consider/do not consider the case of the element name,
Whole cell—whether the search subject is a part of the sought element or completely denotes it,
Highlight found items—highlight all found goods or stop the search at the first found item.
Press the [OK] button.
You can continue the search in several ways:
press the "Find Next" or "Find Previous" commands in the context menu;
use the main menu item "Edit"—"Find Next" or "Find Previous";
use the "hotkey" combinations [F3] (Find Next) or [Shift]+[F3] (Find Previous);
use the button
 (Find Next) or
  (Find Previous) on the toolbar.
Using Drag and Drop
Drag and drop (DRAG&DROP function) can be used in the following cases:
Moving a group or directory element that has a hierarchical structure from one hierarchy level to another;
Changing column widths;
Copying values in the table on the Goods page of a document;
Changing the order of table columns. When dragging a column, the background of the dragged column's name changes color to a darker one. In the figure, the UOM column is being dragged;
Adding goods to tables from the goods list in the Goods directory;
Filling fields by dragging from directories corresponding to the field objects. Equivalent to executing the "Copy" and "Paste" commands.
The drag icon looks like a small white rectangle under the mouse cursor if completing the drag at this moment would lead to changes in directories or documents.
If completing the drag at the current moment would not lead to changes, the drag icon takes the form of a small circle divided in half.
Export to Excel
Two methods can be used to export a directory card, documents, lists of documents, and reports to XLS:
Export via Print Forms
Open the directory card/document/list of documents/report;
Display the print form layout for preview;
In the opened window, select the "Save" - Excel table (XML) item;
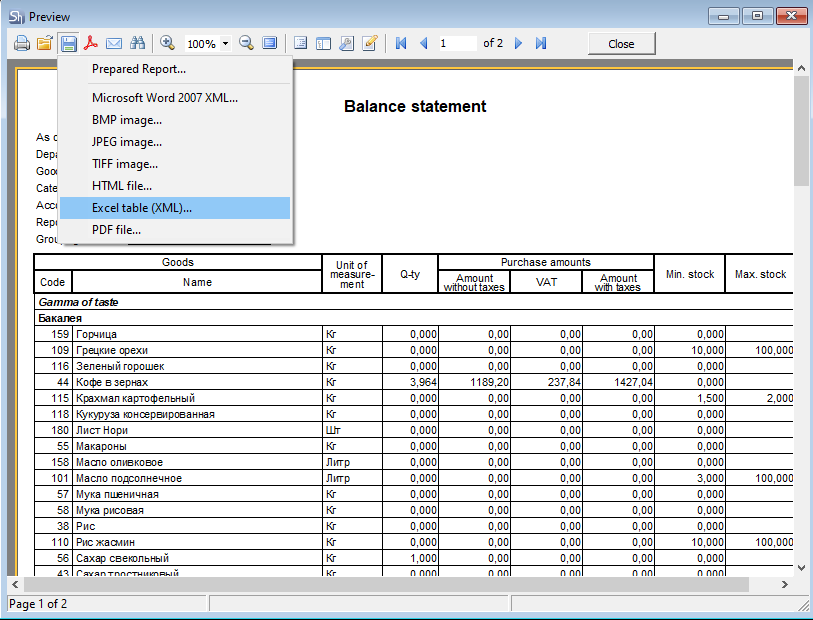
Define parameters for creating XLS tables. You can leave the default values set;
Specify the save location and file name.
The peculiarity of this mechanism is that only the data output to the layout will be exported to XLS, and in the form they are presented in the layout.
Direct export from an open form (added in version 5.98.337)
Open the directory card/document/list of documents/report;
Select the menu item "File" – "Save to File" or press the button on the toolbar;
Specify the save location, file type – XLSX, and file name.
The peculiarity of this mechanism is that only tabular data will be exported to XLS. All user groupings on the table form will also be taken into account.
If the element being exported contains several forms (pages on the form), then each such form (page) will be created as a separate sheet in the XLSX file.
For example: The list of Invoices contains "Filter" and "List Table".
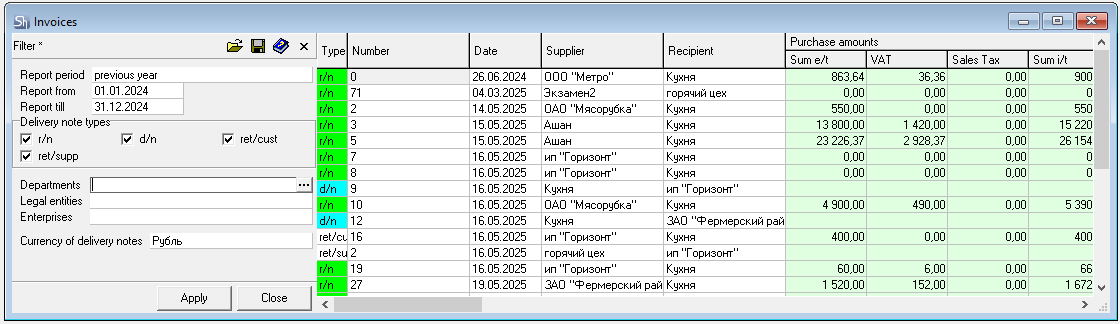
When exporting to XLSX, the file will consist of two sheets with data.
Selecting Toolbars
Toolbar — a set of "quick" buttons that allow you to quickly open, create, or edit any element of the program.
You can define the list of displayed toolbars by calling the context menu from the screen area under the main menu.
By checking and unchecking the boxes next to the names of the toolbars, you can add these toolbars to the screen or remove them from the screen.
The "Document" toolbar appears in the main menu only after opening a document window or a list of documents (if the flag is set).
In addition, you can display or remove from the screen the list of windows open in the application and the hint line for mouse cursor movement – the "Window List" and "Hint Line" flags, respectively. The "Hint Line" and window list are located at the bottom of the r_k SH Pro application window.
Toolbar Buttons
Description of each toolbar button separately.
File Toolbar Buttons![]() - Connect to Server button. Clicking this button opens a dialog box for selecting a server to connect to, as well as for user registration.
- Connect to Server button. Clicking this button opens a dialog box for selecting a server to connect to, as well as for user registration.![]() - Print button. The button is available in the window of a document that can be printed. After pressing the button, a list opens allowing you to select the output form for printing. The document must be saved before printing.
- Print button. The button is available in the window of a document that can be printed. After pressing the button, a list opens allowing you to select the output form for printing. The document must be saved before printing.![]() - Print Preview button. The button is available in the window of a document that can be printed. Before printing, it is recommended to use the print preview function, which allows you to see how the document will look on paper. After pressing the button, a list opens allowing you to select the output form for print preview.
- Print Preview button. The button is available in the window of a document that can be printed. Before printing, it is recommended to use the print preview function, which allows you to see how the document will look on paper. After pressing the button, a list opens allowing you to select the output form for print preview. ![]() - Exit button. Clicking this button closes the program.
- Exit button. Clicking this button closes the program.
Edit Toolbar Buttons
![]() - button Cut. Clicking this button moves the selected element or group of elements to the clipboard, removing the selected element from its previous location.
- button Cut. Clicking this button moves the selected element or group of elements to the clipboard, removing the selected element from its previous location.![]() - button Copy. Clicking this button places the selected element or group of elements into the clipboard.
- button Copy. Clicking this button places the selected element or group of elements into the clipboard.![]() - button Paste. Clicking this button places the text or object from the clipboard at the location indicated by the cursor.
- button Paste. Clicking this button places the text or object from the clipboard at the location indicated by the cursor.![]() - button Add from Dictionary. This button is available when the user is in a field for selecting an object in a directory. Clicking it inserts the directory element selected by the cursor into the field from which the directory was called.
- button Add from Dictionary. This button is available when the user is in a field for selecting an object in a directory. Clicking it inserts the directory element selected by the cursor into the field from which the directory was called.![]() - button Replace from Dictionary. Like the previous one, this button is available when the user is in a field for selecting an object in a directory. If the line being filled in the document is the first one, then clicking it also inserts the directory object selected by the cursor into the document field from which the directory was called. If there are several lines in the document, and you want to replace a previously selected value with another one, call the directory from the field whose value you want to replace, then select the desired value in the directory, press this button, and the value will be replaced.
- button Replace from Dictionary. Like the previous one, this button is available when the user is in a field for selecting an object in a directory. If the line being filled in the document is the first one, then clicking it also inserts the directory object selected by the cursor into the document field from which the directory was called. If there are several lines in the document, and you want to replace a previously selected value with another one, call the directory from the field whose value you want to replace, then select the desired value in the directory, press this button, and the value will be replaced.![]() - button Call Dictionary. This button is available when the user is in a field for selecting an object in a directory. Clicking it opens the directory for selecting the necessary value.
- button Call Dictionary. This button is available when the user is in a field for selecting an object in a directory. Clicking it opens the directory for selecting the necessary value.
Document Toolbar Buttons (Operations on the Current Document)
![]()
![]() - button Create Goods Group. Available in the "Goods" and "Goods Groups" directories. Clicking this button opens the window for creating a new goods group.
- button Create Goods Group. Available in the "Goods" and "Goods Groups" directories. Clicking this button opens the window for creating a new goods group.![]() - button Goods Group Properties. Available in the "Goods" and "Goods Groups" directories. Clicking this button opens the Goods Group window for the selected goods group.
- button Goods Group Properties. Available in the "Goods" and "Goods Groups" directories. Clicking this button opens the Goods Group window for the selected goods group.![]() - button Delete Goods Group. Available in the "Goods" and "Goods Groups" directories. Clicking this button opens the deletion window for the selected goods group.
- button Delete Goods Group. Available in the "Goods" and "Goods Groups" directories. Clicking this button opens the deletion window for the selected goods group.![]() - button Create Goods. Available in the "Goods" directory. Clicking this button opens the Create New Goods window.
- button Create Goods. Available in the "Goods" directory. Clicking this button opens the Create New Goods window.![]() - button Goods Properties. Available in the "Goods" directory. Clicking this button opens the Goods window for the selected goods or the first goods of the selected group.
- button Goods Properties. Available in the "Goods" directory. Clicking this button opens the Goods window for the selected goods or the first goods of the selected group.![]() - button Delete Goods. Available in the "Goods" directory. Clicking this button opens the Delete Goods window for the selected goods or the first goods of the selected group.
- button Delete Goods. Available in the "Goods" directory. Clicking this button opens the Delete Goods window for the selected goods or the first goods of the selected group.![]() - button Goods Movement. Available in the "Goods" directory. Clicking this button opens the "Goods Movement" window.
- button Goods Movement. Available in the "Goods" directory. Clicking this button opens the "Goods Movement" window.![]() - button Create Set Group. Clicking this button opens the window for creating a new set group. Available in the "Sets" directory. A Set is a list of ingredients for a dish or semi-finished product. Components of a set can be both goods that are raw materials and goods related to other sets (i.e., preparations and semi-finished products).
- button Create Set Group. Clicking this button opens the window for creating a new set group. Available in the "Sets" directory. A Set is a list of ingredients for a dish or semi-finished product. Components of a set can be both goods that are raw materials and goods related to other sets (i.e., preparations and semi-finished products).![]() - button Set Group Properties. Available in the "Sets" directory. Clicking this button opens the properties window for the selected set group.
- button Set Group Properties. Available in the "Sets" directory. Clicking this button opens the properties window for the selected set group.![]() - button Delete Set Group. Available in the "Sets" directory. Clicking this button opens the deletion window for the selected set group.
- button Delete Set Group. Available in the "Sets" directory. Clicking this button opens the deletion window for the selected set group.![]() - button Create Set. Available in the "Sets" directory. Clicking this button opens the Create New Set window.
- button Create Set. Available in the "Sets" directory. Clicking this button opens the Create New Set window.![]() - button Set Properties. Available in the "Sets" directory. Clicking this button opens the selected set or the first set of the selected group.
- button Set Properties. Available in the "Sets" directory. Clicking this button opens the selected set or the first set of the selected group.![]() - button Delete Set. Available in the "Sets" directory. Clicking this button opens the Delete Set window for the selected set or the first set of the selected group.
- button Delete Set. Available in the "Sets" directory. Clicking this button opens the Delete Set window for the selected set or the first set of the selected group.![]() - button Create UOM Group. Available in the "Units of Measurement" directory. Clicking this button opens the window for creating a new UOM group.
- button Create UOM Group. Available in the "Units of Measurement" directory. Clicking this button opens the window for creating a new UOM group.![]() - button UOM Group Properties. Available in the "Units of Measurement" directory. Clicking this button opens the properties window for the selected UOM group.
- button UOM Group Properties. Available in the "Units of Measurement" directory. Clicking this button opens the properties window for the selected UOM group.![]() - button Delete UOM Group. Available in the "Units of Measurement" directory. Clicking this button opens the deletion window for the selected UOM group.
- button Delete UOM Group. Available in the "Units of Measurement" directory. Clicking this button opens the deletion window for the selected UOM group.![]() - button Create UOM. Available in the "Units of Measurement" directory. Clicking this button opens the window for creating a new UOM.
- button Create UOM. Available in the "Units of Measurement" directory. Clicking this button opens the window for creating a new UOM.![]() - button UOM Properties. Available in the "Units of Measurement" directory. Clicking this button opens the properties window for the selected UOM.
- button UOM Properties. Available in the "Units of Measurement" directory. Clicking this button opens the properties window for the selected UOM.![]() - button Delete UOM. Available in the "Units of Measurement" directory. Clicking this button opens the deletion window for the selected UOM.
- button Delete UOM. Available in the "Units of Measurement" directory. Clicking this button opens the deletion window for the selected UOM.![]() - button Department Properties. Clicking this button opens the selected department. Available in the "Departments" directory. Department—a place of storage, production, or sale of goods at an enterprise. Analogous to the concept of Warehouse.
- button Department Properties. Clicking this button opens the selected department. Available in the "Departments" directory. Department—a place of storage, production, or sale of goods at an enterprise. Analogous to the concept of Warehouse.![]() - button Delete Department. Available in the "Departments" directory. Clicking this button opens the Delete Department window for the selected department.
- button Delete Department. Available in the "Departments" directory. Clicking this button opens the Delete Department window for the selected department.![]() - button Correspondent Properties. Clicking this button opens the selected correspondent. Available in the "Correspondents" directory. Correspondents—a directory containing a list of objects that can be used when creating r_k StoreHouse Pro documents—suppliers / recipients in delivery notes, reasons for R-Keeper write-offs, etc.
- button Correspondent Properties. Clicking this button opens the selected correspondent. Available in the "Correspondents" directory. Correspondents—a directory containing a list of objects that can be used when creating r_k StoreHouse Pro documents—suppliers / recipients in delivery notes, reasons for R-Keeper write-offs, etc.![]() - button Delete Correspondent. Available in the "Correspondents" directory. Clicking this button opens the Delete Correspondent window for the selected correspondent.
- button Delete Correspondent. Available in the "Correspondents" directory. Clicking this button opens the Delete Correspondent window for the selected correspondent.![]() - button Account Properties. Clicking this button opens the selected account. Available in the "Chart of Accounts" directory.
- button Account Properties. Clicking this button opens the selected account. Available in the "Chart of Accounts" directory.![]() - button Delete Account. Clicking this button opens the deletion window for the selected account. Available in the "Chart of Accounts" directory.
- button Delete Account. Clicking this button opens the deletion window for the selected account. Available in the "Chart of Accounts" directory.
![]() - button Operation Properties. Clicking this button opens the selected operation. Available in the "List of Accounting Operations" directory.
- button Operation Properties. Clicking this button opens the selected operation. Available in the "List of Accounting Operations" directory.![]() - button Delete Operation. Clicking this button opens the deletion window for the selected operation. Available in the "List of Accounting Operations" directory.
- button Delete Operation. Clicking this button opens the deletion window for the selected operation. Available in the "List of Accounting Operations" directory.![]() - button Price List Properties. Clicking this button opens the selected price list. Available in the "Price Lists" directory.
- button Price List Properties. Clicking this button opens the selected price list. Available in the "Price Lists" directory.![]() - button Delete Price List. Clicking this button opens the deletion window for the selected price list. Available in the "Price Lists" directory.
- button Delete Price List. Clicking this button opens the deletion window for the selected price list. Available in the "Price Lists" directory.
![]() - button Delivery Note Properties. Available in the "Delivery Notes" window. Clicking this button opens the selected delivery note.
- button Delivery Note Properties. Available in the "Delivery Notes" window. Clicking this button opens the selected delivery note.
![]() - button Delete Delivery Note. Available in the "Delivery Notes" window. Clicking this button opens the Delete Delivery Note window for the selected delivery note.
- button Delete Delivery Note. Available in the "Delivery Notes" window. Clicking this button opens the Delete Delivery Note window for the selected delivery note.
![]() - button Save Document. Available in the window of a created document (directory), or a document (directory) that has been changed and can be saved. Clicking this button saves the document (directory), if possible, or, if it is not possible, a message will be displayed on the screen about the reason why the document cannot be saved.
- button Save Document. Available in the window of a created document (directory), or a document (directory) that has been changed and can be saved. Clicking this button saves the document (directory), if possible, or, if it is not possible, a message will be displayed on the screen about the reason why the document cannot be saved.
![]() - button Refresh Contents (see section 2.2.1.2).
- button Refresh Contents (see section 2.2.1.2).
![]() - button Filter. The button is available in the windows of document lists, requests, and in report windows. Clicking this button displays the filter for changing the data output parameters of the active window.
- button Filter. The button is available in the windows of document lists, requests, and in report windows. Clicking this button displays the filter for changing the data output parameters of the active window.
![]() - button Request Properties. Clicking this button opens the selected request. Available in the "Requests" window. Request—is a document that defines the list of goods and their required quantity for performing economic activities in an enterprise department (sale, production, purchase).
- button Request Properties. Clicking this button opens the selected request. Available in the "Requests" window. Request—is a document that defines the list of goods and their required quantity for performing economic activities in an enterprise department (sale, production, purchase).
![]() - button Delete Request. Available in the "Requests" window. Clicking this button opens the Delete Request window for the selected request.
- button Delete Request. Available in the "Requests" window. Clicking this button opens the Delete Request window for the selected request.
![]() - button Create Child Requests. Available in the "Requests" window. Clicking this button creates a new request, for which the selected request is specified as the parent request. Child Request is a document automatically created based on a regular request or another child request, for processing a production chain.
- button Create Child Requests. Available in the "Requests" window. Clicking this button creates a new request, for which the selected request is specified as the parent request. Child Request is a document automatically created based on a regular request or another child request, for processing a production chain.![]() - button Delete Delivery Notes for Request. Available in the "Requests" window. After pressing the button, an information window opens with a message about the number of deleted delivery notes. Delivery Notes for Request—these are documents created as a result of processing a request. Request Processing (function "Create Delivery Notes for Request")—automatic creation, based on a request, of active documents according to specified rules that will change the balance of goods as a result of economic activities (sale, production, purchase)
- button Delete Delivery Notes for Request. Available in the "Requests" window. After pressing the button, an information window opens with a message about the number of deleted delivery notes. Delivery Notes for Request—these are documents created as a result of processing a request. Request Processing (function "Create Delivery Notes for Request")—automatic creation, based on a request, of active documents according to specified rules that will change the balance of goods as a result of economic activities (sale, production, purchase)![]() - button Create Delivery Notes for Request Tree (creating delivery notes immediately for the entire chain of child requests based on the parent request inclusive). Available in the "Requests" window. After pressing the button, an information window opens with a message about the number of created delivery notes.
- button Create Delivery Notes for Request Tree (creating delivery notes immediately for the entire chain of child requests based on the parent request inclusive). Available in the "Requests" window. After pressing the button, an information window opens with a message about the number of created delivery notes.![]() - button Activate Delivery Notes for Request Tree. Available in the "Requests" window. After pressing the button, an information window opens with a message about the number of activated delivery notes. The Activate flag is set to assign the document the status "active". Documents with the status "inactive" do not participate in turnover.
- button Activate Delivery Notes for Request Tree. Available in the "Requests" window. After pressing the button, an information window opens with a message about the number of activated delivery notes. The Activate flag is set to assign the document the status "active". Documents with the status "inactive" do not participate in turnover.![]() - button Delete Delivery Notes for Request Tree. Available in the "Requests" window. After pressing the button, an information window opens with a message about the number of deleted delivery notes.
- button Delete Delivery Notes for Request Tree. Available in the "Requests" window. After pressing the button, an information window opens with a message about the number of deleted delivery notes.
Documents Toolbar Buttons![]() - button Delivery Notes. Clicking this button displays the list of delivery notes.
- button Delivery Notes. Clicking this button displays the list of delivery notes.![]() - button New Delivery Note. Clicking the black triangle opens a list of documents for creation.
- button New Delivery Note. Clicking the black triangle opens a list of documents for creation.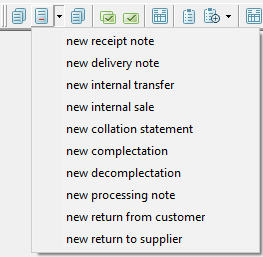
![]() - button Invoices. Clicking this button displays the list of invoices.
- button Invoices. Clicking this button displays the list of invoices.![]() - button Payment Documents. Clicking this button displays the list of payment documents.
- button Payment Documents. Clicking this button displays the list of payment documents.![]() - button Contracts. Clicking this button displays the list of contracts.
- button Contracts. Clicking this button displays the list of contracts.![]() - button New Contract. Clicking this button creates a new contract.
- button New Contract. Clicking this button creates a new contract.![]() - button Document Templates. Clicking this button displays the list of templates.
- button Document Templates. Clicking this button displays the list of templates.![]() - button New Template. Clicking this button creates a new template.
- button New Template. Clicking this button creates a new template.
Dictionaries Toolbar Buttons![]() - button Goods. Clicking this button opens the "Goods" directory.
- button Goods. Clicking this button opens the "Goods" directory.
![]() - button Goods Groups. Clicking this button opens the tree of goods groups.
- button Goods Groups. Clicking this button opens the tree of goods groups.![]() - button Sets. Clicking this button opens the "Sets" directory.
- button Sets. Clicking this button opens the "Sets" directory.![]() - button Units of Measurement. Clicking this button opens the "Units of Measurement" directory.
- button Units of Measurement. Clicking this button opens the "Units of Measurement" directory.![]() - button Goods Categories. Clicking this button opens the "Goods Categories" directory. Category—a property of goods that allows applying additional filters in reports.
- button Goods Categories. Clicking this button opens the "Goods Categories" directory. Category—a property of goods that allows applying additional filters in reports.![]() - button Accounting Categories of Goods. Clicking this button opens the "Accounting Categories of Goods" directory. Accounting Category—a property of goods that allows applying additional filters in reports and generating different accounting entries based on one document.
- button Accounting Categories of Goods. Clicking this button opens the "Accounting Categories of Goods" directory. Accounting Category—a property of goods that allows applying additional filters in reports and generating different accounting entries based on one document.![]() - button Currencies. Clicking this button opens the "Currencies" directory.
- button Currencies. Clicking this button opens the "Currencies" directory.![]() - button Currency Rates. Clicking this button displays the currency rate filter.
- button Currency Rates. Clicking this button displays the currency rate filter.![]() - button VAT Rates. Clicking this button opens the list of Value Added Tax rates.
- button VAT Rates. Clicking this button opens the list of Value Added Tax rates.![]() - button Sales Tax Rates. Clicking this button opens the list of Sales Tax rates.
- button Sales Tax Rates. Clicking this button opens the list of Sales Tax rates.![]() - button Departments. Clicking this button opens the "Departments" directory.
- button Departments. Clicking this button opens the "Departments" directory.![]() - button New Department. Clicking this button opens the Create New Department window.
- button New Department. Clicking this button opens the Create New Department window.![]() - button Corrspondents. Clicking this button opens the "Corrspondents" directory.
- button Corrspondents. Clicking this button opens the "Corrspondents" directory.![]() - button New Corrspondent. Clicking this button opens the Create New Corrspondent window.
- button New Corrspondent. Clicking this button opens the Create New Corrspondent window.![]() - button Legal Entities. Clicking this button opens the list of own legal entities.
- button Legal Entities. Clicking this button opens the list of own legal entities.![]() - button Enterprises. Clicking this button opens the "Enterprises" directory. Enterprise—is an organization that includes one or more departments (warehouses).
- button Enterprises. Clicking this button opens the "Enterprises" directory. Enterprise—is an organization that includes one or more departments (warehouses).![]() - button Chart of Accounts. Clicking this button opens the "Chart of Accounts" directory.
- button Chart of Accounts. Clicking this button opens the "Chart of Accounts" directory.![]() - button New Account/Subaccount Clicking this button opens the window for creating a new account/subaccount.
- button New Account/Subaccount Clicking this button opens the window for creating a new account/subaccount.
![]() - button Accounting Operations. Clicking this button opens the "Accounting Operations" directory.
- button Accounting Operations. Clicking this button opens the "Accounting Operations" directory.
![]() - button New Accounting Operation Clicking this button opens the window for creating a new accounting operation.
- button New Accounting Operation Clicking this button opens the window for creating a new accounting operation.
![]() - button Sale Locations. Clicking this button opens the "Sale Locations" directory. Sale Location—a directory that organizes the connection between the department that prepares the dish and the cash station where this dish is sold.
- button Sale Locations. Clicking this button opens the "Sale Locations" directory. Sale Location—a directory that organizes the connection between the department that prepares the dish and the cash station where this dish is sold.
![]() - button Periods of Day. Clicking this button opens the list of day periods. The sale of goods at an enterprise can be carried out in different periods of the day. Periods can be called differently, for example: breakfast, lunch, dinner, etc.
- button Periods of Day. Clicking this button opens the list of day periods. The sale of goods at an enterprise can be carried out in different periods of the day. Periods can be called differently, for example: breakfast, lunch, dinner, etc.
![]() - button Types of Alcoholic Products. Clicking this button opens the "Types of Alcoholic Products" directory.
- button Types of Alcoholic Products. Clicking this button opens the "Types of Alcoholic Products" directory.![]() - button Customs Declaration Numbers List. Clicking this button opens the list of Customs Declaration Numbers.
- button Customs Declaration Numbers List. Clicking this button opens the list of Customs Declaration Numbers.
![]() - button Price Lists. Clicking this button opens the "Price Lists" directory.
- button Price Lists. Clicking this button opens the "Price Lists" directory.
![]() - button New Price List. Clicking this button opens the window for creating a new price list.
- button New Price List. Clicking this button opens the window for creating a new price list.
Reports Toolbar Buttons![]() - button Balance statement. Clicking this button opens the Balance statement report filter.
- button Balance statement. Clicking this button opens the Balance statement report filter.![]() - button Extended Balance statement. Clicking this button opens the Extended Balance statement report filter.
- button Extended Balance statement. Clicking this button opens the Extended Balance statement report filter.![]() - button Quantitative Balance statement. Clicking this button opens the Quantitative Balance statement report filter.
- button Quantitative Balance statement. Clicking this button opens the Quantitative Balance statement report filter.![]() - button Receipts Balance. Clicking this button opens the Receipts Balance report filter.
- button Receipts Balance. Clicking this button opens the Receipts Balance report filter.![]() - button Balance by Units of Measurement. Clicking this button opens the Balance by Units of Measurement report filter.
- button Balance by Units of Measurement. Clicking this button opens the Balance by Units of Measurement report filter.![]() - button Goods Movement. Clicking this button opens the Goods Movement report filter.
- button Goods Movement. Clicking this button opens the Goods Movement report filter.![]() - button Goods Group Movement. Clicking this button opens the Goods Group Movement report filter.
- button Goods Group Movement. Clicking this button opens the Goods Group Movement report filter.![]() - button Turnover Ledger. Clicking this button opens the Turnover Ledger report filter.
- button Turnover Ledger. Clicking this button opens the Turnover Ledger report filter.![]() - button Goods Movement Statistics. Clicking this button opens the Goods Movement Statistics report filter.
- button Goods Movement Statistics. Clicking this button opens the Goods Movement Statistics report filter.![]() - button Counterparty Analysis. Clicking this button opens the Counterparty Analysis report filter.
- button Counterparty Analysis. Clicking this button opens the Counterparty Analysis report filter.![]() - button Supplier Analysis. Clicking this button opens the Supplier Analysis report filter.
- button Supplier Analysis. Clicking this button opens the Supplier Analysis report filter.![]() - button Consolidated Supplier Report. Clicking this button opens the Consolidated Supplier Report report filter.
- button Consolidated Supplier Report. Clicking this button opens the Consolidated Supplier Report report filter.![]() - button Recipient Analysis. Clicking this button opens the Recipient Analysis report filter.
- button Recipient Analysis. Clicking this button opens the Recipient Analysis report filter.![]() - button Delivery Note Payment Terms. Clicking this button opens the Delivery Note Payment Terms report filter.
- button Delivery Note Payment Terms. Clicking this button opens the Delivery Note Payment Terms report filter.![]() - button Receipts Report. Clicking this button opens the Receipts Report report filter.
- button Receipts Report. Clicking this button opens the Receipts Report report filter.![]() - button Price List Price Control. Clicking this button opens the Price List Price Control report filter.
- button Price List Price Control. Clicking this button opens the Price List Price Control report filter.![]() - button Price List Comparison. Clicking this button opens the Price List Comparison report filter.
- button Price List Comparison. Clicking this button opens the Price List Comparison report filter.![]() - button ABC Analysis. Clicking this button opens the ABC Analysis report filter.
- button ABC Analysis. Clicking this button opens the ABC Analysis report filter.![]() - button ABC Analysis by Products. Clicking this button opens the ABC Analysis by Products report filter.
- button ABC Analysis by Products. Clicking this button opens the ABC Analysis by Products report filter.![]() - button Receipts Sales. Clicking this button opens the Receipts Sales report filter.
- button Receipts Sales. Clicking this button opens the Receipts Sales report filter.![]() - button Sales Act. Clicking this button opens the Sales Act report filter.
- button Sales Act. Clicking this button opens the Sales Act report filter.![]() - button Daily Sales. Clicking this button opens the Daily Sales report filter.
- button Daily Sales. Clicking this button opens the Daily Sales report filter.![]() - button Log of journal entries. Clicking this button opens the Log of journal entries report filter.
- button Log of journal entries. Clicking this button opens the Log of journal entries report filter.![]() - button Account Balances. Clicking this button opens the Account Balances report filter.
- button Account Balances. Clicking this button opens the Account Balances report filter.
![]() - button Balance by Correspondents. Clicking this button opens the Balance by Correspondents report filter.
- button Balance by Correspondents. Clicking this button opens the Balance by Correspondents report filter.
![]() - button Estimated Cost. Clicking this button opens the Estimated Cost report filter.
- button Estimated Cost. Clicking this button opens the Estimated Cost report filter.
![]() - button Online Balances. Clicking this button opens the Online Balances report filter
- button Online Balances. Clicking this button opens the Online Balances report filter![]() - button List of Sets. Clicking this button opens the List of Sets report filter.
- button List of Sets. Clicking this button opens the List of Sets report filter.![]() - button Goods Report. Clicking this button opens the Goods Report report filter.
- button Goods Report. Clicking this button opens the Goods Report report filter.![]() - button Alcohol Declaration. Clicking this button opens the Alcohol Declaration report filter.
- button Alcohol Declaration. Clicking this button opens the Alcohol Declaration report filter.
Service Toolbar Buttons![]() - button Documents. Clicking this button opens the filter for the list of USAIS documents.
- button Documents. Clicking this button opens the filter for the list of USAIS documents.![]() - button Outgoing Documents. Clicking this button opens the filter for the list of USAIS outgoing documents.
- button Outgoing Documents. Clicking this button opens the filter for the list of USAIS outgoing documents.![]() - button Acts. Clicking this button opens the filter for the list of USAIS acts.
- button Acts. Clicking this button opens the filter for the list of USAIS acts.![]() - button Queries. Clicking this button opens the filter for the list of USAIS queries.
- button Queries. Clicking this button opens the filter for the list of USAIS queries.![]() - button Counterparties. Clicking this button opens the filter for the list of USAIS counterparties.
- button Counterparties. Clicking this button opens the filter for the list of USAIS counterparties.![]() - button Goods. Clicking this button opens the filter for the list of USAIS goods.
- button Goods. Clicking this button opens the filter for the list of USAIS goods.![]() - button Inventories. Clicking this button opens the filter for the list of USAIS goods inventories.
- button Inventories. Clicking this button opens the filter for the list of USAIS goods inventories.![]() - button VETIS Delivery Notes. Clicking this button opens the filter for the list of VETIS delivery notes.
- button VETIS Delivery Notes. Clicking this button opens the filter for the list of VETIS delivery notes.![]() - button VETIS Correspondents. Clicking this button opens the list of VETIS correspondents.
- button VETIS Correspondents. Clicking this button opens the list of VETIS correspondents.
Window Toolbar Buttons![]() - button Cascade. Clicking this button arranges open windows in a cascade.
- button Cascade. Clicking this button arranges open windows in a cascade.
![]() - button Tile. Clicking this button arranges open windows in a tile pattern.
- button Tile. Clicking this button arranges open windows in a tile pattern.
![]() - button Arrange Icons.
- button Arrange Icons.![]() - button Close All Windows. Clicking this button closes all windows open in the program.
- button Close All Windows. Clicking this button closes all windows open in the program.
List of Hotkeys
[Shift] + [Ctrl] + [F] - Find object
[Insert] - Insert row
[Down Arrow] - Insert row
[Ctrl] + [Delete] - Delete row
[Alt] + [F4] - Exit the r_k SH Pro application
[Ctrl] + [F4] - Close window in r_k StoreHouse Pro
[F5] - Refresh
[Ctrl] + [C] - Copy
[Ctrl] + [V] - Paste
[Ctrl] + [A] - Select all
[Tab] - Move between window fields
[Esc] - Exit edit field