Drive Thru System Setup
Terms
Order taking window — a window with an installed POS terminal. Orders are taken through this window. The station can be of a waiter type — without a fiscal printer and a possibility to close orders.
Payment window — a window with an installed POS terminal. Orders made at an order taking window, or via an order booth, or via a mobile terminal, are paid through this window. A fiscal printer and other cash register station attributes, f.ex., pinpads are required.
Pickup window — a window where orders are packed and handed over to customers. VDU system must be installed to show full orders from order taking and payment stations. Sometimes a POS terminal can be installed for both order taking and payment, if there are few customers and all operations are performed via a single window.
OrderTaker station (OT) — the place where an operator takes an order from a guest.
A monitor located in a booth, if order taking booths are used, can be connected to this station. The number of OT stations shall be the same as the number of order taking booths.
Each ОТ station works with its own booth.
An ОТ station cannot work with several booths simultaneously.
Cashier station (CS) — a cashier pays orders here. There can be several cashier stations in a restaurant at a drive-thru line. A station that is first in a line after order taking windows/booths is the main one.
All stations in a drive-thru line should work with one cash server.
Possible Configurations
The basic scheme is as follows: 1. Order taking window > 2. Order payment window > 3. Order pickup window
The second monitor can be connected to an order taking window. Either a waiter station or a mobile waiter is used.
VDU shall be installed in a pickup window.
Settings
The required versions:
- RK 7.5.5.73
- VDU 3.9.8.2
- Specify station codes for the stations:
Cash stations of this system should have specific codes, since VDU is used:- OT stations should have codes 50 or 52
- CS stations should have codes 51 or 58
- Configure service positions:
In the manager station, go to Options > Parameters > Options usage and enable the Use service positions parameter by checking the Boolean box in the parameter's properties.
Then, go to Personnel > Serving Positions reference, and create a Drive Thru serving position for your restaurant.
You can give it any name but it should contain a drive-thru mark, f. ex., Drive Thru serving position - Set a waiter type for an OT cash station:
In Options > Parameters > Station parameters >Station working modes, enable the usage of FALSE exception for the Cash station parameter by checking the Exceptions box in the parameter's properties - Hall plan creation:
In Options > Tables and Plans > Hall Plans and Tables, create a hall plan and tables for Drive Thru. The number of tables should be aproximately equal to the queue length.
In the hall plan properties, select Drive Thru serving position for this restaurant in the Seving position line of the Restrictions section - Configure start windows for stations:
In Options > Parameters > Station parameters >Station working modes, create two exceptions for the Start Window parameter — Order creation and Order choosing — and configure their usage.
Now, go to Options > Parameters Usage and specify the station where order taking will be performed — OT, as the Order creation exception usage.
For Order choosing exception, specify the station where order payment will be made — CS) - Configure automatic table selection:
In Options > Parameters > Station parameters > Order creation, create a new exception with First empty value for the Auto choice of the table parameter.
Go to Options > Parameters Usage and specify the station where order taking will be performed — OT, as the usage for this exception - Select the hall plan for the stations:
Go to Service > Stations and Devices, select the required cash server and open the Cash stations tab. In the Default Hall Plan property, in the Basic section, select the previously created hall plan - Add the VDU driver to cash stations on the Drivers tab in the Service > Stations and Devices reference
- Edit the Order label in VDU parameter:
Go to Options > Parameters > Installation > Link with other systems > KDS & VDU > Order label in VDU and change the String parameter value to "%4:s"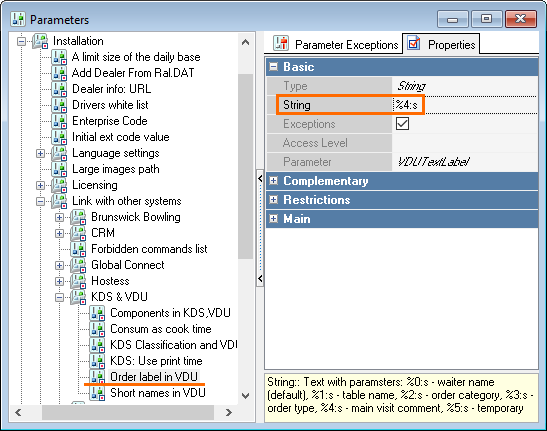
Cash Station Interface Settings
Generally, user, i.e. not pre-installed cash register forms are used for Drive Thru system: Order editing, Order edition (quick check), Order choice as well as order buttons form.
Therefore, it is necessary to design new forms for CS and OT stations, and configure their usage.
Add the To one car button to the order editing form for the OT station

The location of the button is at your discretion. The button functionality is described below since the script is important in this case.
- Go to Service > Scripts > Operations, create a script and link it to a free user operation from the Service > Operations > User operations reference.
Link the operation to a newly created functional key in the Options > User Interface - Function Keys reference
The script content is as follows:
procedure ProcessOperation1000147(Parameter: integer); // procedure name may be different in your case
begin RkCheck.UpdateVisitcomment('<<<', '');
end;The new forms scheme should be configured for CS and OT stations.
Use different selectors for different types of CS and OT stations.
For CS stations, use the set of functional keys for Order edition (quick check).
For ОТ stations, use just Order editing.
To configure selectors for the stations go to Options > User Interface > Selectors Usage.
Operation selectors for the Order editing form are located in Options > User Interface > Selectors > Order > Operation's selector > Receipt: Operation's selector.
Do not forget to configure selectors for the CS cash station. If no separate selector is used, enable the default FD receipt: operations selector.
Be sure to specify the Default page in the Basic properties of the selector in the Options > User Interface > Selectors reference
If the To one car button is used, at the VDU orders will be displayed with a special mark — <<<<< , preceded by the number of order with which this order should be served.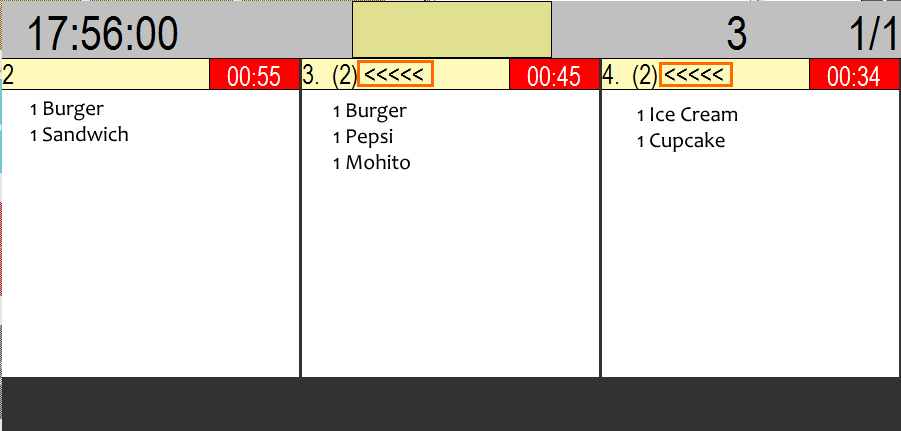
The orders will also have the <<< mark at the CS cash station.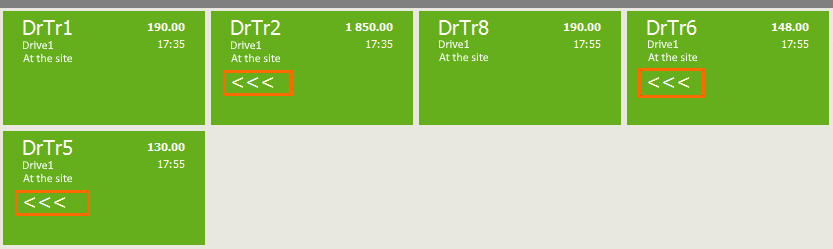
Setup of Booth Screens
If the OT station is connected to the order booth, add a second screen driver to it. See more detail in the article on setup of the second screen.
VDU Settings
Configure connection of the OT and CS cash station with the VDU. See more detail in the article on VDU setup.
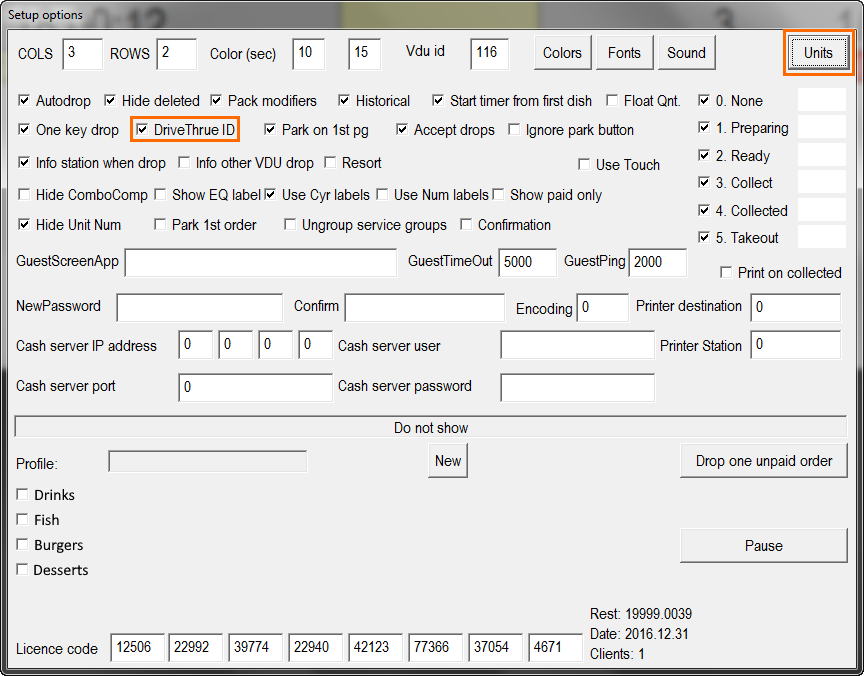
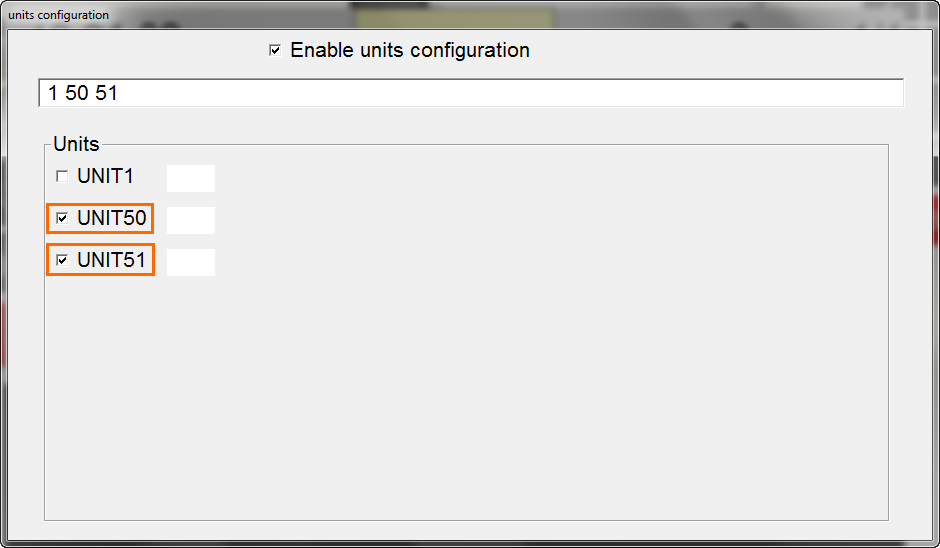
For the orders not to duplicate at VDU screens, install VDU version 2.4+, and check the Drive thru ID box in VDU settings. Also, enable the station control by Enable unit configuration option.