Setup of Second Screen via XML Interface
Important!
The Second Screen will not be updated and supported from December 31, 2020. Use Guest Screen instead.
Introduction
SecondScreen.exe is a Windows application controlled by the cash station.
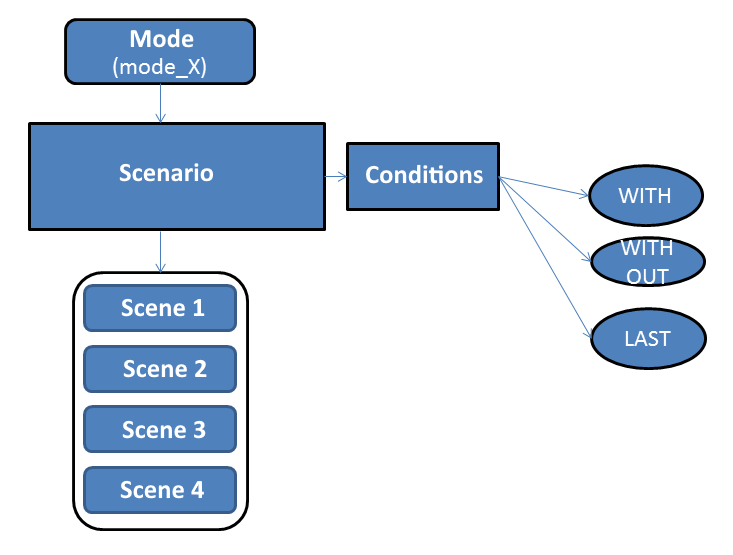
The cash station sends the operation status changes to the application, which, in turn, responds to the events and triggers corresponding scenarios.
Usually, for each cash station operation mode, a separate scenario or several scenarios with different conditions are configured. Scenarios consist of scenes.
Scenes have a specific data display algorithm. It uses one of the supported media files for display, which can also be a .dll application.
When editing parameters of r_keeper 7 objects, such as dishes, dish categories, business periods, in XML files, the code property is used instead of an identifier.
All necessary files are available at FTP: ftp://ftp.ucs.ru/rk7/INSTALL/RK7_XMLSecondScreen.
The system consists of two parts:
- The core — SSXMLAIR_core_version.rar
- The folder with design templates, SSXMLAIR_Designs, which contains pre-installed design variants for different screen layouts and restaurant concepts.
Configuration and Launch Procedure
For the software correct operation on certain platforms, an MFC security system update can be required for the Microsoft Visual C++ 2008 distributable package with service pack 1 (SP1).
- Download and install the Adobe Flash active-x component v.11 or later. The distribution kit is available at FTP: ftp://ftp.ucs.ru/Foreigns/TOOLS/Flash. It is not required for the latest versions.
- Unzip the SSXMLAIR_core_<version>.rar archive contents to the folder containing wincash.bat of the cash station, where the second screen is physically connected, keeping the folder structure.
- Apply the relevant formatting. For this purpose, select the archive with the required formatting in the SSXMLAIR_Designs directory and unzip it to the cash station folder, keeping the folder structure.
- Edit SecondScreen.ini and SSConfig.xml — see details below.
- At the manager station, go to Service > Stations and Devices, and add the Second Screen with XML Interface to the Devices tab. Specify the log file name in the Log Name parameter, and select the logging level in the LogLevel line.
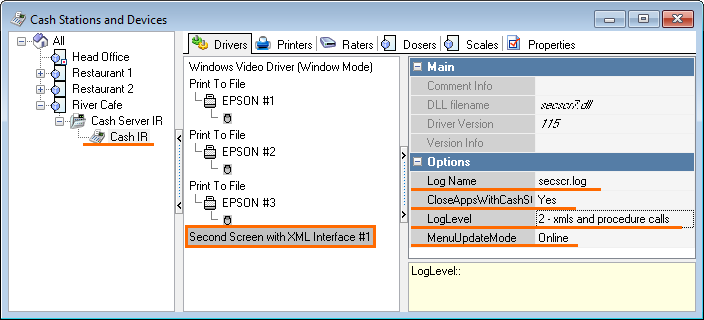
- Reload the cash station and make sure that secscr7.dll has been uploaded to the cash desk.
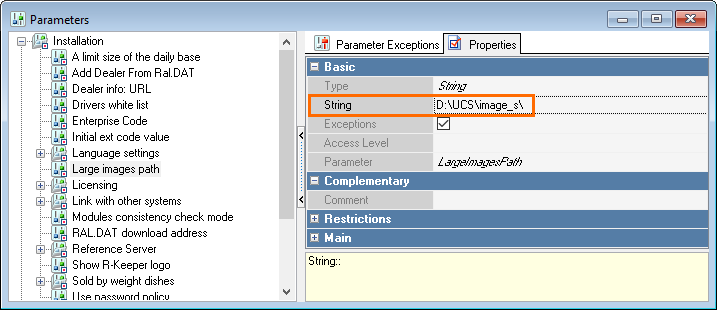
- If you need to assign an image to a dish, create a new directory and fill it with 512x512 px dish pictures in .png format.
- Go to Options > Parameters > Installation and specify the path to this directory in the String property of the Large images path parameter .
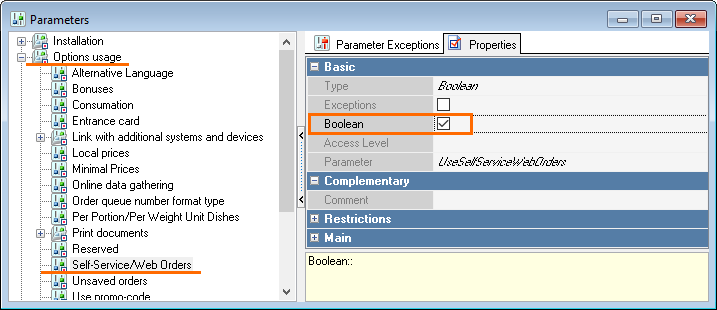
- To allow the image selection from the previously created folder, go to Options > Parameters > Options usage and check the Boolean box in the Self-Service/Web Orders parameter properties. Then fill in the Large image file field in the Self-Service/Web Orders section of the dish properties in the Menu > Menu reference.
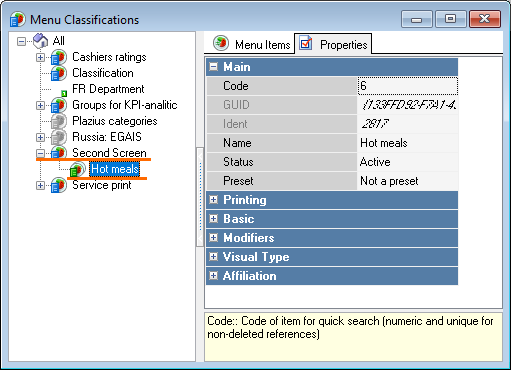
- Go to Menu Classifications. Create a new Dish Classification and a category (-ies) for the Second Screen. Dish categories are required if you need to configure scenes based on several dishes.
- Configure the Business period, if needed. For that, go to Options > Head Office > Business Periods.
- Now, you should configure the display scenario for the second screen which requires changing the corresponding configuration files: SecondScreen.ini and SSConfig.xml.
Update
To update the installed version, you need only to update the contents using the SSXMLAIR_core_<new_version>.rar archive.
Editing Configuration Files
When configuring the display of images and captions on the second screen, pay attention to three main files:
- SecondScreen.ini — general settings for the second screen forms, configuration of sizes, coordinates, display and logging parameters
- SSConfig.xml — configuration of scenarios, scenes, and their design
- media\skin.xml — detailed characteristics for the second screen design: enabling or disabling areas and fields, color formatting, base layers, font sizes, and colors.
SecondScreen.ini
General settings for the second screen forms: configuration of the notification area, advertisement area, and order calculation area sizes
[DISHPICS]
Dir=C:\image\ ;; The path to the dish images. This folder should contain files used for the dishes at the manager station
ImageForMissing=media\image_for_empty.png ;; The path to the image file that displays in case of a missing dish image

[OUTPUT]
DecimalDigits=0 ;; The number of decimal digits in prices
Language=RUS ;; Localization language (RUS, ENG, GER) as specified in SSStrings.xml
ItemName= ;; The field containing dish names. If empty, the Name field value is taken. Moreover, an AltName value can also be specified. If an extended property is specified, it should be prefixed with gen, e.g., ItemName=genName0419.
ShowZeroCheckLines=1 ;; To show zero price lines in the receipt (0=hide, 1=show)
ShowNewItem=1 ;; To display the dish, that has just been sold, on the second screen (0=do not display, 1=display, empty=0). In this case, a special effect (steam) is displayed over the dish image

PicByCode=0 ;; To display the dish image, finding it in the "Dir" folder according to the DishCode.png template in case of an empty Large image file parameter at the r_keeper 7 manager station.
ShowVoting=0 ;; To show the voting box (0=hide, 1=show, empty = 0). See details in the Quality index section
DriveMode=1 ;; Drive mode (0=hide, 1=show, empty = 0)
ShowCursor=0 ;; To show a cursor (0=hide, 1=show, empty = 0)
PopupStation=1 ;; To send a focus to the cash desk (0=do not move, 1=move, empty = 0)
ShowModifiers=1 ;; To show modifiers and combo contents (0=hide, 1=show, empty = 0)
ReverseCheck=0 ;; To show a receipt in reverse order (0=no, 1=yes, empty = 0)

ShowLastOrder=1 ;; 0 — to work as usual, not to display previous order info, 1 —  to display previous order info until a new one is opened (sold dishes and order amount ). Implemented in SecondScreen.dll 1.0.0.160
ScenarioType=1 ;; Scenario type: 0 — normal, 1 — according to the last dish sold
HidePrices=1 ;; Not to show prices

[SCREENPOSITION]

; Second screen left coordinate
MainLeft=1024
; Second screen top coordinate
MainTop=0
; Second screen width
MainWidth=1024
; Second screen height
MainHeight=768

[LOGFILE]
; Logging level (0=no logging, 1=errors only, 2=errors and warnings, 3=full log)
Log=3
; Log directory
LogDir=SSLogFiles
[REGSOCKET]
; Screen internal communication host ( it is recommended to keep 127.0.0.1 by default)
Host=127.0.0.1
; Screen internal communication port (it is recommended to keep 2489 by default)
Port=2489
[CS_CONNECTION]
; Common Server address, if the configuration (scenario) is performed via the r_keeper 7.5.2 plugin and FeatureServer. If the parameter is empty, settings are taken from local files
;; WSDL= https://IP_CommonServer:PORT_CommonServer/soap/UCSCommonWS
WSDL=
[STATION]
; Station code. Used when launching.
Code=1SSConfig.xml
A file with scene settings for the second screen. For each cash desk state/mode, a scenario with conditions should be specified. The scenes are launched if the relevant conditions are fulfilled.
SSConfig.xml basic parameters
- Scenes
Scenes are tagged with <SceneList> and can be edited in the <SceneList> ... </SceneList> block.
Possible scene types are:
- Type=“Gallery” – gallery. Specify a dish group code or a single dish code
- Type=“Image” – an arbitrary image, not linked to r_keeper 7 references
- Type=“Video” – a video in .flv format
The scene with id = {-1} can be used to display the dish, that has just been sold, only if the ShowNewItem=1 parameter is set. Add any scenario without scenes to the Mode 3_2.
If a specific caption is required when displaying a certain category, f.ex., if Don't forget to order a beverage should be displayed for the Juices category, use the Slogan parameter.
This parameter has the following characteristics:
Slogan="Taste the dessert... and you'll long for more!" SloganAlign="center" SloganX="150" SloganY="680" SloganWidth="500" SloganHeight="20" SloganBackground="" SloganFontSize="25" SloganFontColor="0xFFFFFF" SloganPadding="0"
These characteristics are responsible for the caption display — alignment, upper left point coordinates (X,Y,Z), width, height, background, font size and color, indent.
If you need the dish, that has just been added to the order, to display on the second screen not for a a couple of seconds but longer, add the Duration="10" attribute for the scene with ID="1" in SSConfig.xml. This attribute specifies the required display duration in seconds.
Starting from version 1.0.0.146, you can set an effect for a scene by adding a child element to it.
Example:
<Scene Id="{-1}" Type="Gallery" Name="LastItem" DishCode="0" Description="Added to order" Price="0" Currency="" Background="Advert/Background.png" PriceSubstrate="Advert/Price.png" Padding="40" NameFontSize="72" NameFontColor="0xfff9d4" DescriptionFontSize="25" DescriptionFontColor="0xf3d7b7" PricePadding="30" PriceFontSize="90" PriceFontColor="0xfff9d4" CurrencyFontSize="60" CurrencyFontColor="0xfff9d4" Effect="2" Animation="0" NameAlign="center" DescriptionAlign="center" PriceAlign="right" Slogan="" SloganAlign="center" SloganX="0" SloganY="0" SloganWidth="0" SloganHeight="0" SloganBackground="" SloganFontSize="0" SloganFontColor="0xFFFFFF" SloganPadding="0" Duration="10">
<EffectCase>
<CaseItem Category="category_code_without_effect" Value="0"/>
<CaseItem Category="category_code_with_steam" Value="1"/>
<CaseItem Category="category_code_with_frost" Value="2"/>
</EffectCase>
</Scene>Frost and steam effects can be disabled by the Effect="0" parameter.
- Scenarios
Scenarios are tagged with <ScenarioList>. A scenario allows configuring scenes depending on the cash station mode or state. Find the description of modes below.
The <Scenario Id="{Q}" parameter reflects the scenario ordinal values (Q = 0...N).
For modes 4 (payment) and 5 (receipt printing) you can also specify scenarios, f.ex., advertise special offers. For these modes, it is required to configure the advertisement area and make it visible: in media\skin.xml, set visible=0 for the <adverts> tag.
In these modes, scenarios can be additionally restricted with the Payment="true" attribute, which means that the scenario will be displayed only if the payment has already been made, or with the Payment="false" attribute, which means that this scenario will be displayed only if the payment has not been made yet — the so-called last offer. If there is no such attribute in the scenario, it is applicable in both cases.
In the scenarios, you can specify a category-based hierarchy, for example:
<Scenario Id="{4}" Last="22" With="6,9,7" Without="8" Comment="added dishes from the category with code 6, 9, 7; there are no dishes from category 8. Launching scene 6"> <ShowScene Id="{6}"/>CODE- Instead of order of categories, With and Without parameters take the whole set of them in the receipt (the "AND" condition), formatted as a comma-separated list (without spaces). For the example above, the condition will be as follows: if the order contains a dish from category 6, and a dish from category 9, and a dish from category 7, and no dish from category 8, then execute scene 6.
- The Last="22" parameter verifies that the last added dish belongs to the category with code 22.
If you need to check the availability of certain dishes, and not categories, use the following parameters: WithCodes, WithoutCodes and LastCode.
The Last and LastCode parameters can be applied, only if SecondScreen.ini has the ScenarioType=1 parameter.Skin.xml
Skin.xml contains detailed characteristics for the second screen design: enabling and disabling areas and field, color formatting, base layers, font sizes and colors.
In this file, you can configure the visual design of the second screen in different modes mode_X.
Let us look at the parameters:
- <Advert X="0" Y="187" Width="768" Height="837" Visible="1"/> — the line responsible for the advertisement block
- <Check X="0" Y="0" Width="0" Height="0" Visible="1"/> — the line responsible for the receipt area
- <QualityServise X="0" Y="0" Width="0" Height="0" Visible="0"/> — the line responsible for the service quality assessment block
- <QRCode X="0" Y="0" Width="0" Height="0" Visible="0"/> — the line displaying the QR-code block
- <Logo X="25" Y="187" Width="142" Height="74" Visible="0"/> — to display logo
- <Ico X="0" Y="0" Width="0" Height="0" Visible="0"/> — to display icon (f.ex., in mode_4, it's a cart icon)
- <Display X="0" Y="0" Width="768" Height="193" Visible="1"> — to display the caption from "showtext"
- <Effect Visible="0"/> — to enable or disable effects
These lines also allow editing the data arrangement coordinates, such as: X,Y — block coordinates, Width — block width, Height — block height, and the Visible parameter (enable/disable).
The receipt area transparency can also be adjusted in skin.xml, in the Second Screen > Screens > Check element by the AdvertAlpha="50"attribute: from 0 — non-transparent to 100 — completely transparent.
Modes
- Mode_1— waiting mode — before the cashier login
- Mode_2— main menu and other service forms — the cashier has logged in and is active
- Mode_3— the form for order editing and order status changing
- Mode_3_1— order collection mode, but without any dish selected
- Mode_3_2— dish adding mode, when at least one dish is selected
- Mode_4— the form for order editing, order calculation, and payment status
- Mode_5 — the form for order editing, receipt printing status
- Mode_11 — order creation form
- Mode_18— logging form, after the cashier login, but before the activation.
Examples of Second Screen Animation Setup
To implement the scenario, use either dish codes, or category codes from the Menu > Menu Classifications reference.
Task No.1: When adding a main course to the order, start displaying dishes from another category on the second screen.
For example, when a dish from the Hot meals category is sold, start displaying dishes from the Desserts category.
Solution:
First, make necessary settings in the SSConfig.xml file, specifically a set of scenes to be displayed should be specified in the SceneList group. In our case, we need to display the Desserts category when selling dishes from the Hot meals category.
For this purpose, create a new scene written in one line, for example:
<Scene Id="{4}" Type="Gallery" Name="DESSERTS" DishGroup="6" Description="" Price="" Currency="" Background="Advert/Background.png" PriceSubstrate="Advert/Price.png" Padding="40" NameFontSize="72" NameFontColor="0xfff9d4" DescriptionFontSize="20" DescriptionFontColor="0xf3d7b7" PricePadding="30" PriceFontSize="90" PriceFontColor="0xfff9d4" CurrencyFontSize="60" CurrencyFontColor="0xfff9d4" Effect="2" Animation="1" NameAlign="center" DescriptionAlign="center" PriceAlign="right" Slogan="" SloganAlign="center" SloganX="0" SloganY="0" SloganWidth="0" SloganHeight="0" SloganBackground="" SloganFontSize="0" SloganFontColor="0xFFFFFF" SloganPadding="0">
  <SloganCase>
    <CaseItem Category="6" Value="Taste the newest dessert!" />
    <CaseItem Category="14" Value="Taste the newest pie!" />
   </SloganCase>
</Scene>The DishGroup parameter stands for the group that contains dishes to be demonstrated. It should match the category code from the Menu Classifications reference.
Further, the group of parameters Mode_3_2 ModeId="3_2" is responsible for the algorithm of displaying scenes when adding dishes to and order, i.e.:
<Mode_3_2 ModeId="3_2">
<Scenario Id="{2}" With="5" Name="Order a dessert...">
<ShowScene Id="{4}"/>
</Scenario>
<Scenario Id="{1}" Name="Scenario 1">
<ShowScene Id="{1}"/>
<ShowScene Id="{2}"/>
<ShowScene Id="{3}"/>
</Scenario>The algorithm is executed from top to bottom. If the With=category_code (i.e. dish code from the required category) condition is fulfilled, then the scenario with Id=4 is executed, if not — the program executes everything below it.
Task No.2: The following scenario should be implemented:
1) To display dishes from category 6 until a corresponding dish is added
2) If a dish from category 6 has been added, to display dishes from category 9
3) If dishes from categories 6 and 9 have been added, to display dishes from category 7
4) If dishes from categories 6, 9, and 7 have been added, to display dishes from category 8, for example, and so on.
Solution:
SSConfig.xml should contain the following scenario:
<SecondScreen>

<SceneList>

...cut...

<Scene Id="{6}" Type="Gallery" Name="Desserts" DishGroup="6" AltDishName="Our desserts"...cut... />

<Scene Id="{7}" Type="Gallery" Name="Burgers" DishGroup="5" AltDishName="Our burgers" ...cut... />

<Scene Id="{8}" Type="Gallery" Name="Fish" DishGroup="7" AltDishName="Our fish" ...cut... />

<Scene Id="{9}" Type="Gallery" Name="Beverages" DishGroup="4" AltDishName="Our beverages" ...cut... />

</SceneList>

<ScenarioList>

<!--...cut...-->

<Mode_3_2 ModeId="3_2">

<Scenario Id="{1}" With="5,7,4" Without="6" Comment="there are Burgers(5) AND Fish(7) AND Beverages(4), but no Dessert(6), display cat. Dessert(6)">

<ShowScene Id="{6}"/>

</Scenario>

<Scenario Id="{2}" With="5,7" Comment="there are Burgers(5) AND Fish(7), but no Beverages(4), display cat. BEVERAGES(4)">

<ShowScene Id="{9}"/>

</Scenario>

<Scenario Id="{3}" With="5" Without="7" Comment="there is a dish from category Burgers(5), but no Fish(7), display category Fish(7)">

<ShowScene Id="{8}"/>

</Scenario>

<Scenario Id="{4}" Without="5" Comment="there are no dishes from category Burgers(5), display dishes from category Burgers(5)">

<ShowScene Id="{7}"/>

</Scenario>

</Mode_3_2>

<!--...cut...-->

</ScenarioList>

</SecondScreen>System operation
Launch
- Start the r_keeper cash desk as usual. If secscr7.dll has been loaded to the cash desk, r_keeper 7 will call for SecondScreen.dll at startup. secscr7.dll is the 'Second Screen with XML interface' driver file at the cash station. It will be preloaded to the station.
- SecondScreen.dll triggers SecondScreen.exe.
Configuring Second Screen Remotely on Another PC
If it is implied that the second screen is launched on a station (PC2), meanwhile the cash desk is located on another station (PC1), perform the following steps:
- Folders with images should be available on both PCs, and their paths should match. The paths to the win\media directory should also match completely.
- On PC2, remove Second Screen with XML Interface from the device list in the manager station.
- On PC2, specify the IP address of PC1 for the Settings element in the Host attribute of the [RK7 path]\bin\win\media\Settings.xml file
- Restart PC2
- After PC2 startup, launch manually the [RK7 path]\bin\win\media\SecondScreen.exe file. You can also create a shortcut in the autoloading menu.
- On PC1, configure the Second Screen as usual, and then delete or rename the [RK7 path]\bin\win\media\SecondScreen.exe file
- Restart PC1.
If you need to launch a second screen on a PC without the manager station (PC2), create the same path to the win\media directory, as on PC1, and then copy the media folder there from PC1. After that, perform the actions as described above.
Geometric characteristics (height, width, upper left corner coordinates) of SecondScreen.exe on PC2 should be specified in SecondScreen.ini, located on PC1 in the cash station folder.
Reports
- You can review the Service Quality Index, if it is used in r_keeper 7 reports. Available in the Receipts data set , ID=14.
- The quality index can take the following two values: good=1, bad=5.
- You can find the quality index in the r_keeper 7 database, [PRINTCHECKS] table, [SQI] field.
Quality Index
After the order is paid, you can get feedback — there are special buttons for it.
Configure the corresponding buttons in the \media\skin.xml file, in the following block:<QualityServise Enabled="1" Text="ASSESS OUR WORK" FontSize="32" FontColor="0xfff9d4" Image="qs_image.png" BtnNegativeA="qs_negative_a.png" BtnNegativeB="qs_negative_b.png" BtnPositiveA="qs_positive_a.png" BtnPositiveB="qs_positive_b.png"/>CODE
- After the order is rated, the data will be written into the database, and the user will receive the following message:

- You can print SQI or its associated text in almost any document. In this case, it is usually necessary to edit the corresponding layout.