QMS Electronic Queue Setup
Introduction
QMS is a program for displaying the status of orders on the screen in the delivery area. The guest will be able to monitor the status of their dish on the screen.
QMS works only alongside with KDS Pro or VDU.
To open the program settings, click in the upper-right corner in the main menu.
The approximate zone is drawn in the screenshot: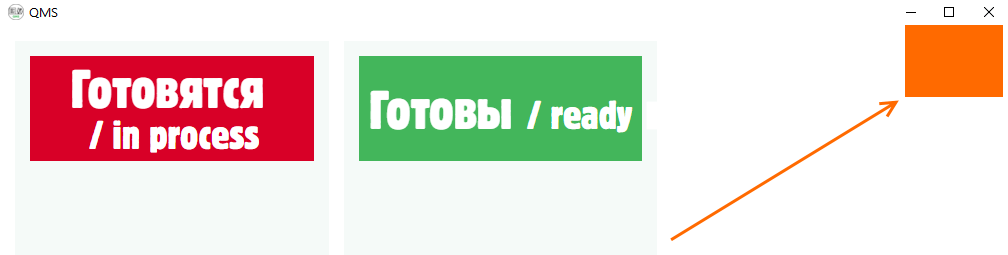
The letter in the QMS order is the code of the cash station + the number of the letter in the alphabet corresponding to this code. For example, if the code of the station at which the order is made is 1, then the number will be A-01.
The order from the station with code 3 will have number C-02, and so on.
System Requirements
QMS server minimum requirements:
- OS Windows 7 SP1
- 1 GHz processor
- 512 MB RAM
- 850 MB HDD
- These ports must be open on the server:
- 443 for access to the licensing server and localization server
- 60606 to access the licensing system
QMS client minimum requirements:
- OS Windows XP
- Installed NetFramework 4 and VC Redist 2013 libraries
- Windows XP or installed Net Framework 4 require Service pack KB2468871
- Windows 7 embedded requires Service pack KB2533623
- Adobe Flash Player to use flash elements
Licensing
To work with the QMS system, the object must have a master license on the licensing server.
The license is called R-Keeper module QMS and there are 2 types:
- For 1 year — R-keepeг Queue Management System 12 months
- Unlimited — R-Keeper QMS
The master license is required to activate the software. There is no need to generate an active license on the license server. The program will do it automatically. Find more details in License Activation.
Server Installation
Follow these steps to install the QMS server:
- Download QMS_server_setup.exe from the FTP server: ftp://ftp.ucs.ru/rk7/other/QMS/QMS_server/
- Run this file
- Select the installation language and accept the terms of the license agreement
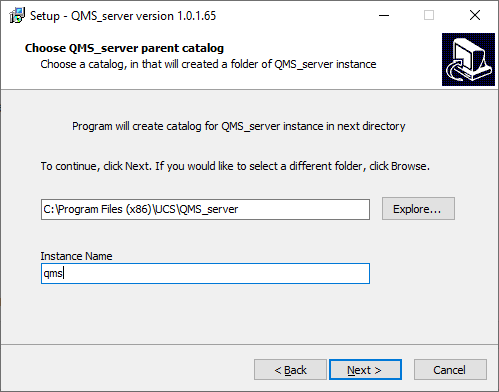
- Choose New instance install
Specify the path to the folder where the QMS server will be installed and specify the name of the instance

Spaces in folder address are not recommended.
- Specify the port which the QMS server will use
- Select the Start menu folder to create a QMS server shortcut
- Click Install
- Click Finish after the installation is complete
After being installed, the server starts and runs as a service.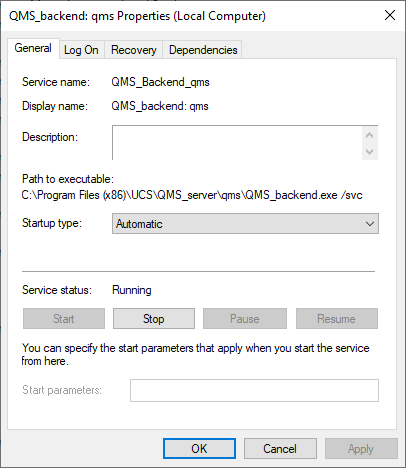
Server Update
Use the installer to update the server. The server and templates are updated separately.
- Download the latest version of the server from the FTP server and run it.
- Select the required item
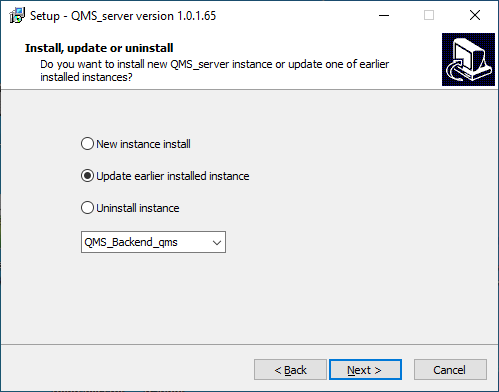
- Click Update
The installer will update the server and restart the service.
Server Templates Update
Templates are the appearance of a QMS client. During the initial installation, the server applies standard templates.
If developers change the standard templates, they need to be updated.
To update the templates, do the following:
- Download the archive with the standard theme from ftp://ftp.ucs.ru/rk7/other/QMS/QMS_server/Themes/
- Open the QMS client and go to Settings > Display (Настройки > Отображение)
- At the bottom of the page, in the Download theme section, select the downloaded archive
- Click Apply
- The new templates will be applied, and the client will restart.
Client Installation
To install the QMS client, follow these steps:
- Run QMS_client_setup.exe after downloading it from the FTP server: ftp://ftp.ucs.ru/rk7/other/QMS/QMS_client/
- Select the installation language
- Accept the terms of the license agreement
- Select the QMS client installation folder
- Click Install
- After the installation is complete, click Finish
Setting up the Connection
- Right-click in the main menu and select Settings
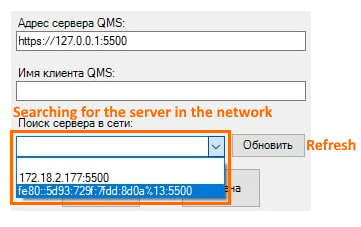
- The server will automatically search for the servers in the network
- Enter the name of the QMS client and click OK.
License Activation
First, it is necessary to activate the license in the client.
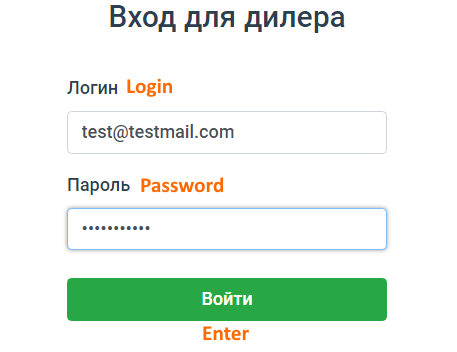
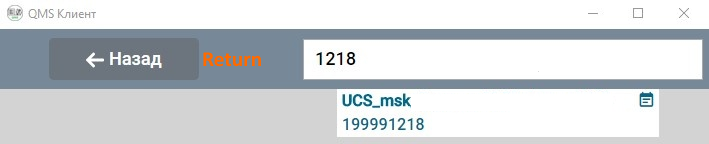
- Run the QMS_Client.exe file and log in with your dealer password and the e-mail specified in your object properties in the license system
- After authorization, select your object
- There are 2 options for activating the license:
- Activating a new license
- Linking an existing license
Select the required tab. To activate a new license, select the master license in the list under the New license line: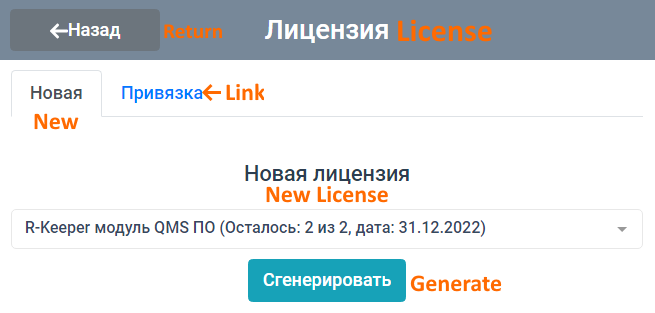
Click Generate.
- If the license has already been generated, go to the Link tab and select this license.
Click Link
After the license is activated, the main window of the electronic queue opens.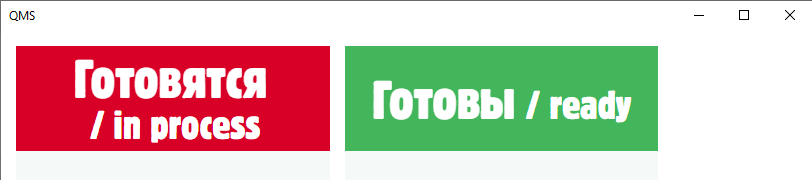
Localization
Russian is QMS default language. To change the language, do the following:
- Open the QMS client and go to settings:

- On the Main tab (Основные), scroll down and find the Localization settings (Настройки локализации)

- Select the required language from the drop-down list.
Click Save (Сохранить) in the bottom of the screen.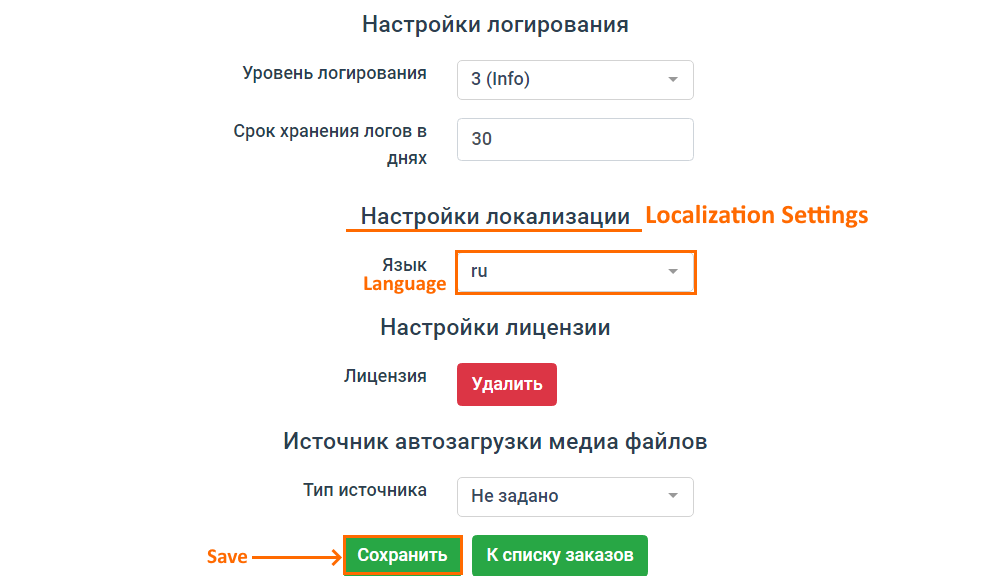
Communication with KDS Pro
KDS Pro Settings
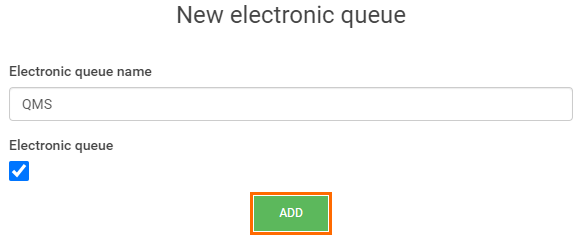
- Go to https://kds.ucs.ru and create a new client to display QMS orders from KDS Pro

- Check the box Electronic queue, specify the name and click Add
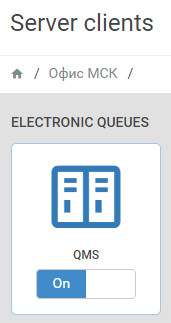
- The created electronic queue will appear in the Electronic queues list:
QMS Client Settings
- Open the QMS client and go to settings by clicking in the upper-right corner
- On the Main tab, click the New KDS server button.
Specify the IP address, port, and name of the station created in KDS PRO. The station name register should be exactly the same as the name register in KDS PRO.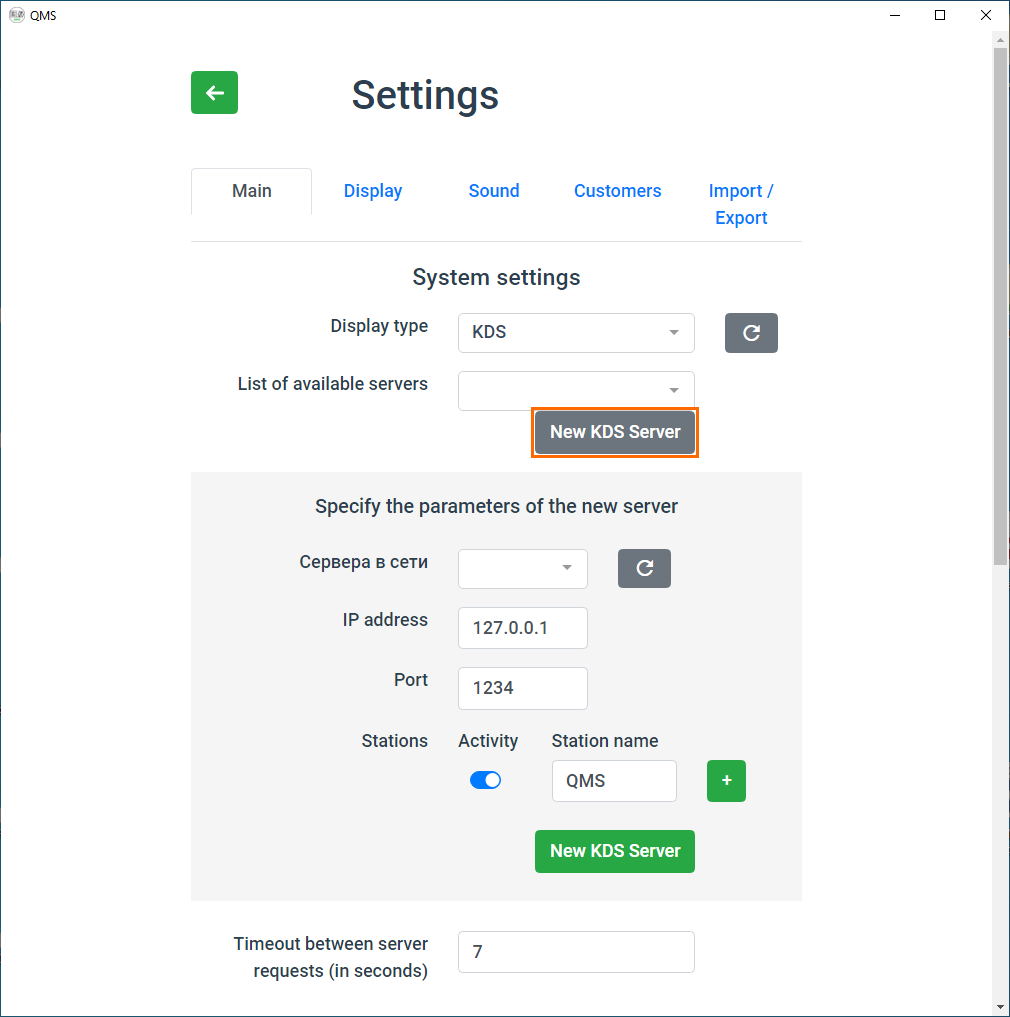
After that, the server can be selected in the list of available servers. Pay attention to the parameter setting Timeout between requests. The shorter the timeout, the faster the order statuses in QMS will change.
Communication with VDU 4+
VDU Settings
- Go to the VDU settings. Go to the section Interfaces > Network > General and select 3 as the VDU protocol. QMS does not work with version 2 of the protocol.
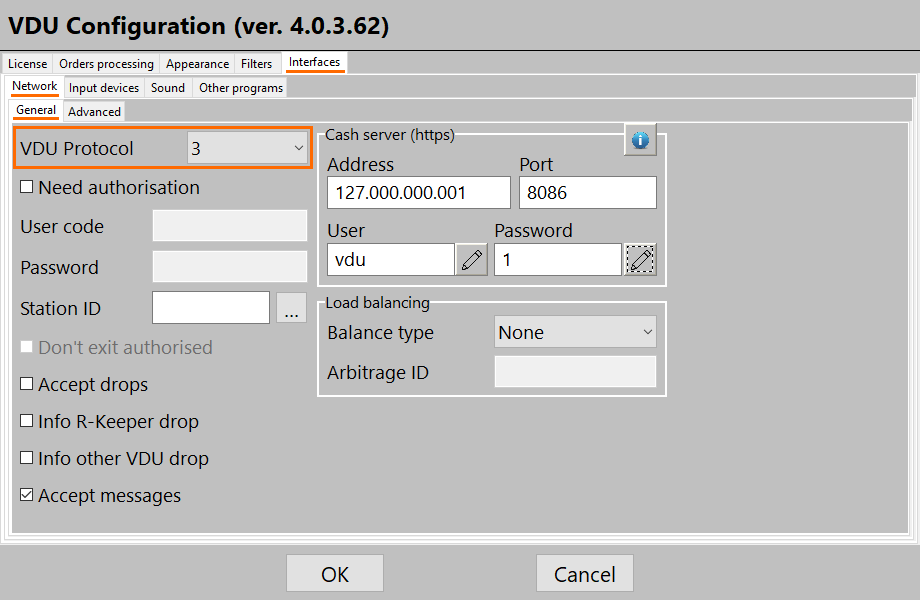
- At one of the VDU stations, specify the address and port of the QMS server in the settings. The port should match the data exchange port between the QMS server and the client.
To do this, go to Interfaces > Third-party programs and specify the server IP and port. Port 8888 is specified as an example.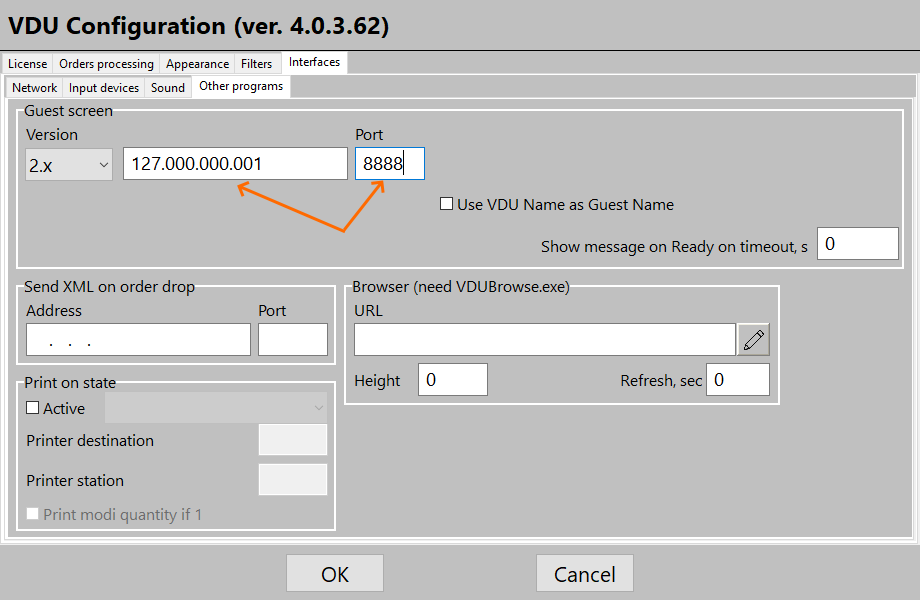
QMS Client Settings
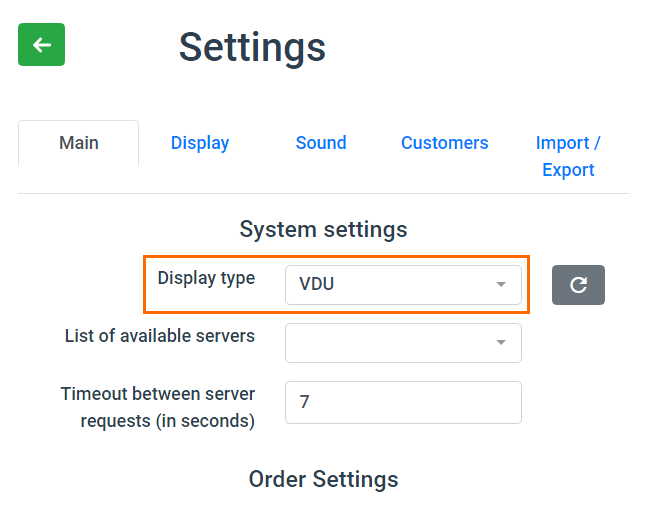
- Open the QMS client settings
- In the System settings, select VDU as the Display Type parameter
- In the main QMS settings, the VDU server will appear in the list of available servers only after the VDU sends any order to the QMS server.
Configuring Several Clients
You can connect several screens to the QMS system. The settings of all screens will be the same and all displayed orders will be the same. To connect a screen with unique settings, you will need to obtain an additional license and configure a separate QMS server.
Client Authorization
- The first login to QMS is performed automatically from the first connected client. Its default name is Admin.
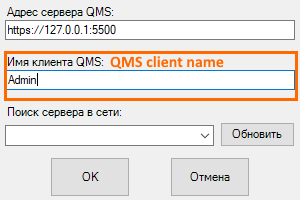
If you fail to log in, right-click in the blank space and select QMS client settings (Настройки клиента QMS) and enter the client's name manually: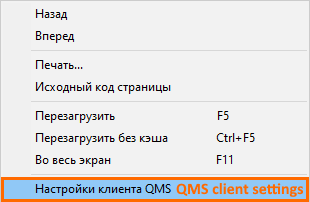
- To access QMS from other clients, create them on the Customers tab of the main QMS settings
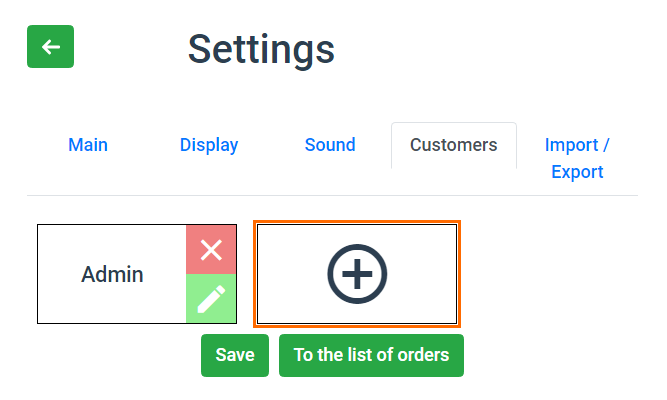
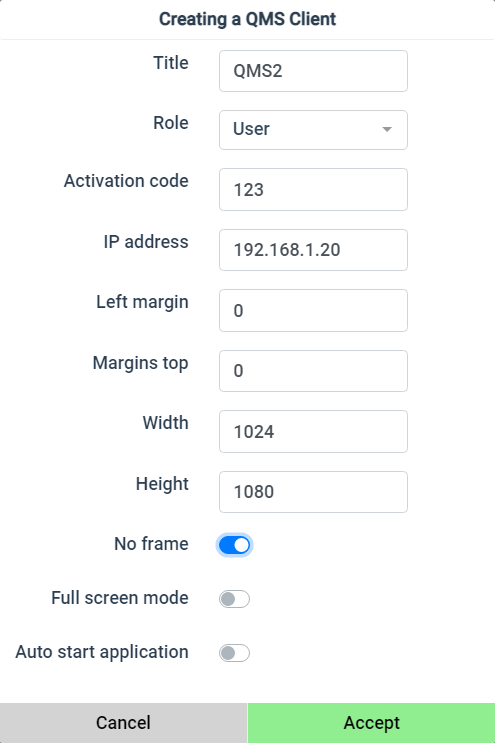
Specify the following parameters:- Title — a unique name
- Screen margins
- Auto start settings
- Select the role: Admin or User.
User has no access to the settings from the main screen of the QMS client and and cannot open them by right-clicking at the main screen. You can manage the settings of all clients from any client that has the Admin role. - After filling all the nessecary fields and click Accept.
- Click Save

To connect the client created in the settings with the ones installed through the installer, you need to perform the activation procedure.
There are two ways to activate the client:
- By IP address: open the settings by right-clicking in the blank space and specify the clients name or select it from the drop-down list:
- In the client aettings, specify the activation code that appeared in the client window when you first started it.
Custom Themes
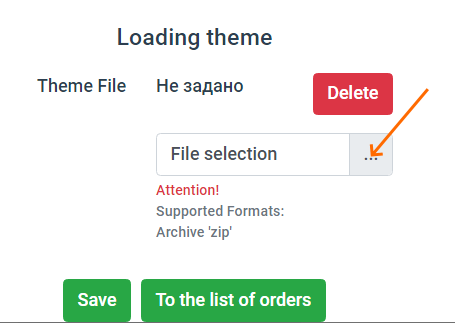
The QMS server supports changing themes. The theme itself is a regular zip archive. It is used in the settings, on the Display tab.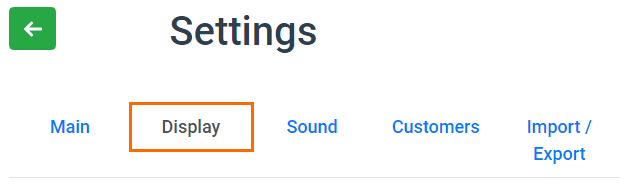
To change the theme:
- Find the Loading theme section in the bottom of the screen
- Click the File selection button and find the archive with the theme
- then click the Apply button and wait until the progress icon disappears and the page is refreshed.
Different themes may have additional specific settings.