Introduction
VDU — Video Display Unit. This system is a monitor for displaying orders generated on various devices: cash stations, mobile POS terminals, etc.
A VDU can replace service print or can be used as a supplement to it.
As a rule, VDUs are used in fast food restaurants: the information is displayed on the monitor either immediately after changing an order but before its saving or after saving it, i.e. receiving payment).
Licensing
The VDU system requires licensing. The license is linked to the restaurant code and a certain number of simultaneously working VDU stations.
The license is generated on the licensing server. To license this product, get the R-Keeper 7 VDU master license.
The license type is the software key that consists of 8 five-digit groups.
See detailed information on protection methods and licensing mechanisms in the article on this topic.
Once the master license is obtained, generate a new license in the object properties section. There is no need to enter anything in the query box, just press Next:
You do not have to enter the key code either. Activate the VDU using the generated key.
VDU Installation
To install VDU on Windows OS:
- Download the current VDU distribution package from the FTP server: ftp://ftp.ucs.ru/r-keeper/VDU/4.x.x/
- Extract the archive contents into a convenient folder
- Installed r_keeper 7 version 7.5.7 or later.
The legacy special keypad having the RS232 interface must be connected to COM2. If there is only one port available in Windows — COM1, it must be changed to COM2.
Localization
The default VDU interface is in English. To make the interface Russian, go to the VDU\Locales installation folder.
It has two files:
- VDULocaleEN.xlf
- VDULocaleRU.xlf
Copy VDULocaleRU.xlf to the root VDU folder. This folder already contains the localization file. It must be deleted or renamed.![]()
Rename the old VDULocale.xlf file into VDULocale_backup.xlf and the VDULocaleRU.xlf file into VDULocale.xlf.
Restart the VDU. The language will change into Russian.
Connection to r_keeper 7
To connect the cash station to VDU, do the following:
- At the manager station, go to Service > Stations and Devices and select a required cash server
- Add the VDU cash server interface driver to this cash server Drivers tab:
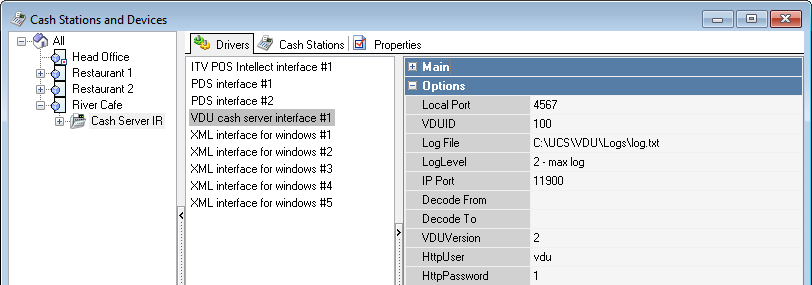
Configure the driver parameters:
- Local port — a free port of the cash station. If the port is busy, the next consecutive number will be used
- VDUID — the VDU station or station group identifier. Several VDUs can be used at once: for example, if there are several restaurants in one local network and they all use VDUs. The parameter value must match the VDU ID in the settings of the VDU cash server interface driver
- LogFile — the log file name. If the parameter is empty, logging is not performed
- LogLevel — the logging level
- IP Port — the VDU port to which orders are sent
- VDUVersion — a VDU protocol version
- Decode From, Decode To — the data recording parameters sent and received by the VDU
- HttpUser — the VDU username. The user must be created in advance and have the Http Access right
- HttpPassword — the VDU user's password
In Options > Parameters, configure the additional parameters in Installaion > Link with other systems > KDS and VDU section.
To show a short dish name on the VDU screen (Print > Short Name), enable the Short names in VDU parameter.
To do so, go to Options > Installation > Link with other systems > KDS and VDU > Short names in VDU.Create a user that will be used for logging in to the VDU system. To do so, go to Personnel > Employees and create a new employee.
Specify the name and password that you indicated in the properties of the VDU cash server interface driver.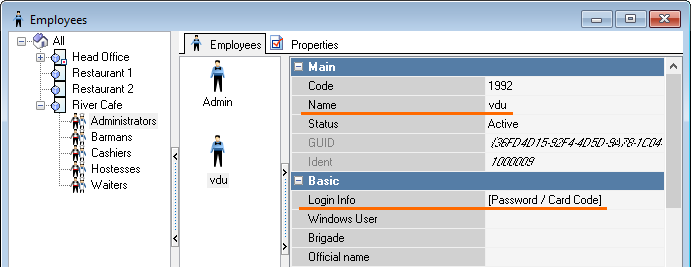
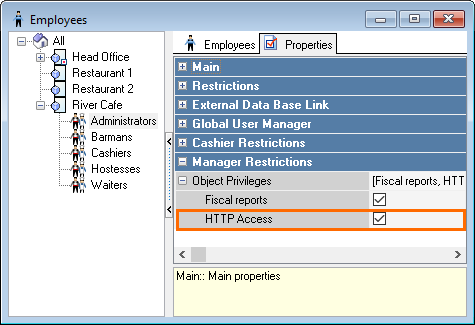
Next, add the HTTP ACCESS right in the properties of the new employee group.
- Go to Service > Stations and Devices and open the cash server properties. Fill in the HTTP data port parameter in the HTTP Server section. Remember this port as you will need to specify it in the VDU settings
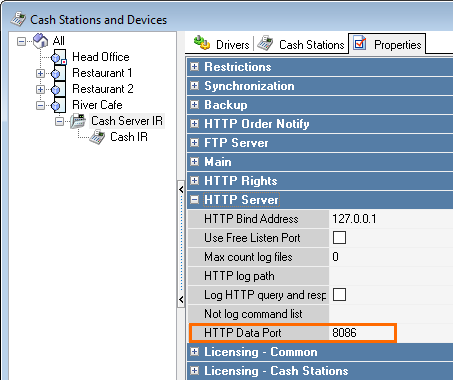
Open the HTTP Rights section and select HTTP Access in the XML Interface field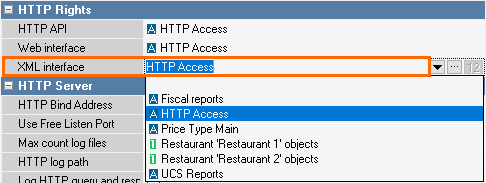
- Bind the created interface to the logical one.
Go to Service > Interfaces and create a new interface. In the interface settings, select the previously added VDU Cash server interface driver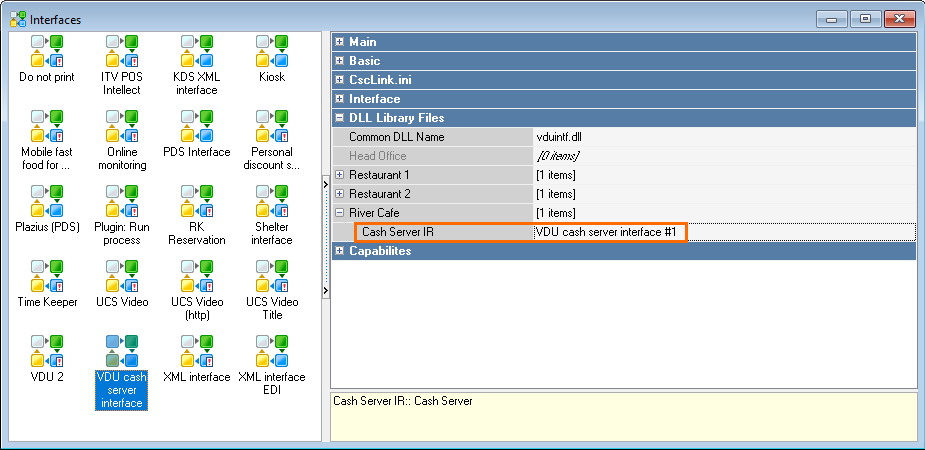
- Save the changes.
VDU Settings
The VDU setup process is the same for any platform.
- Start the rostvdu.exe file
- To enter the setup mode, press the Setup|Copy button on the special keypad in the top right corner or use the r button on the computer keyboard and the system will request the password. The default password is 1.
Press the Enter button on the special keypad or the t button on the computer one.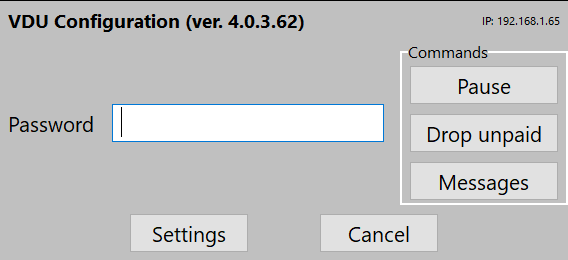
- The first time you run VDU, a window for entering the license key will appear. Enter the key and press OK.
The license can also be entered in the License field of the VDU.ini file
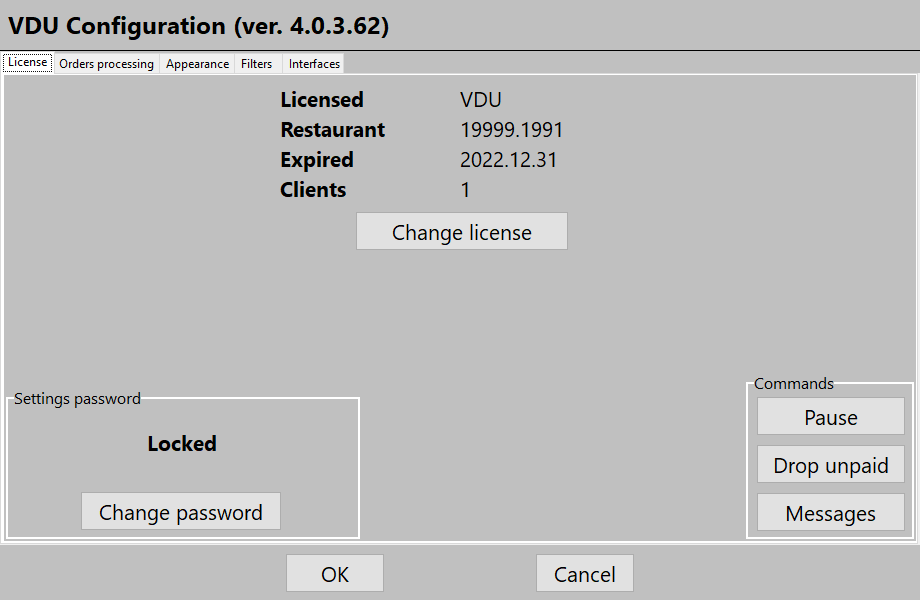
- After activation, the license information will appear, and other settings will become available
Interface Description
Below is description of the VDU settings interface tabs.
Orders processing
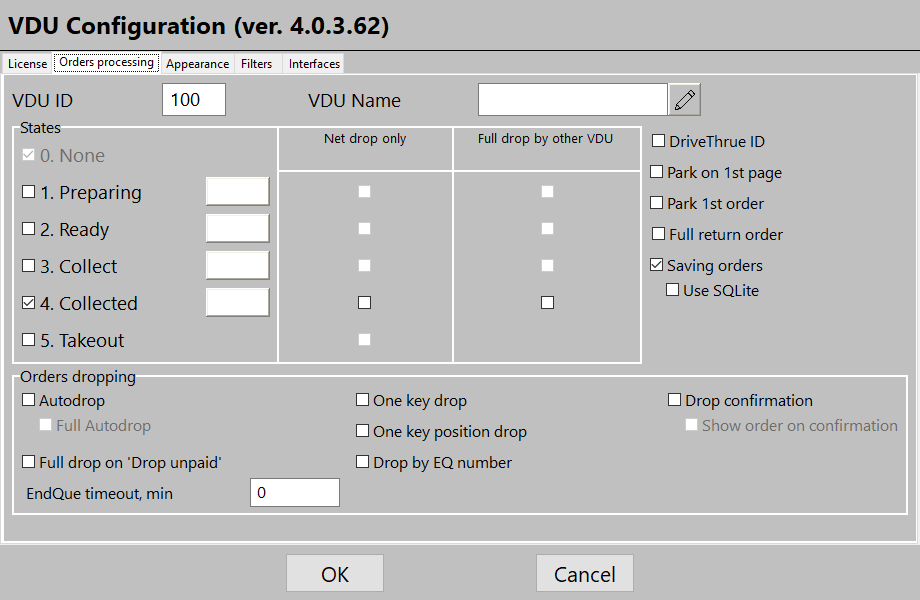
- VDI ID — the ID of the VDU station
- VDU NAME — the name of the VDU station. This parameter is mandatory
- Full return order — a return of a fully reset order with the electronic queue return and resending the status to r_keeper. Functions only if the order has been reset at this station. Press Return to activate the option. Applies to 40 latest orders
- Net drop only — enabling order reset only via the network. For example, if the option is activated for the Ready status, this status can be obtained only if an order is reset at another VDU, i. e. via the network. It will be impossible to reset an order on this device
- Full drop by other VDU — if this option is activated for any status, once an order with this status is reset on another VDU, this order will be fully removed from the current device regardless of the number of assigned statuses. Used as the Start performing an order option if there are several stations having the same set of orders
- States — dish readiness statuses:
- None — an order is received
- Preparing
- Ready
- Collect — an order is being assembled
- Collected — an order is assembled
- Takeout — an order is taken by a customer
- Autodrop — an order is automatically reset
- The Full Autodrop function is used together with the Autodrop parameter. If enabled together with it, resets orders fully regardless of the number of statuses
- Drop confirmation — a confirmation of order reset
- Full drop one unpaid — if Drop one unpaid order is enabled and this parameter is activated, an order will be reset fully regardless of the number of statuses
Appearance > Main view
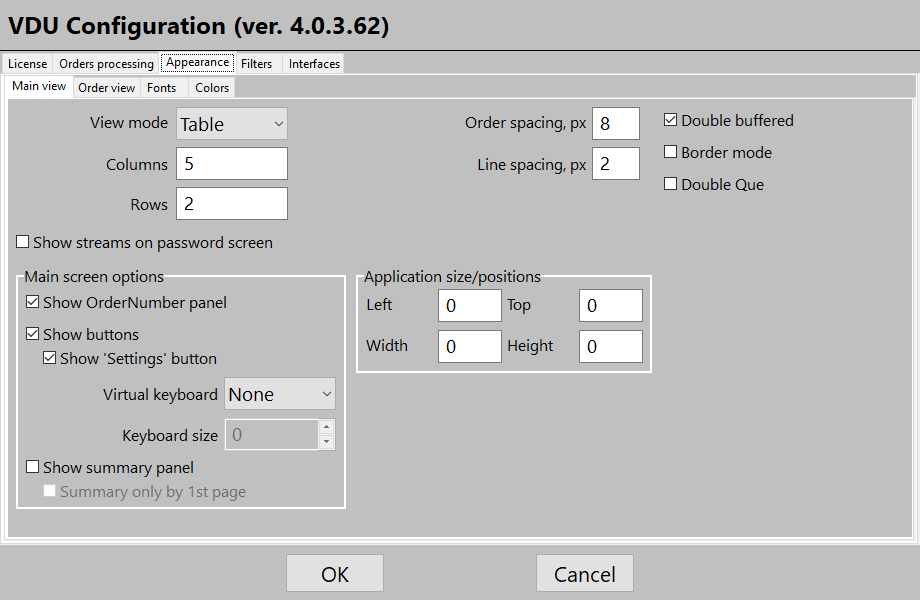
In the Main view section, you can configure the VDU displaying.
- View mode — the view type, either the Table or the Column
- Columns — the number of columns
- Line spacing — the spacing between dish lines
- Order spacing — the spacing between orders
- Double buffered — enable it to eliminate flicker in slower systems, like WinCE-ARM
- Show streams on password screen — enabling filter editing by categories before opening the settings
- Height — the height of a VDU screen
- Width — the width of the VDU screen
- Top — the top screen margin
- Left — the left screen margin
- Show buttons, show setting button — allows to display arrow buttons on the screen to make selection with the mouse or the touch panel more convenient. Displays an icon for quick access to settings
- Show OrderNumber panel — to display the order number panel
- Show summary panel — to display the summary panel on the right side of the screen.
Appearance > Order view
In the Order view section, you can configure the order displaying.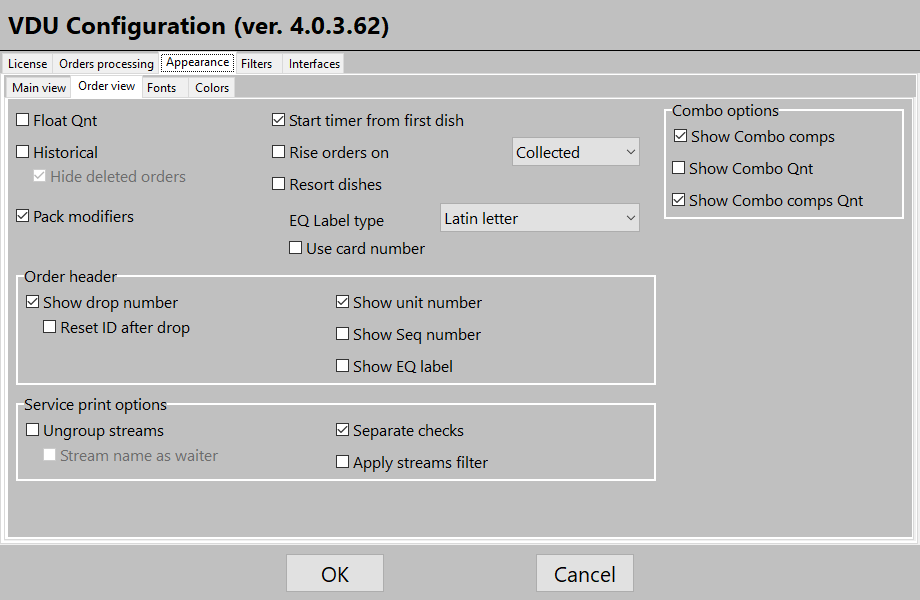
- Float Qnt — to display the quantity of dishes with one decimal place for weighted or dosed goods
- Historical — to show deleted dishes and modifiers in the order, as well as order transfer/breakdown. Dishes added within 5 seconds do not require VDU reset
- Hide deleted orders
- Pack modifiers — to display modifiers
- Start timer from first dish — to start the timer from the first dish
- Rise ready orders — to place ready orders before the selected group. A group can be selected in the window on the right
- Resort dishes — to re-sort dishes in the order by print groups
- EQ Label type — the electronic queue tag type. Available options are Latin or Cyrillic characters, numbers, by Unit number (see details in the Filtres > Units section) and by table number
- Apply streams filter — to make the print group filter also start taking service print orders. When enabling, please check that the PrintGroup fields have the same classification as the FastFood protocol
- Separate checks — separate order sessions are not united in one order. Applicable to service print orders
- Ungroup streams
- Stream name as waiter — to use a waiter's name as a stream name
- Show EQ label — to show an electronic queue tag
- Show Seq number — to show a serial number
- Show unit number
- Show drop number — to show the number of a reset order
- Reset ID after drop — to reset the ID after an order is reset
- Show combo comps Qnt — to show the number of components in combo dishes
- Show combo Qnt — to show the number of combo dishes
- Show Combo comps — to show components of a combo dish
- Use card number (last 4 sym) — to display the last four digits of a card number instead of an electronic queue number.
Appearance > Fonts
In the Fonts section, you can configure the font parameters for VDU screen elements. To open the Fonts section, select it using the Up/Down button and confirm your choice by pressing the Select button. To return to the main settings window, press the Return button.
When opened, the section displays the list of VDU screen elements for which you can configure their own font parameters:
- Font
- Encoding — the font encoding. For r_keeper 7 data encoding to be correct, the value must be 1251 Windows Cyrillic
- Available font parameters:
- Style — roman or italic
- Weight — normal or bold
- Width — a normal font or a font with a fixed width —Fixed
- Size (height)
- Font parameters that can be configured:
- Page header — the main window header
- Order header
- Combo component — the line containing a combo dish component name
- Combo — the line containing a combo dish name
- Dish line — the line containing a dish name
- Modi — the line containing a modifier name.
Appearence > Colors
Color Settings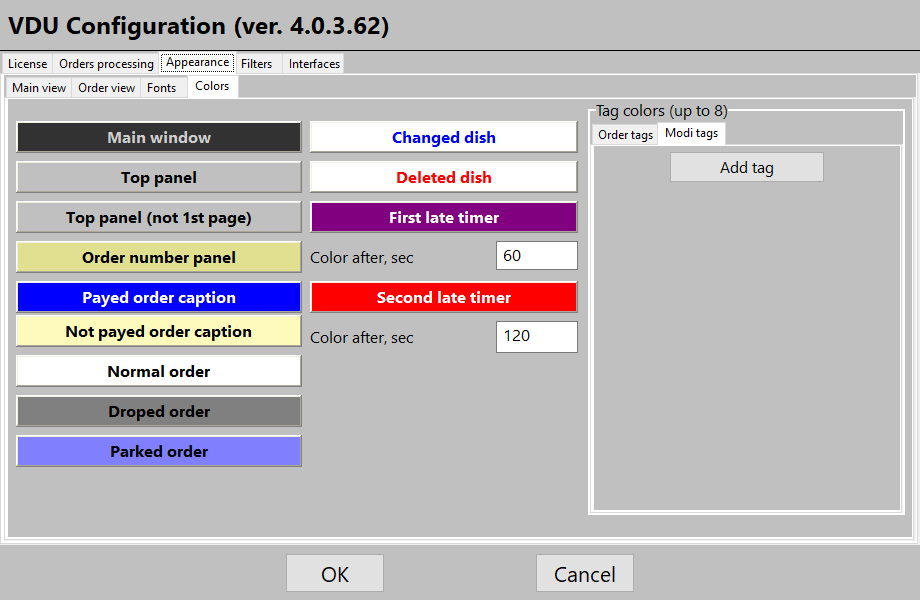
- Parked order color — the window of a parked order
- Second late timer — the timer font and background color after the second delay period in order preparation elapses
- First late timer — the timer font and background color after the first delay period in order preparation elapses
- Deleted dish — the font color for the quantity of a deleted dish, the name of a deleted dish remains in red
- Changed Dish — the font color of a dish, the quantity of which has been changed in the process of forming an order
- Normal order color — the active order window
- Dropped order color — the reset order window
- Payed order caption — the header of a paid order
- Unpaid order caption — the header of an unpaid order
- Order Number Panel — the window for entering the number when resetting an order
- Top panel — the main window header
- Main Window — Only background color can be changed.
Interfaces
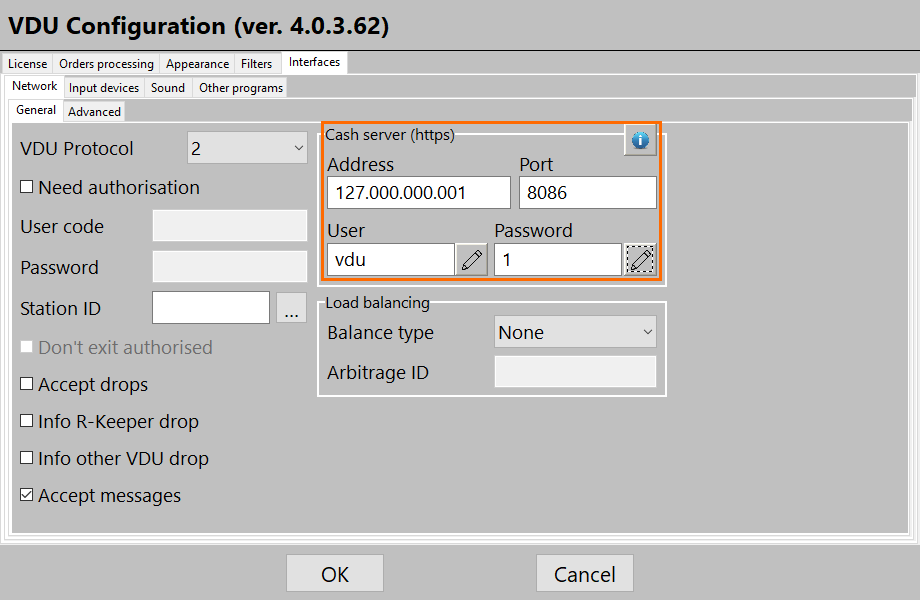
On the Interface > General tab, you can configure connection to r_keeper 7. Specify the following in the corresponding fields:
- The cash server address and port that are specified in the HTTP Server section of the cash server properties
- The user having the HTTP Access rights and the password
- The protocol version, which is VDU Protocol. The version must match the setting in the VDU cash server interface driver properties
- Press the
 sign to check connection. The VDU must confirm that everything is OK.
The Load Balancing setting is required for balancing orders within restaurants. The balancing group is configured using an ArbitrageID.
An ArbitrageID is the group code. A group is a set of VDUs having the same ArbitrageID. The whole group also must have the following same parameters:
- VDUID
- Print groups
- Displaying units.
As a rule, there is one VDUID within a restaurant. However, each restaurant department can have several packers, so specify the same ArbitrageID to balance orders within a department between several VDUs. Balancing can be performed by orders and by dishes.
You cannot use different balancing within a group. If both BusyLevelByDishes and BusyLevelByOrders are disabled, that means that balancing is disabled.
Possible configurations are:
- By dishes
- By orders
- Both disabled.
Other parameters:
- Info other VDU drop — to inform other devices about reset orders. Information on order status cancellation is also returned to other stations where this order was also displayed. If this order is already fully reset at these stations but the Full return order option is enabled, the order will also return to the screens of these stations having the previous status, if this status is configured for displaying. Applies to 40 latest orders
- Info R-keeper drop — to inform r_keeper 7 about reset orders
- Accept drops — to reset orders which are already reset on other devices.
Filters > Units
The system allows one VDU instance to work with several cash stations or several VDU instances to work with one cash station.
To determine the connection between a cash station and a VDU, the VDUID parameter is used that is indicated both in the VDU settings and in the cash station settings.
To limit the list of stations to which a VDU should interact, the Units section is used.
When the section is opened, enable the Enable units configuration parameter. Then you will see the field for entering identifiers of the cash stations to restrict interaction with: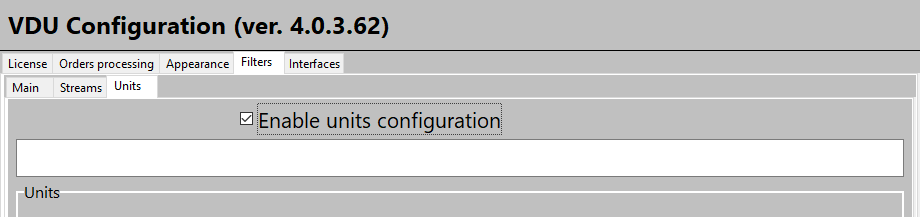
Procedure for entering cash station identifiers:
- Specify the identifiers separating them by spaces
- For r_keeper 7, a cash station identifier is the station code
- Identifier values are entered using numeric keys, the Select button is used as the space
- To select stations in the list, use Up\Down buttons. To confirm your choice, use the Select button.
In addition to restricting interaction for each cash station, you can specify your own color for orders — there is a color button for each entry in the station list.
It is also possible to make a unit number disableable on the VDU screen. To do this, change the DoNotShowUnitNum parameter from OFF to ON in VDU.ini.
The VDU.ini file encoding is UTF-8
Using VDU
For an order to be displayed on a VDU, it should be saved. To do so, press the green check mark at the cash station and confirm saving.
An order should appear at the VDU.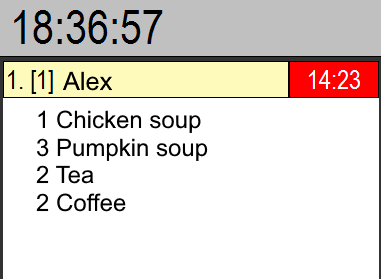
If an order is displayed, everything is configured correctly.
VDU Status Codes
The VDU status code is displayed in the top left corner next to the clock:
The status code can change depending on the received data and allows to analyze various problem situations arising in the process of sending data to a VDU.
Possible VDU status codes:
- P — a mismatch of the VDU and r_keeper 7 protocols. In some cases, it can appear because of a license mismatch. Check the protocols in VDU settings and at the manager station
- N — no packages. This is a default status after starting a VDU
- I — a package is received but has a different VDUID
- L — a package is received, the VDUID is proper, but the license is incorrect
- U — a package is received, the VDUID is proper, the license is correct, but packages have been sent by a device that is disabled on this VDU
It is recommended to analyze VDU status codes when using one device sending data to a VDU.
Additional Settings
Special Aspects of Setting Up Mobile POS Terminals to Work with VDUs
If orders are saved at the mobile terminal and several VDU stations are used, orders appear on all VDU screens and are not filtered even when the parameters are enabled in the Do not show group section. Such orders are filtered only if a restaurant has at least one active service scheme.
Displaying orders on VDU screens immediately after saving them at the mobile terminal functions only together with r_keeper 7.
After receiving an order at the mobile terminal in the Electronic queue configuration, this order appears on the VDU screen with the special status: it is impossible to reset such an order before opening it at the cash station. After opening and paying for or cancelling such an order at the cash station, it is deleted from the VDU without any doubling.
Using the EndQueTimeout parameter you can configure automatic reset of unpaid orders in a specified time.
Using Computer Keyboard
For operational purposes, you can use a standard keyboard instead of the special keypad. Such capability is supported both for the program VDU and the WinCE VDU.
| Correspondence Table of Special Keypad Keys and Computer Keyboard Keys | |||
|---|---|---|---|
Special keypad | Computer keyboard | Special keypad | Computer keyboard |
1 | a | Up Arrow | f |
2 | b | Down Arrow | m |
3 | fr | Left Arrow | g |
4 | d | Right Arrow | n |
5 | e | Reset | o |
6 | h | Return | p |
7 | i | Park. | q |
8 | j | Settings | r |
9 | k | Copy | u |
0 | l | Selection | s |
Enter | t | ||
Reset (long reset) | w | ||
When using a computer keyboard in the VDU system, the keyboard layout must be English and Сaps Lock must be turned off
Setup of Service Print
It is assumed that standard service print is configured and works in the system.
To configure service print linked to the VDU system,do the following:
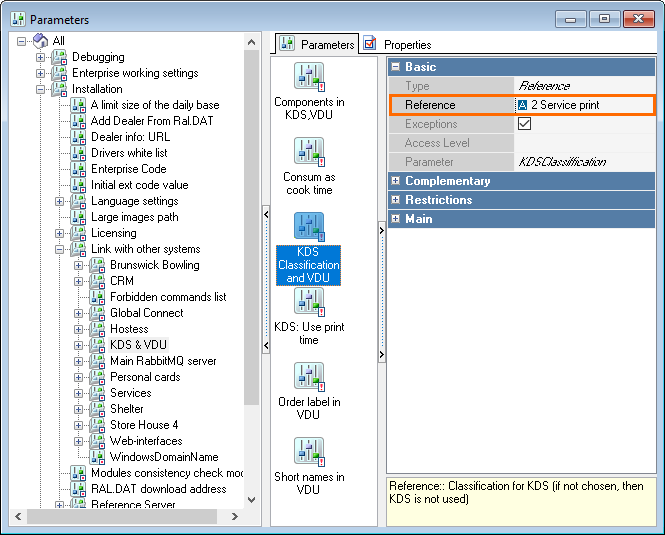
- Go to the manager station. Add a new classification and categories in Menu > Menu Classifications
- Go to Options > Parameters > All > Installation > Link with other systems > KDS and VDU > KDS Classification and VDU and select the classification for work with the VDU in the the Reference field of the parameter properties
- Restart the VDU and send several dishes from the cash station, having saved them
- Enter the VDU setting mode and configure the Do not show parameter. Select the dish categories that must not be processed on this VDU screen.
When the KDS Classification and VDU parameter is enabled, service checks will have an additional section containing barcodes that can be used for labelling dishes.
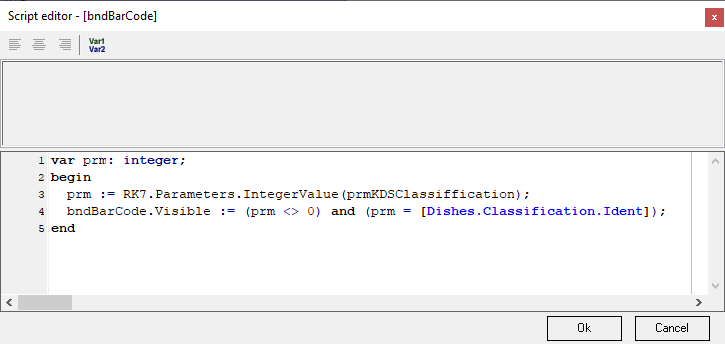
To avoid printing barcodes, edit the current service check layout by deleting the band or changing the script: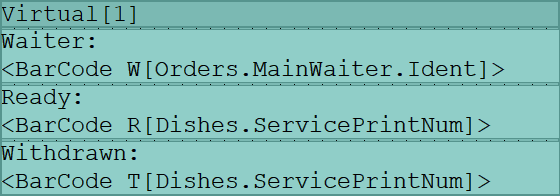
Displaying Orders after Saving
To display an order on the screen after saving it or printing a bill, configure sending orders to the VDU via service print:
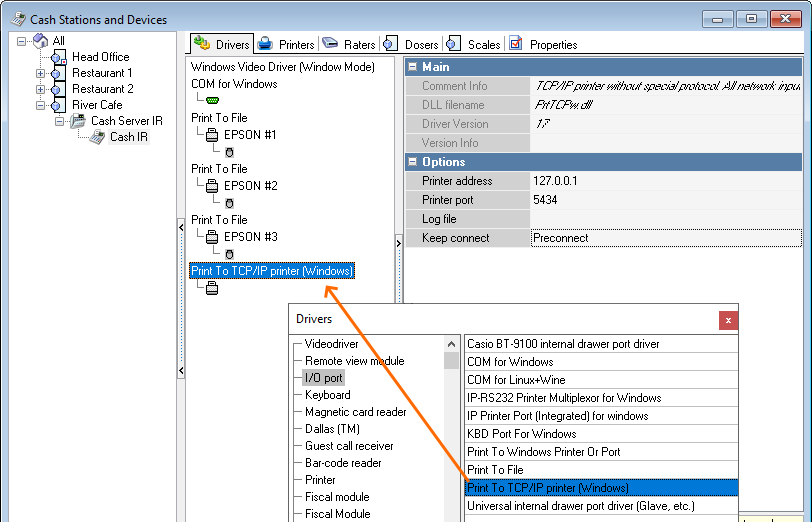
- Add the Print to TCP/IP printer (Windows) driver to the cash station
- Configure the following parameters in the Options section of the driver properties:
- Printer address — the IP address of the computer where the VDU is installed
- Printer port — any free port
- Keep connect — to set the Preconnect value.
Add any printer to the driver and clear the Encode lines for the printer. Next, add the service print layout from the VDU directory — SP.mak.
Configure service print of this layout for changing,adding and deleting dishes. Configure the added printer as an XML printer.
Delete the VDU cash server interface from the cash station.
SAPI4 Voice Generator Setup
To configure voice notifications that orders are ready, do the following:
- Install Infovox Desktop 2.220 Engine and the voice module
- License the program as by default a trail version is installed for 1 month and after this period the module will stop functioning
- In the installed Lexicon manager app, add the *.dic dictionary of the installed voice module on the Lexicon > Voice Associations > Add Lexicon tab
- In the Interface > Sound of the VDU settings, select the installed voice generator and specify the playback speed and text.

These settings can also be specified in the VDU.ini settings file:
SAPIEngine=Alyona (Russian) SAPI4 22kHz      ; the full name of the voice generator
SAPISpeed=85                                 ; playback speed. Optimal is 80-100
SAPISpeakTxt=Order <EQLabel> is ready        ; playback text. You can add the <EQLabel> variable to the text; during playback it will be changed to the electronic queue number.
Electronic Queue Setup
Current Version
The current electronic queue version is called QMS. It is this version that should be set up and connected. The settings are described in the corresponding article.
Legacy version — EQ
To set up the EQ electronic queue:
- Open the settings window. Press the r button on the standard keyboard. Be sure to select the English layout
- On the Orders processing tab, indicate the order statuses 0, 4, 5. Indicate a different color for status 4
- On the Appearance/Order view tab, select the EQ label type parameter. This is how an e-queue number will be generated
- If needed, check the Show EQ number box on the same tab. This is required for displaying the e-queue number in the order header
- On the Interfaces/Other programs, specify the path to GuestApp and its query period.
To configure order selection by arrows and reseting selected orders, check the Border mode box on the Appearance/Main view settings tab.
The Order spacing parameter on the Appearance/Main view tab must be more than zero and even. The spacing between orders will be used for framing an active order.