Setup of Guest Screen
Introduction
Guest Screen (GS) is a new version of the second screen.
Hotkeys:
- F11 — enables/disables full-screen display
- F5 — update
- Ctrl+F5 — refresh without cache
System Requirements
The minimum system requirements:
- OS — Windows 7 and older, operation not guaranteed for Windows XP
- 1 GHz processor frequency
- 512MB RAM
- 200MB HDD
- Net Framework 4. Download: http://microsoft.com/ru-ru/download/details.aspx?id=3556
- Visual C++ redistributable 2013 libraries. Download: https://www.microsoft.com/ru-RU/download/details.aspx?id=40784.
In case the Please install the "VC redist 2033" error occurs, install the x86 version. - These ports must be open on the server:
- 443 to access the https://l.ucs.ru and https://weblate.ucs.ru/
- 60606 to access the licensing system.
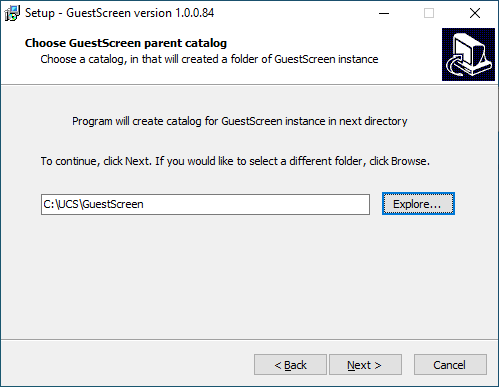
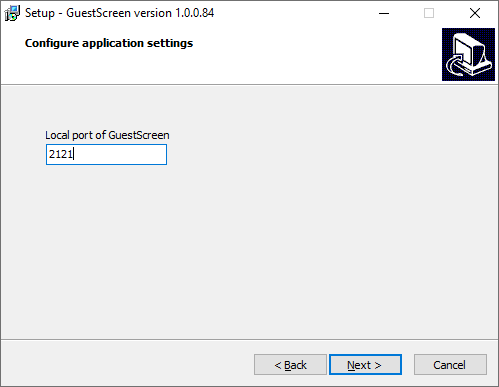
Installation
Download the installation file from the FTP server at ftp://ftp.ucs.ru/rk7/other/Guest_Screen/.
| |
Starting with GuestScreen 1.0.0.68, you can choose one of three desktop themes:
- Bakary
- Cafe
- Pizza
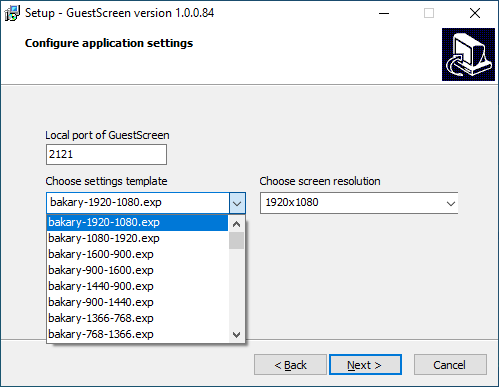
These themes are available with the following screen resolutions:
For landscape orientation, px | For portrait orientation, px |
|---|---|
| 800*600 | 600*800 |
| 1024*600 | 600*1024 |
| 1024*768 | 768*1024 |
| 1024*1280 | 1280*1024 |
| 1366*768 | 768*1366 |
| 1440*900 | 900*1440 |
| 1600*900 | 900*1600 |
| 1920*1080 | 1080*1920 |
1280*800 | 800*1280 |
After installation, the GS client shortcut will appear on the desktop.
The first launch of GS must always be performed as an administrator. If you have installed GS to Program Files, you will always have to run it as administrator.
After installation, go to Settings > Modes and check for a template of modes and scenarios in the GS settings. The list should contain 7 standard modes. If there are none, import the templates.
Licensing
The guest screen requires licensing. The license is purchased for a year.
On the licensing server, it is called the R-Keeper module Guest Screen 12 months of software. The detailed process of obtaining licenses is described in the article about the licensing system.
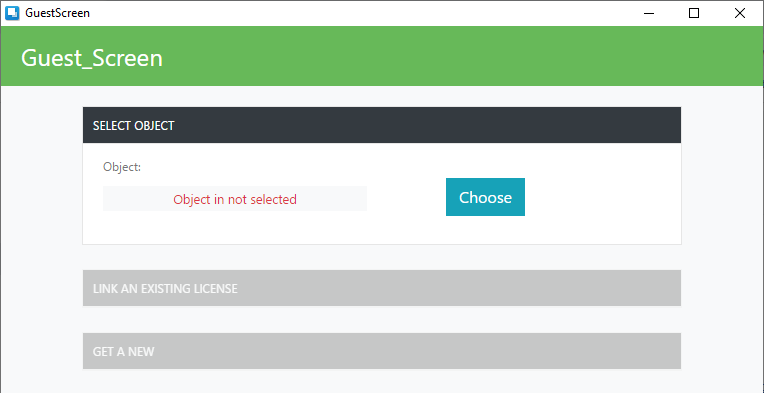
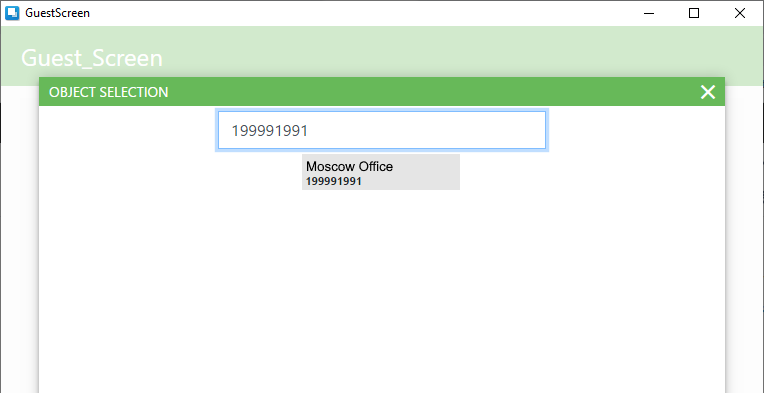
Run GS. In the window that opens, enter your Dealer ID.
First, GS needs to be activated. To activate the license, the object must have a master license. If you do not have it, get it.
If there is no master license, an error will appear:
Select the object where you want to activate the license.
 |
|
After selecting the object, click Get a new and select master license. Click Generate.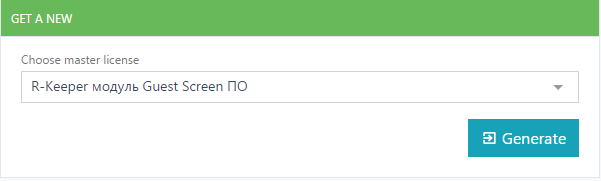
If you need to remove the license, you must also run GS from the administrator.
If you need to link an existing license, select Link an existing license and select an available master license from the list.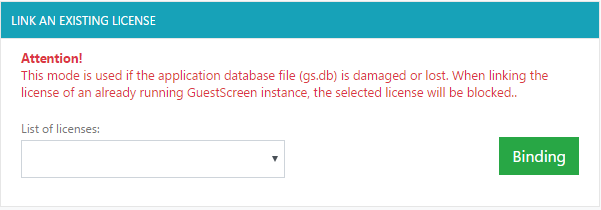
Click Binding.
Changing license settings
You can change the licenses. To do this, go to Settings > License and log in as a dealer.
Here you can choose another license or generate a new one.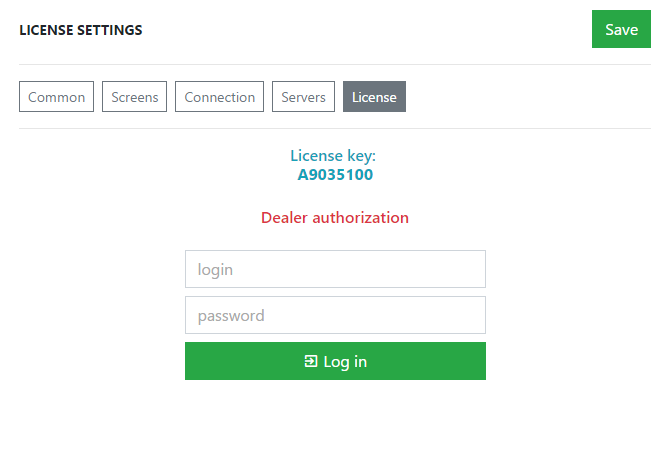
Setting up communication with r_keeper 7
Driver update
RK7 and GS integration requires the HTTP Order Notify driver 18+ version. As the current assembly does not contain it yet, it should be updated manually. To do this, perform the following steps:
- Stop the reference server and the cash server
- Download the httpnotf.udb file from the attached files or from FTP: ftp://ftp.ucs.ru/rk7/other/KDS_PRO/Extra_Files/
- Copy the httpnotf.udb file to [RK7 installation folder]\base\workmods with the replacement
- Start the r_keeper 7 servers
Manager station settings
Open the manager station and go to Service > Stations and devices.
Enable the use of the HTTP port on the cash server. Specify a free port in the HTTP Data Port field and do not check the Use Free Listen Port box.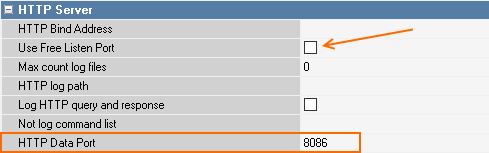
Then, set up the HTTP order notify drive.
For r_keeper 7.6.5 and later
Since version 7.6.5.371, HTTP Order Notify settings were moved from the Drivers tab to the Properties.
Scenario:
- In the DestURLs filed, specify the connection string in the following way:
http://GS_server_address:GS_server_port/api/httpNotify/postOrders - Save the changes
- Restart the cash server.
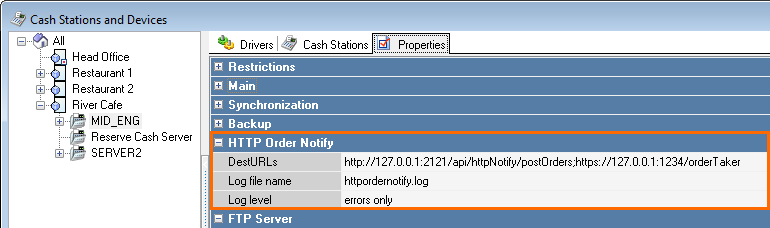
If you need to specify several connection strings, write them separated by semicolon ";"
F.ex.: http://127.0.0.1:2121/api/httpNotify/postOrders;https://127.0.0.1:1234/orderTaker
For versions earlier than 7.6.5
If your r_keeper version is lower than 7.6.5, HTTP Order Notify interface should be added manually to the cash server.
Scenario:
- For proper KDS PRO operation, the driver version, not earlier than 18, is needed. If you have a lower version, before adding HTTP Order Notify, download the driver from FTP:ftp://ftp.ucs.ru/rk7/other/KDS_PRO/Extra_Files/httpnotf.udb
- Copy and replace the httpnotf.udb file in the reference server folder.
- Restart the cash sever.
- Add HTTP Order Notify driver to the cash server:
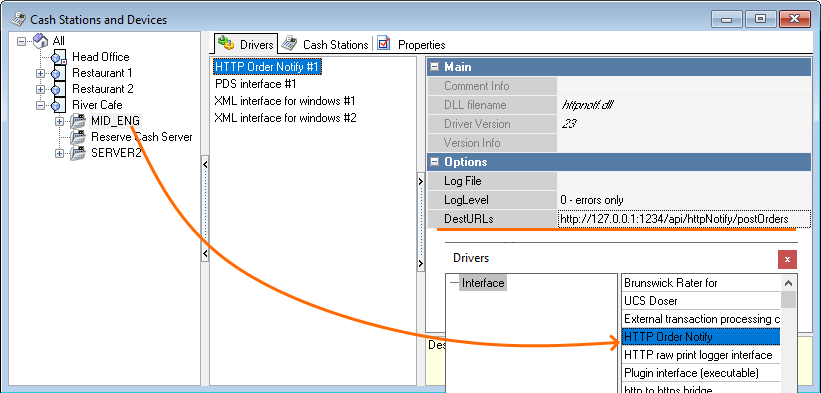
- Set up the driver for all the cash servers if necessary.
- In the DestURLs filed of the Drivers tab, specify the connection string in the following way:
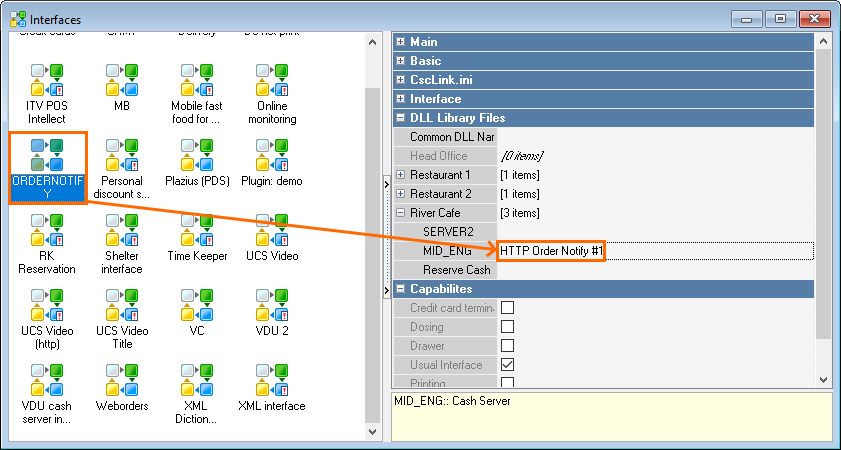
http://GS_server_address:GS_server_port/api/httpNotify/postOrders - Go to Service > Interfaces and create a new interface
- In the DLL Library Files section, select the required restaurant and then select the HTTP Order Notify driver for the cash server
- Change the interface status to active and save the changes.
Go to Personnel > Employees and create a new employee with an HTTP role, using only Latin characters. Be sure to assign all the rights to this role.
Save the changes and restart the cash server.
Guest Screen Settings
Launch GS and tap 5 times in the upper-right corner of the screen. When clicked, a white circle should appear.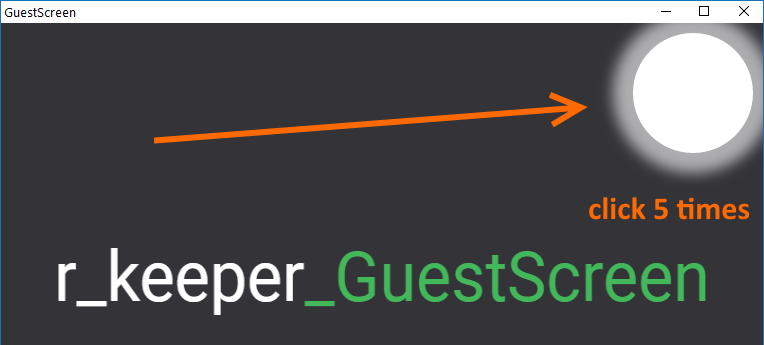
After 5 clicks, the modes window will open.
To open the menu, click the button 
To open settings, click the gear in the upper-right corner.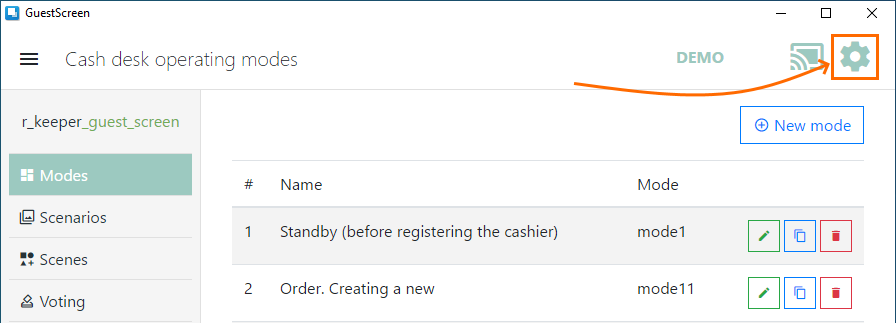
Open the Connection settings. Specify here the data for connecting to the cash server via the HTTP interface:
- XML-int.: address — the IP address of the cash register server
- XML-int.: port — HTTP port of the cash register server
- RK7: login — the name of the user from the HTTP-Access group
- RK7: password — this user's password
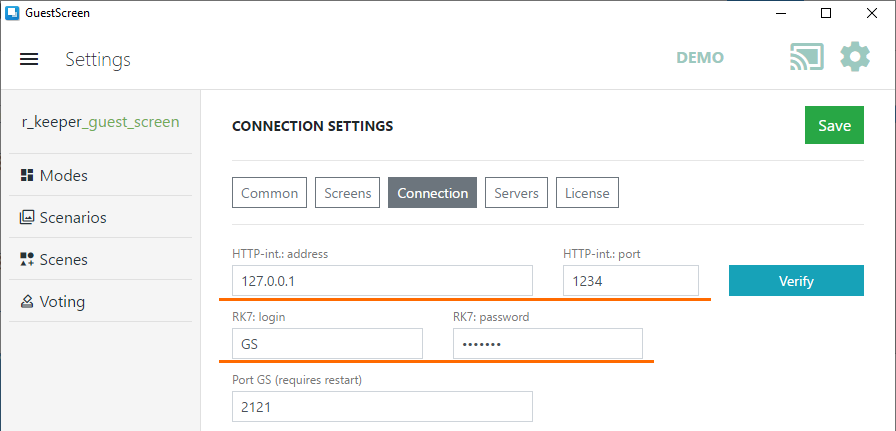
- Click Verify. The system will check the connection and display a message, depending on the result.
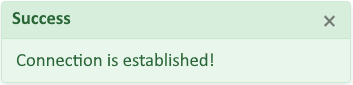
- If the data is entered correctly, a message about the established connection will appear:
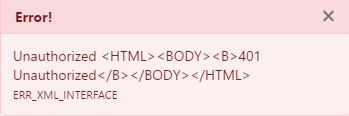
- If login or password is incorrect, you will see the Unauthorized error:
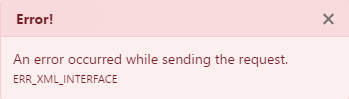
- An error occurred while sending the request means that the cash server connection data is incorrect. Check the IP and connection port.
- If the data is entered correctly, a message about the established connection will appear:
- After successful connection, the code of the restaurant and the cash register will be downloaded from the cash server. Select the required cash desks, from which you want to receive orders, in the Cash desk code field
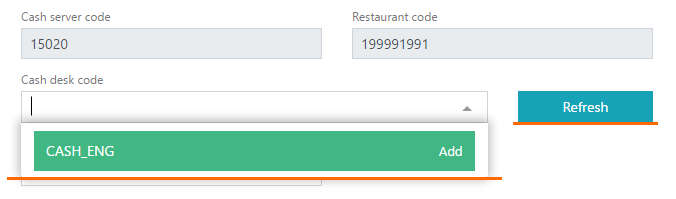
If cash desks are not displayed, click Refresh - Optionally, specify the logging level and the synchronization frequency with r_keeper_7
- Click Save

- The connection setup is complete.
Update
The Guest Screen is updated via the installer.
If you have version 0.0.0.x installed, be sure to delete the gs.db database file. It is located in the root folder of the installation with GuestScreen.exe
Run the installer, the system will detect the old version and offer to update it: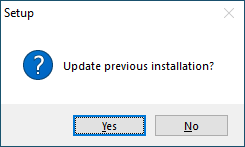
 |  |
Settings Import
After the update, you need to download a new standard template. Download the template file from the FTP server: ftp://ftp.ucs.ru/rk7/other/Guest_Screen/. The template file has the .exp extension, for example, GS-UCS-0.0.1.33.exp.
Open GS and go to settings, tab Common.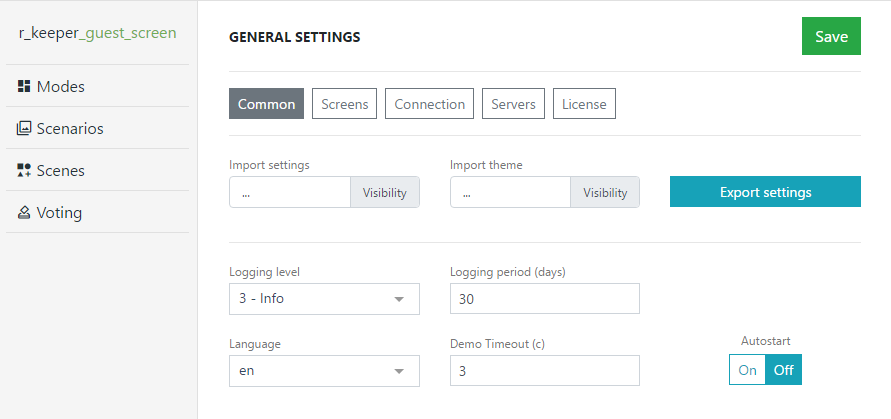
Select the template file in the Import settings field. Check the boxes (if any) and click Import.
The standard templates will be loaded into GS.
Displaying content
Display Settings
Open Settings and select the Screens section.
Here you can select the monitor to display the content and the resolution.
Standard Settings
There are several concepts describing content display on the screen in GS:
- Modes — the operation mode of the cash register
- Scenarios — a sequence of conditions under which scenes will be shown
- Scenes — design of the content that will be shown according to the scenarios.
GS has default ready-made modes:
- Standby (before registering the cashier)
- Order. Creating a new
- Screen work with not running the cash desk
- Order. Dishes not selected
- Order. Add dishes mode
- Order. Calculation and payment status
- Order. Print check
And scenarios:
- Mode1 – Standby (before registering the cashier). Activated on the cash desk where there is no user authorization
- Mode11 – Order. Creating a new. Displays an image when the cash desk is available and ready to accept the order
- Mode18 – Screen work with not running the cash desk. Displays the image on the screen when the connection with the cash desk is lost
- Mode2 – Service mode (cashier is registered). Activated when the user is logged in at the cash desk
- Mode32 – Order. Add dishes mode. Displays images of dishes on the screen when they are added at the cash register
- Mode4 – Payment scenario. Displays the order receipt with the total payment amount.
Scenes
Scenes mean content that is shown according to the scenario conditions. Thus, scenes should be created before scenarios.
- To create a scene, go to the Scenes section
- Click Add

- Enter the name of the scene and select its type. It is possible to add videos. The video should be located at \Front\media\video. Its size depends on the computer's capacities. If the video slows down during playback, it means that the video size is too large for this computer.
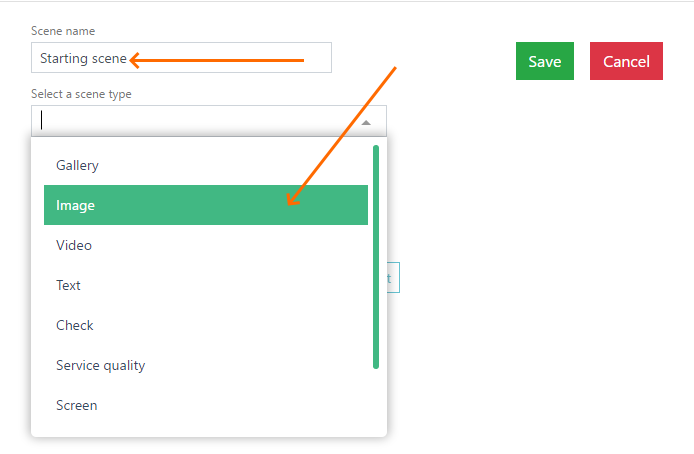
- Upload the selected content. For example, choose the Image scene type. Download the file by clicking Select image
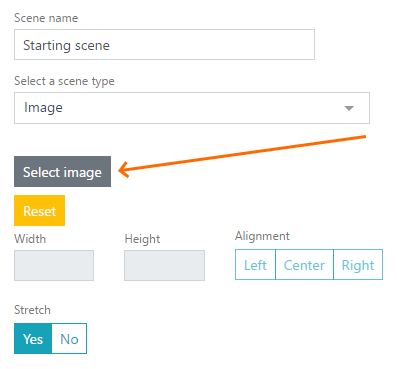
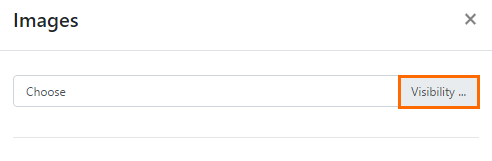
- Click Visibility and select the file on your computer. The file will be uploaded to GS. Click on the desired image.
- Adjust the display settings: stretch, alignment, size
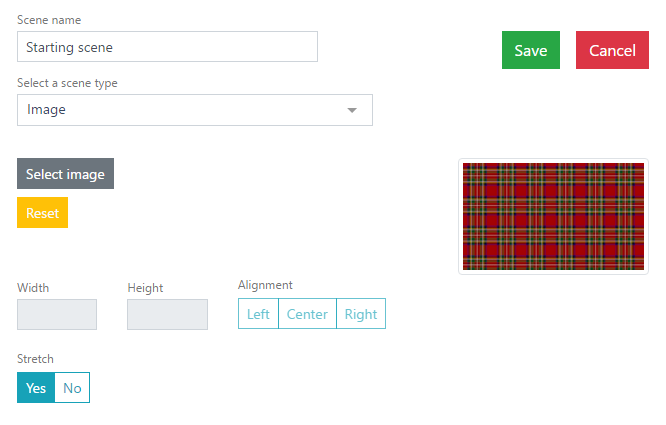
- Click
 to create a scene.
 - The scene is ready, you can move on to creating a script.
Scenarios
Make sure that you have all the default scenarios. After installation, there should be 6 of them. If there are no scenarios or they are partially installed, you need to import standard templates.
Consider the example of the Order mode32 scenario, i.e. the dish adding mode. Go to the Scripts section and click on the pencil next to the script you want: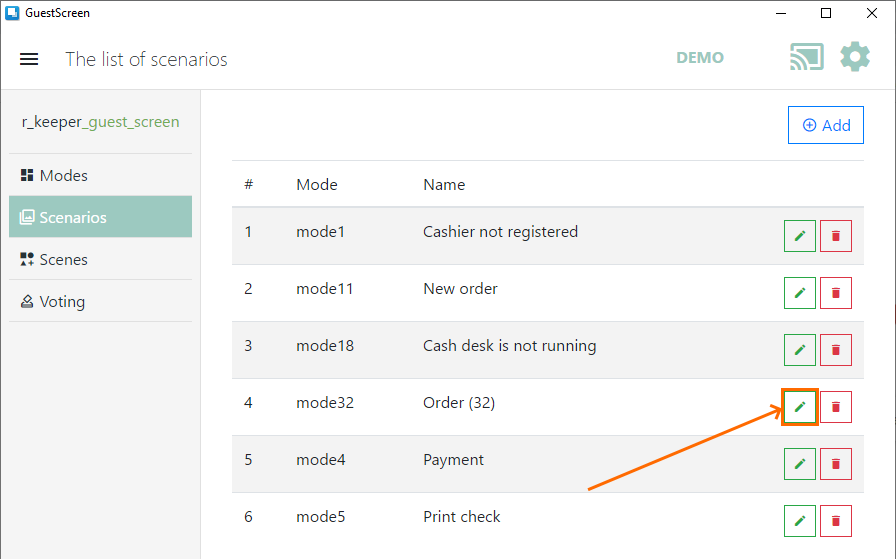
The scenario editing window will open. Here you can create and delete content display conditions. The conditions are checked sequentially from top to bottom and the first suitable one will be satisfied.
Create a new condition by clicking the button ![]()
- Specify the name of the script
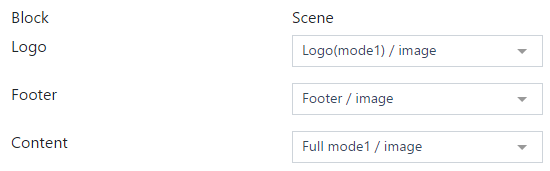
- Select the required scenes in the blocks
- Configure the conditions for scene displaying. You can create conditions based on:
- Presence of dishes from the specifed categories in the order
- Absence of dishes from the specifed categories in the order
- The last dish from the categories
- Presence of dishes with codes in the order
- Absence of dishes with codes in the order
The last dish with codes
 Early versions of GS request data from RK7 at the time of launch. Therefore, if there is a connection to the cash server, and the dish data is not shown, restart GS.
- Specify the restaurant codes to apply the created scenario to
- Specify the business periods during which this scenario will be executed
- Select the display model:
- Payment made
- Payment not entered
- In any case
- Click

Let's create an example scenario.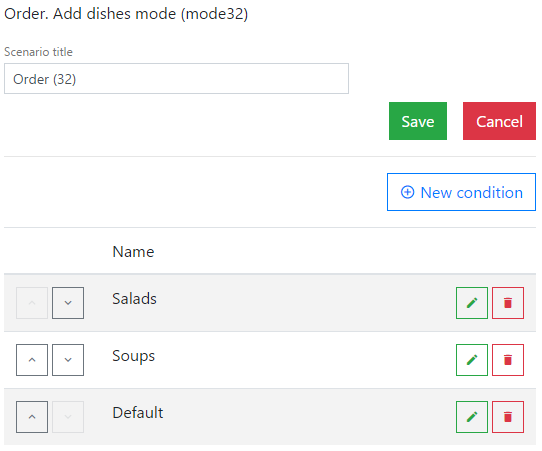
In this scheme, the first conditionto be checked is Salads. If there is no salad in the order, the next condition to be satisfied is Soups. If the order contains a dish from the Soups category, this condition will display an image with certain settings. If the order does not include any soup, then the next condition, located below in the list, will be satisfied.
If the order contains both soup and salad, the Salads condition will be displayed on the screen, because this condition is located above the Soups condition and has a display priority. If necessary, it is possible to change the conditions places by clicking on the up or down arrow .
The Default condition can be placed below all the created conditions, so that it comprises those dishes that do not fall under any condition.
Consider the first condition Salads. Open the condition editing mode — tap the pencil ![]() .
.
Select the required dishes in the Run if thereare dishes with codes in the order field. Change the rest of the settings as you want. Save the settings.
Make settings for the Soups condition.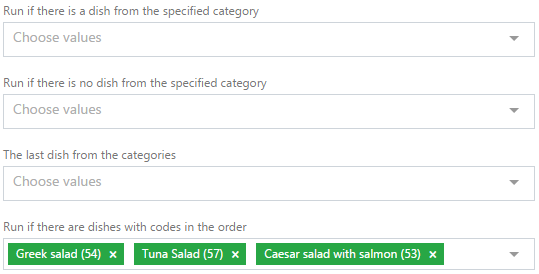
Now, if an order with a salad is made at the cash desk, the order with the scene settings will appear on the screen.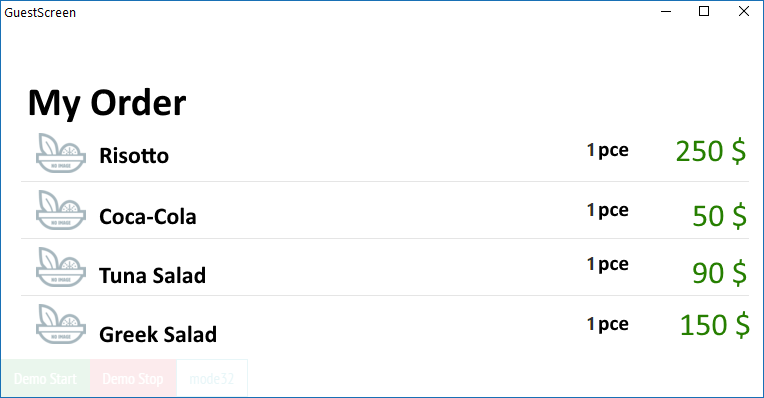
If the soups are added to the order, the screen with the order will look as follows: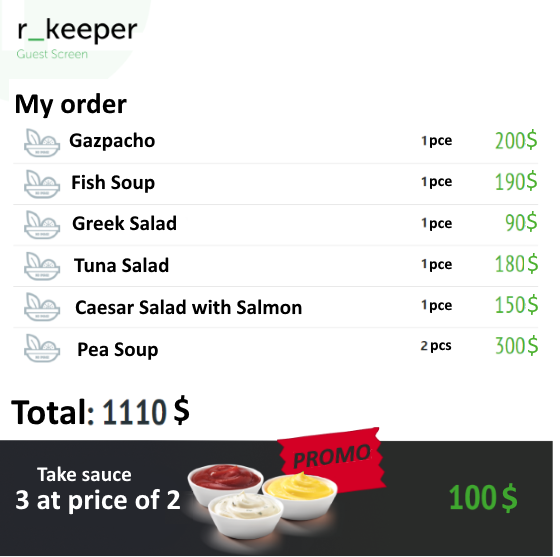
The soup condition settings are applied first, because the gazpacho soup was added to the order earlier than the salad, and it has a display priority.