Setup of connection to MS SQL
Introduction
R_keeper 7 can only be connected to MS SQL version 2012 or higher.
Setup of connection to MS SQL 2012
SQL server installation
- Install MS SQL Server 2012 or higher. Express edition may be used.
During server installation, use combined authentication mode and set the user password «sa». - Run SQL Management Studio, and create a new base named, f.ex., RK7.
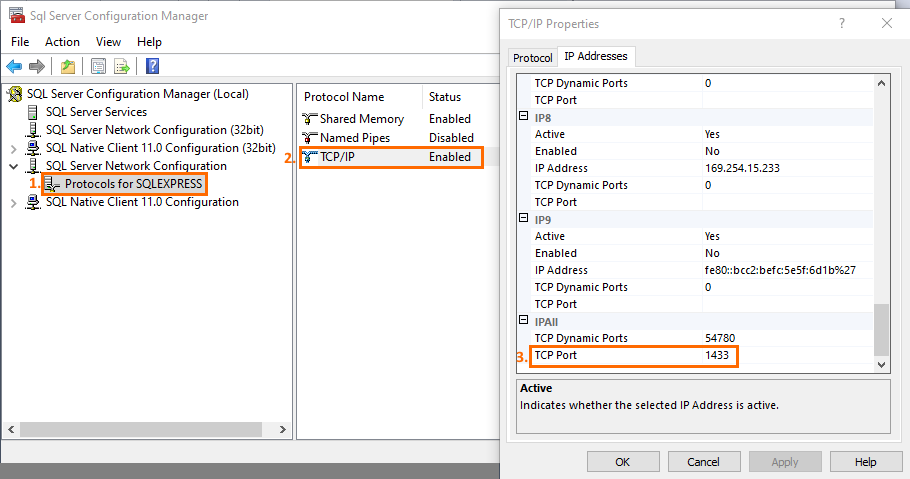
- In SQL Server Configuration Manager, enable TCP/IP protocol. Restrart SQL Server.
- Change the base mode to Row Versioning
By default, SQL Server works in the «Read Commited» mode, which sections data during request. This may cause problems in multi-user environment. Starting from 2005 version, the «READ COMMITTED using row versioning» mode is supported, where the sections can only cause problems if different users are recording data in the same place. Reading data is never sectioned and never sections no one.
To enable versioning mode, run the script:
ALTER DATABASE RK7 SET READ_COMMITTED_SNAPSHOT ON;See more details in the articles on Row Versioning-based Isolation Levels or Row Versioning-Based Transaction Isolation.
Manager workstation setup
- Go to Service > Data Export > External Database Configurations reference, and copy pre-set «Microsoft SQL Server» setting. Assign a unique name to it .
- In Basic > Connection String, press the button at the end of line.

- Click «Build...» and configure connection to the database created in par. 1.
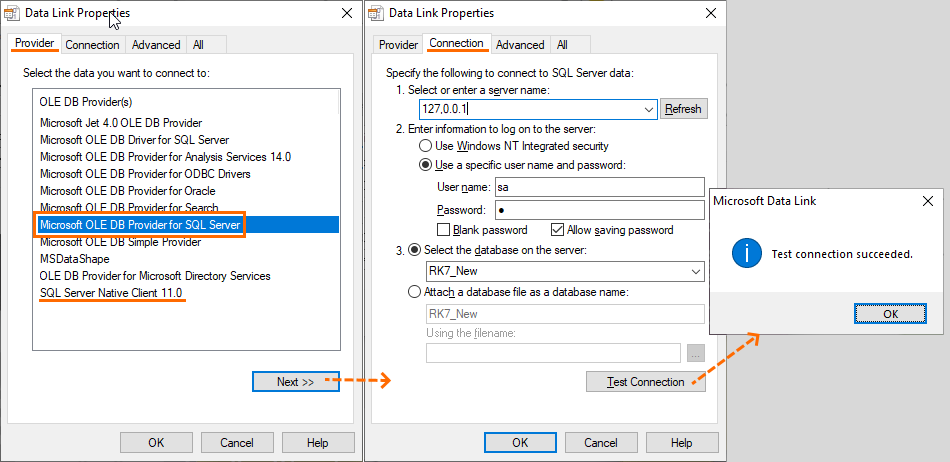
- Make sure that the «Provider» tab has the Microsoft OLE DB Provider for SQL Server provider selected. In the «Connection» tab, select the server from the list, enter the username and the password, select the d atabase, and click «Check connection». If connection is verified successfully, click «ОК». Then, click «ОК» again.
If there is no required server in the list, enter its name manually. It is usually the same as the name of the computer where SQL Server is installed, an IP address may also be used as the name. Then, you should fill in the «User name» and «Password» fields before selecting the base.
The server name is displayed during SQL Server Management Studio launch: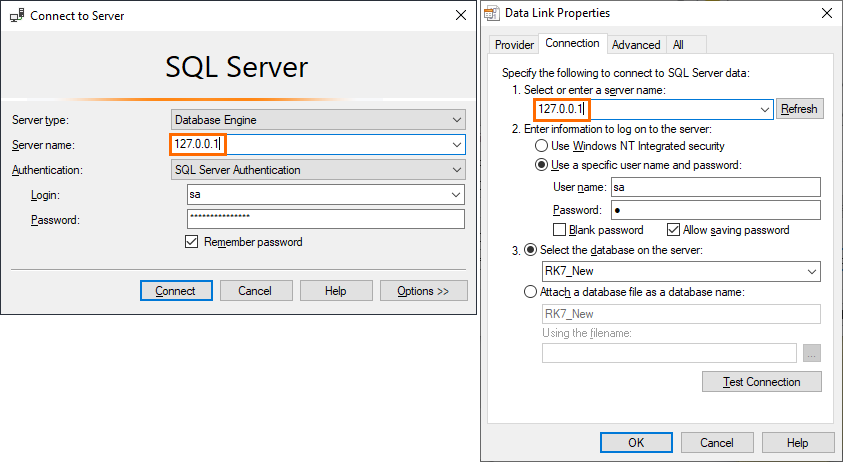
As a result, the «Connection string» will look as follows: Provider=SQLOLEDB.1;Password=1;Persist Security Info=True;User ID=sa;Initial Catalog=RK7;Data Source=127.0.0.12
 Data Source = a name or an IP address of the computer where SQL Server is installed. Using the server instance name, like 192.168.190.150\SQLEXPRESS, is also possible.
- Then, perform an upload to the SQL database, using the setting you have just created.
- Open Service > Data export > Export to other DB, and select the setting created in p. 5. Specify the password in the «ADOBasePass» field and the username in the «ADOBaseUser» field.
- In the «Export parameters» section, leave default checkmarks if an upload is performed to a clean SQL DB.
- Click «Test». If the connection is successful, the «ОК» button shall become active. Press it. Data export to SQL DB will start. SQL are being created at this moment.
- If the upload is successful, the «Data export settings» window will close. There will be no additional messages.
- Then, set up the references or report server by licensing it and selecting the setting created in p. 5.
- Open Settings > OLAP Reports > Report Servers, select a required server, and configure it as described below.
- License the references or report server as described in the «Setup of References Server» article.
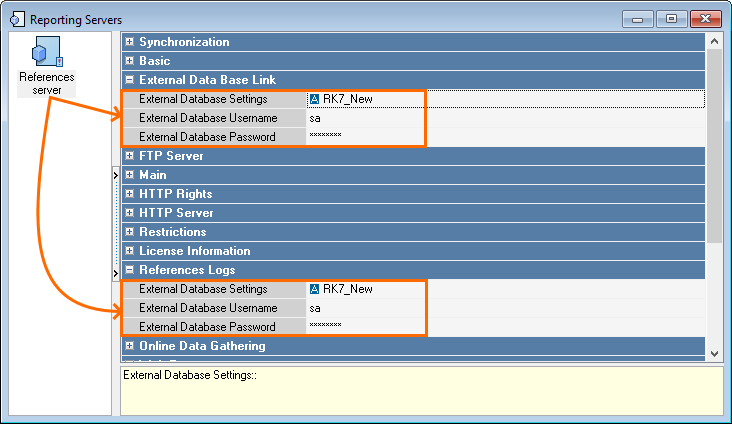
- In the «External Data Base Link» section, perform the following actions:
- In the «External Database Settings» field, select the setting created in p. 5 .
- In the «External Database Username» field, specify the SQL DB username.
- In the «External Database Username» field, specify the SQL DB user password.
- Specify the same settings in the «Reference logs» section:
- In the «External Database Settings» field, select the setting created in p. 5 .
- In the «External Database Username» field, specify the SQL DB username.
- In the «External Database Username» field, specify the SQL DB user password.
- In the «Basic» section perform the following actions:
- In the «Cubes Source Type» field, select the «SQL database» parameter
- In the «Queries Logging Type» field, select a suitable parameter:
- llAll — to log all queries
- llErroneous — to log erroneous queries
- llNone — not to log
- In the «UDB Database Mode» field, select one of the modes: large, medium, lite, ultra lite. This mode is for cumulative Check.udb base. Find the description below.
- Large (full copy). This is a default mode. It has been used for simple (not chain) restaurants. It used to be the only possible option if there was no connection to an external database. Do not modify the «Full copy» parameter until the connection to an external database is configured.
- Medium (partial copy). This mode means that, apart from order data, all amounts will be saved in check.udb.
- Lite (checks only). The mode is used if you are sure there will be enough cumulative data (several restaurants). In most cases, this mode is recommended to avoid an oversized database.
Ultra lite (global shifts only). check.udb will only contain information on common shifts and links thereto in the SQL base.

If you decide to modify the UDB database mode from Large to Lite when the connection to SQL is set (i. e., the restaurant has been working in this mode for quite a while already) and to perform manual re-export of cumulative data, Check.udb file size will decrease automatically. Hence, a significant part of the data will be deleted from this database, and only a part of the data will be exported to the SQL database. Therefore, never perform cumulative data export if Lite or Medium UDB database mode is used.
A selected UDB database mode does not affect reference info in any way. Reference info is always fully saved on each server and can be re-exported if needed.
- In the «Data Gathering» section, select the restaurants (the restaurant is represented by a set of cash servers) whose data is supposed to be collected and presented in reports.
In the config file of the references server rk7srv.INI or the report server repsserv.ini, specify the parameter
UseSQL=1CODEFor the reference server in the [RefServer] section, and in the [Config] section for the report server.
- Restart the references or report server (mandatory).
If anything needs to be modified in some external database settings, first stop all report servers that use such settings, and launch them with the parameter UseSQL=0. Then change settings, stop the server again, and set value 1 again for the UseSQL parameter (UseSQL=1). I. e., all changes in external database settings shall be made while the server is working with the parameter UseSQL=0.
If the UDB database mode parameter is changed from Large to Lite or Medium, and the further upload to SQL is performed, most of the cumulative info will be deleted from check.udb base. This is critical if an external cumulative database is not used in SQL.
It is not possible to establish a simultaneous connection to SQL Server database for several RK7 roles using the same SQL database user. RK7 will not save the user info in the settings of connection to the external database.
Performance optimization
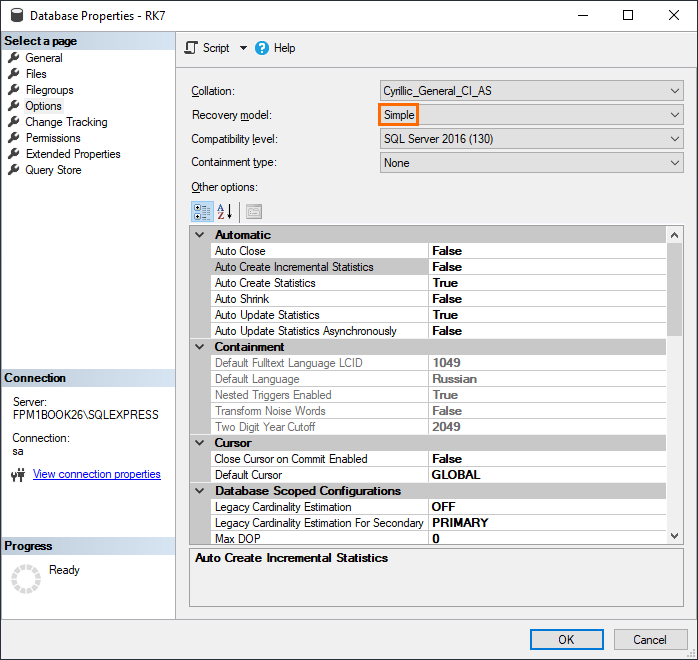
To save the disk space and somehow improve performance, it is recommended to use the «Simple» recovery model
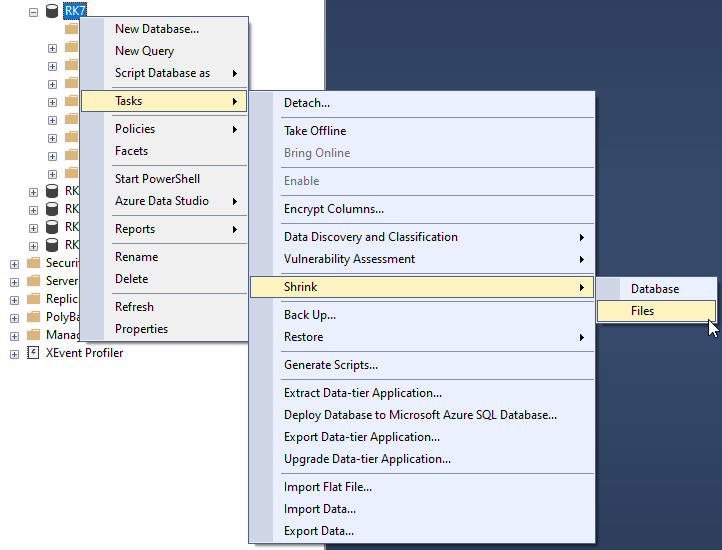
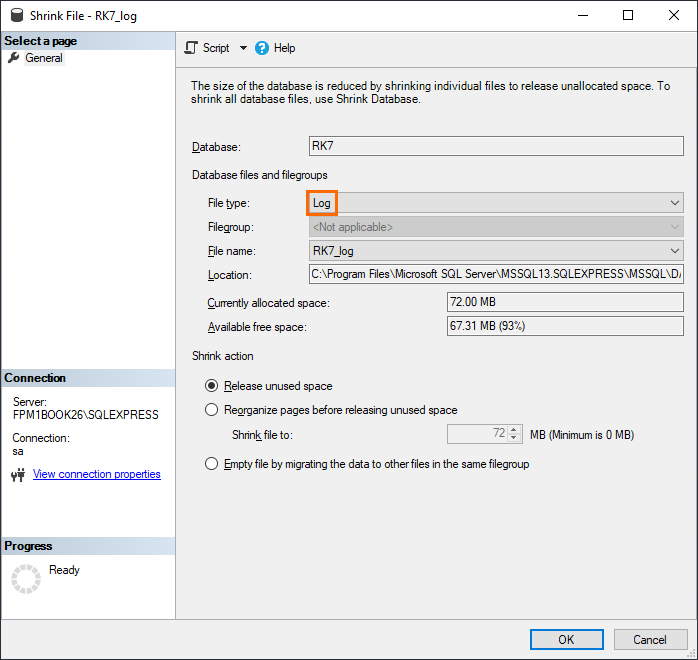
After recovery model change, perform log file compression. Right-click on the DB being used: Tasks -> Shrink -> Files, and select the «Log» file type in the next window.
Possible problems
Problem 1: Sometimes, export to just created SQL Server 2008 database cannot be executed with selected Native Client provider in accordance with p. 3.1.3.
Solution: Select other Microsoft OLE DB Provider for SQL Server provider, re-create a clean DB, and repeat export.
Problem 2: Direct reports are not generated.
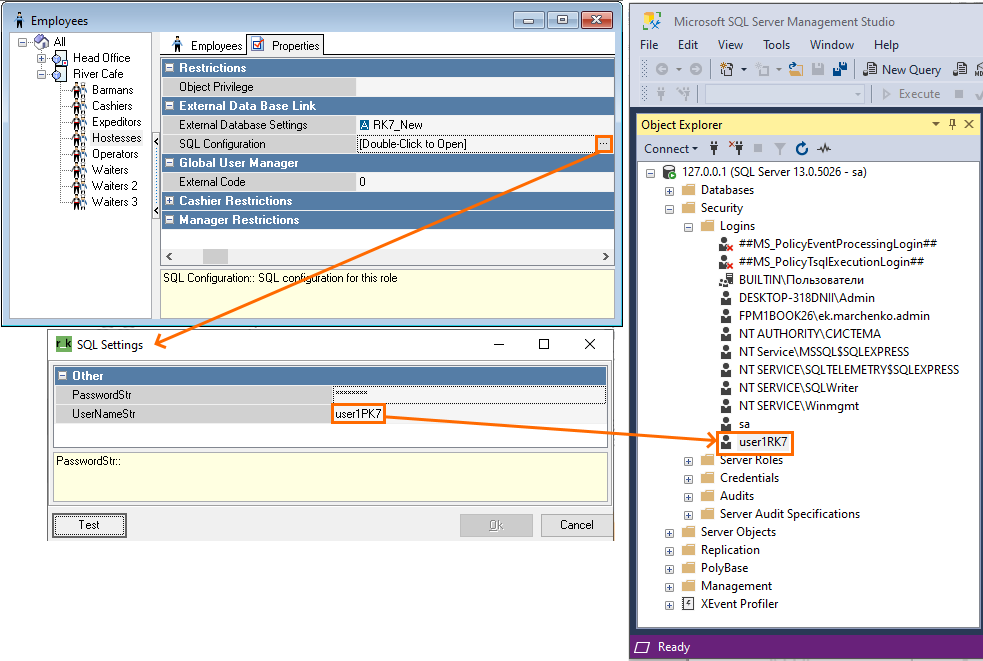
Solution: For each role having different viewing rights for different object reports (f.ex., one role has viewing rights for one object, another role — for several objects), create different users at SQL server for the role to generate direct reports, and configure roles with such users in SQL accordingly. See a schematic in the figure below.