Introduction
This article provides the instructions for installing r_keeper 7.6.5+ along with WSA v2. Starting with r_keeper 7.6.5.452.6, the r_keeper installer comes with White Server Agent v2. This simplifies the process of implementing Loyalty and Delivery in a restaurant.
This means that when installing r_keeper version 7.6.5.452.6 and later, r_keeper Loyalty will work out of the box and will not require additional settings to run.
Product Versions
The r_keeper distribution kit includes the following products:
- White Server Agent v2
- r_keeper 7
If you need to install WSA separately from r_keeper 7, then use the article about installing WSA v2.
System Requirements
Minimum system requirements for WSA v2:
| Operating system | Windows 7 Home (32/64) |
CPU | Intel Core i3 1 GHz |
RAM | 4 GB |
| Hard disk space | 2 GB |
Internet connection | 1 Mbps, stable communication channel |
| r_keeper | 7.6.0 |
The following updates are required to run on older operating systems:
- KB976932 (~540Mb)
- KB2999226 (<1Mb) or Visual Studio C++ 2015 Redistributable (~14Mb)
- KB2533623 (~1Mb)
Any operating system later than Windows 7 SP2 is also suitable.
Installing r_keeper
A silent installation of r_keeper does not visually differ from the standard one. For a detailed description, see the article on installing r_keeper 7 via the installer.
After installation, you need to configure and license the cash server and perform all other standard steps.
After successful installation of r_keeper, to launch WSA, you need to make additional settings in the manager station:
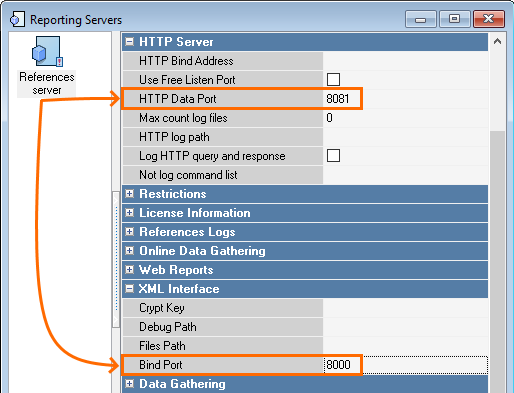
- Open the manager station and go to Options > OLAP reports > Reporting Servers
- Select the required report or reference server
- In the XML interface section, specify the binding port. The port must be free and available over the network
- In the HTTP Server section, specify a free port in the HTTP Data Port field, while the Use Free Listen Port setting must be disabled
- Save your changes and agree to the warnings that the server needs to be restarted
- In the HTTP Rights section, select the HTTP Access right in all fields

- If the HTTP Access privilege is missing, then create a new privilege with such a name
- Restart the reference or report server. After that, the settings in the WSA v2 json file will be updated.
- Restart the cash server
- Within 15 minutes WSA will connect to the server and will be displayed in the admin panel. If it doesn't, restart the White Server Agent service.
Configuring WSA to Connect to r_k Delivery
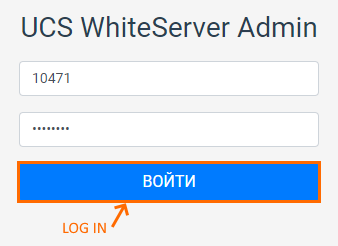
- Go to the WhiteServer admin panel. Use dealer login and password
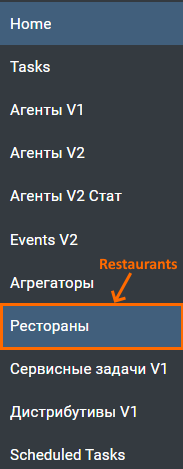
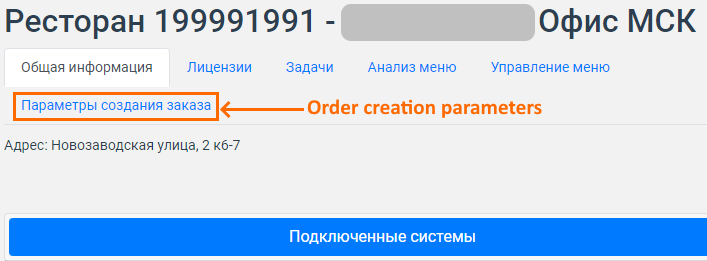
- Go to the Restaurants (Рестораны) section
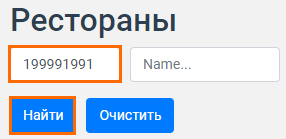
- Specify the full object code in the ObjectId field and click the Find (Найти) button
- Go to the restaurant editing menu by clicking on the gear
 . The restaurant card will open.
 - Make sure the Connected systems (Подключенные системы) section is blue and the enabled agent for RKMid is selected
- Go to the Order creation parameters menu
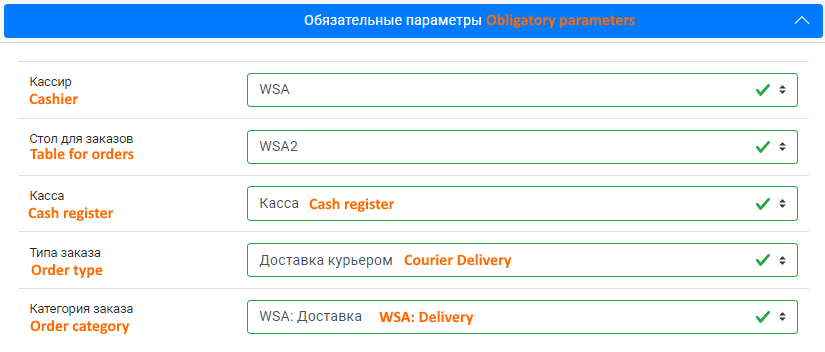
- Click the Update references (Обновить справочники) button to download the parameters from the cash server:

- The necessary settings for connecting to Delivery will be filled in automatically.
- Идентификатор кассира — Cashier ID
- Код стола — Table code
- Идентификатор кассы — Cash register ID
- Код типа заказа — Order type code
- Код категории заказа — Order category code
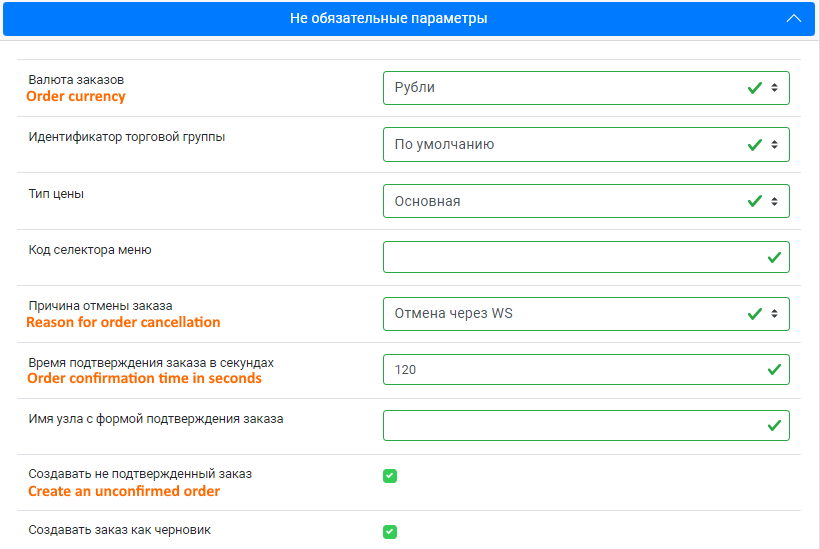
- In the Optional parameters (Не обязательные параметры) section, fill in:
- Order currency — Валюта заказов
- Reason for order cancellation — Причина отмены заказа
- Order confirmation time in seconds — Время подтверждения заказа в секундах
- Create an unconfirmed order — Создавать не подтвержденный заказ
- Save your changes by clicking the Save (Сохранить) button

- The new settings will apply to the agent with the RkMid role.
Сonnection to r_k Loyalty
After a successful WSA connection, Loyalty activation will begin. If it doesn't, restart the White Server Agent service.
- XML and PDS interfaces will appear on the cash server
- All presets are activated — currencies, workers, and others
- If everything is alright, proceed to filling in the data for onboarding.