Installing r_keeper 7 via Installer
Before installing r_keeper 7, make sure that you have the required certificate installed in your operating system.
For version 7.07.00.232, it is obligatory to install the certificate.
Installation of Reference Server and Database
Open ftp://ftp.ucs.ru/rk7/versions/ in the file explorer or in your browser. To log in, use your Dealer ID

FTP links cannot be open in modern browsers like Google Chrome or Firefox. That is why open them using the file explorer or an FTP client.
Open the needed version folder and download the RK7_Setup_exe file. The number in the installer name indicates the r_keeper 7 version

The installer only works on Windows 7 or higher.
- Run RK7_Setup_.exe. In the window that appears, select the installation language, and click Ok
- In the r_keeper 7 installation wizard, click Next
- Read the license agreement, select I accept the agreement and click Next
- In case another r_keeper 7 version was installed earlier, you will be offered to either upgrade or delete the installed copy. Choose New instance installation / adding components to existing instance
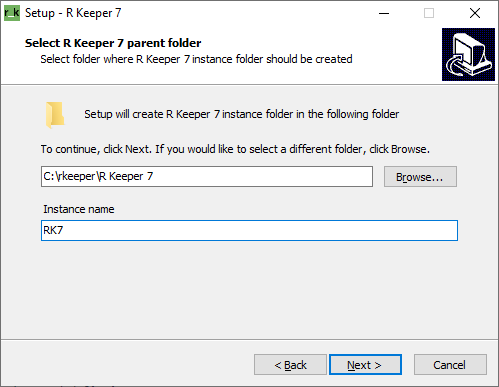
- Select the catalog for installing r_keeper 7. Specify the name of r_keeper instance, click Next
Select the components to be installed, click Next
If you need to restore r_k Cloud backups in a local r_keeper 7, select all components. If the local reference server has been previously installed in a restaurant, uncheck the Reference server box.
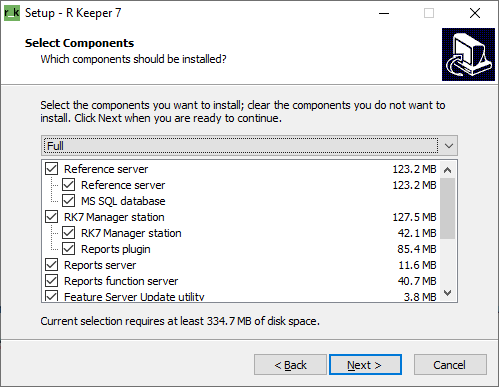
If the SQL Server client is not installed on the PC, the report feature server will be unavailable for selection.
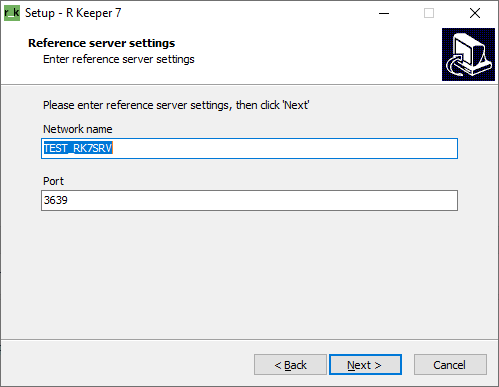
Specify the network name of the reference server and the port for incoming connections, click Next
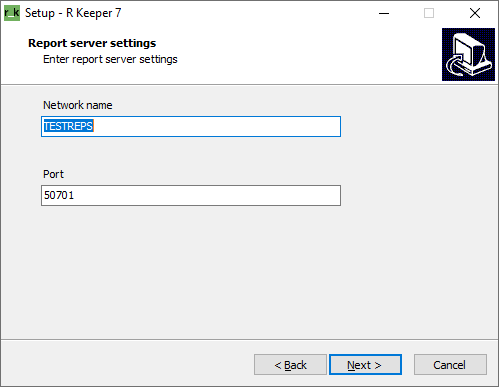
- Specify the network name of the report server and the port for incoming connections, click Next
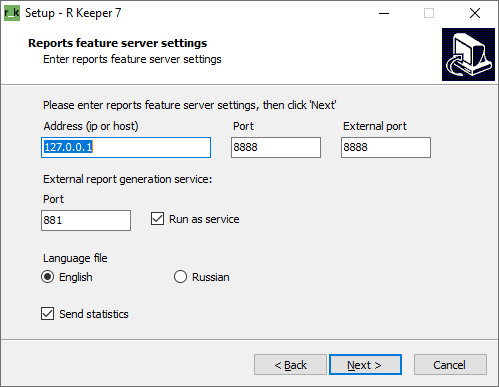
- Specify:
- The IP address of the report feature server
- The local port for receiving incoming connections
- The external port for receiving external connections. This port is specified in the port forwarding settings in NAT
- The port for external report generation service
- r_keeper 7 language
- Check the Run as service and Send statistics boxes if necessary
- Click Next
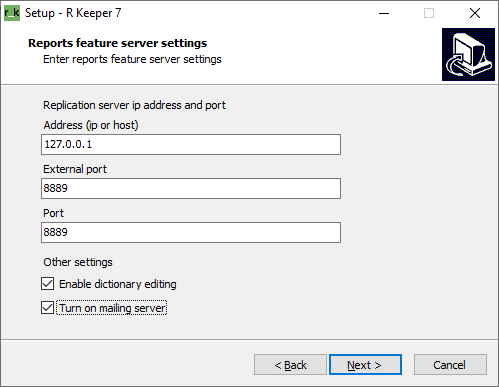
- Specify the data for the report server configuring:
- The replication server IP address
- The external port for receiving external connections. It is specified in the port forwarding settings in NAT
- The local port for receiving incoming connections
- If you need to delete or create plugin elements — such as reports for mailing, mailing calendar, etc. — check the Enable dictionary editing box. The box should not be checked if the plugin will be used for reading only
- Check the Turn on mailing server if you are going to use emailing
- Click Next
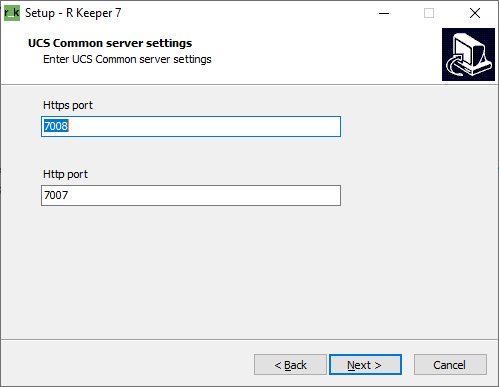
- Specify the protected connection port and connection port, click Next
- Specify the data on individual certificates if you are going to use them. If not, certificates will be generated automatically. Click Next
- Select the logging level, click Next
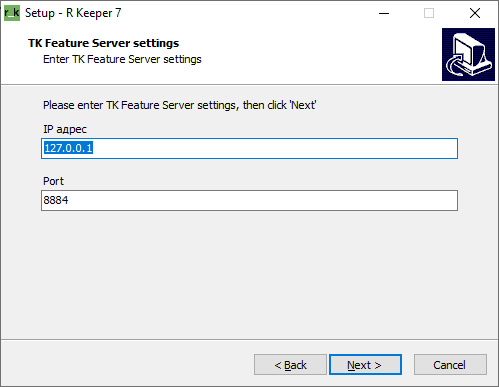
- Specify the IP address and port for Feature Server TimeKeeper, click Next
- Click Next or Browse, specify the folder with Farcards.exe and cardserv.exe and click Add to replace the libraries
- Choose what components should be run as a service. If none of the components is selected, the system will offer you to create the components' desktop icons. Click Next
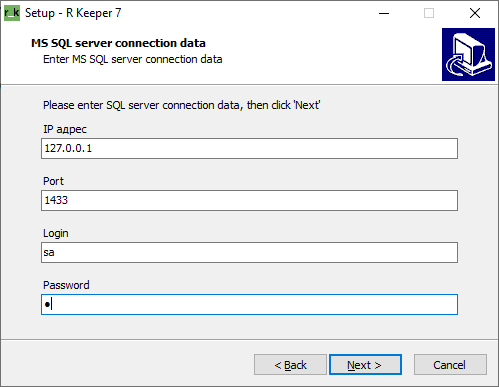
- Enter SQL server connection data. Enter the password used during SQL server installation. Click Next
- Enter the name of the database which will be created in MS SQL. Click Next
- Select the components for which desktop icons should be created. Click Next
- You will see information on the components to be installed. Click Install
- You will see information about successful r_keeper 7 installation. Click Finish.
Once installation is complete, R Keeper 7 folder containing desktop icons will be created on the desktop.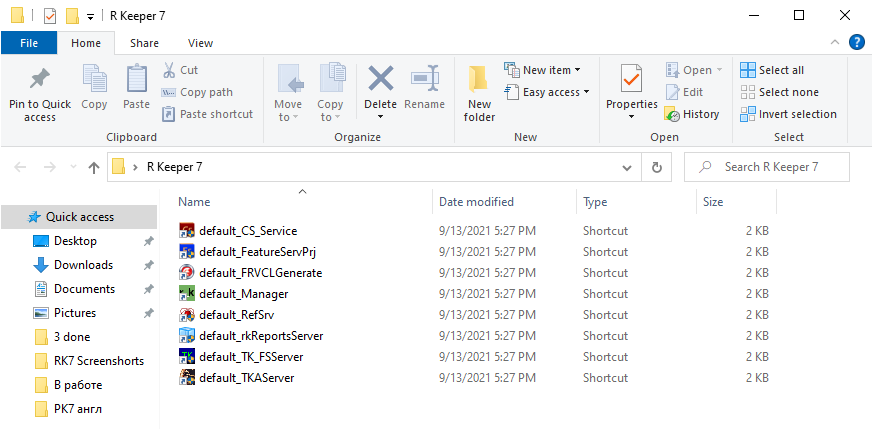
The path to the folder with the installed r_keeper 7 is specified in paragraph 7.
Cash Server and Cash Station Installation
- Open ftp://ftp.ucs.ru/rk7/versions/ in the file explorer or browser.
- Open the required version folder and download RK7Cash_Setup.exe. The number in the installer name indicates the RK7Cash version
- Run RK7Cash_Setup_x.exe. In the window that appears, select the installation language, and click Ok
- Follow the installation instructions
- At the Select R Keeper 7 parent folder step, click the Browse button to select the folder for installing RK7Cash.
Enter the name of the RK7Cash instance. If the instance name coincides with the RK7 instance name, the system automatically displays the path to the RK7 folder. Click Next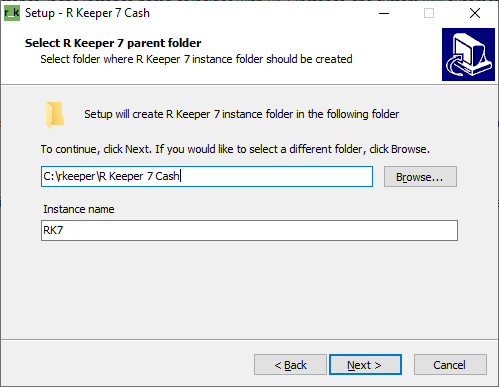
- Select the components to be installed. The already installed copies will be inactive in the list.
Upgrade the TK_Reg.dll component. Other components upgrade automatically after upgrading the reference server. Click Next
- Enter the cash server name and the port for incoming connections. Click Next

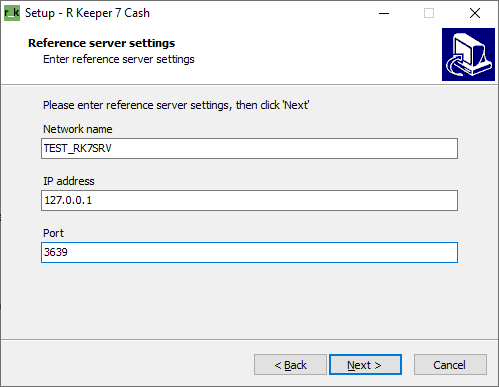
- Enter the network name of the reference server, IP address and the port for external connections. Click Next
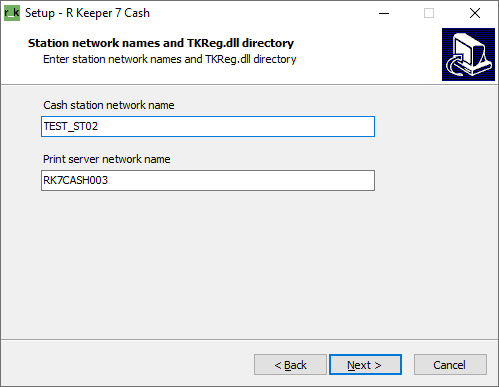
- Enter the cash station network name and the print server network name. Click Next
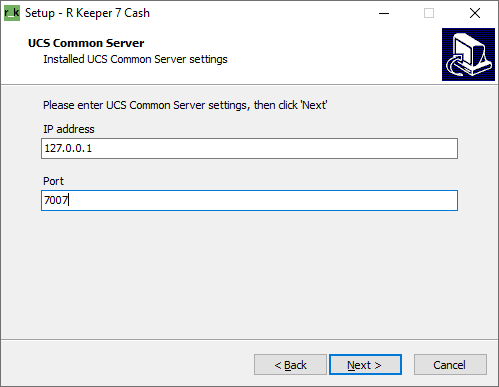
- Indicate the UCS Common Server IP address and port for configuring TKReg.dll. Click Next
- Click Next or Browse, specify the folder with Farcards.exe and cardserv.exe and click Add to change the libraries
- Indicate which components should be run as a service. Click Next
- Select the components to create the desktop icons for. Click Next
- You will see information on the components to be installed. Click Install
- You will see information on successful RK7Сash installation. Click Finish.
Once installation is complete, created desktop icons will appear in the R Keeper 7 desktop folder.