...
The status code can change depending on the received data and allows to analyze various problem situations arising in the process of sending data to a VDU.
Possible VDU status codes:
- P — a VDU protocol mismatch in RK7mismatch of the VDU and r_keeper 7 protocols. In some cases, it can appear because of a license mismatch. Check the protocol protocols in VDU settings and at the manager station
- N — there are no packages. This is a default status after starting a VDU
- I — that a package is received but has a different VDUID
- L — that a package is received, the VDUID is proper, but the license is incorrect
- U — that a package is received, the VDUID is proper, the license is correct, but packages have been sent by a device that is disabled on this VDU
| Info |
|---|
...
It is recommended to analyze VDU status codes when using one device sending data to a VDU. |
Additional Settings
Special Aspects of Setting Up Mobile POS Terminals to Work with VDUs
If orders are saved at the mobile terminal and several VDU stations are used, orders appear on all VDU screens
and are not filtered even when the parameters are enabled in the 'Do not show' group section. Such orders are filtered only if a restaurant has at least one active service schemascheme.
| Note |
|---|
Displaying orders on VDU screens immediately after saving them at the mobile terminal functions only together with |
...
r_keeper 7. |
After taking receiving an order at the mobile terminal in the Electronic queue configuration, this order appears on the VDU screen
in with the special status: it is impossible to discard reset such an order before opening it at the POScash station. After opening and paying for ( or cancelling ) such an order at the POScash station, it is deleted from the VDU without any doubling.
Using the EndQueTimeout parameter EndQueTimeout you can configure automatic discarding reset of unpaid orders in a specified time.
Using
...
Computer Keyboard
For operational purposes, you can use a standard keyboard instead of the special keypad. Such capability is supported both for the program VDU and the WinCE VDU.
| Correspondence Table of Special Keypad Keys and Computer Keyboard Keys | |||
|---|---|---|---|
Special | |||
keypad | Computer keyboard | Special |
keypad | Computer keyboard | ||
1 | a | Up Arrow | f |
2 | b | Down Arrow | m |
3 | fr | Left Arrow | g |
4 | d | Right Arrow | n |
5 | e | Reset | o |
6 | h | Return | p |
7 | i | Park. | q |
8 | j |
Settings | r | ||
9 | k | Copy | u |
0 | l | Selection | s |
Enter | t | ||
Reset (long reset) | w |
...
| Note |
|---|
When using a computer keyboard in the VDU system, the keyboard layout must be English and Сaps Lock must be turned off |
Setup of
...
Service Print
It is assumed that standard service print is configured and works in the system.
To configure service print bound linked to the VDU system, you shoulddo the following:
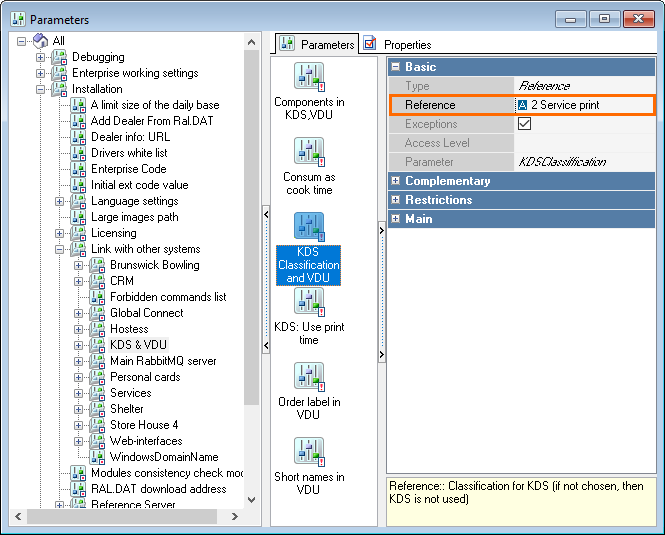
- Go to the manager station. Add a new classification and categories in
...
- Menu >
...
- Menu Classifications
- Go to Options > Parameters > All > Installation >
...
- Link with other systems > KDS and VDU > KDS Classification
...
- and VDU and
...
- select the classification
...
- for
...
- work with the VDU
...
- in the the Reference field of the parameter properties
- Restart the
...
- VDU and send several dishes from the
...
- cash station
...
- , having saved them
...
- Enter the VDU
...
- setting mode and configure the
...
- Do not show
...
- parameter. Select the dish categories that must not be processed on this VDU screen.
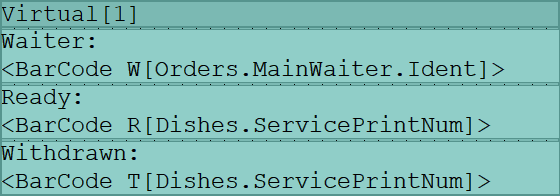
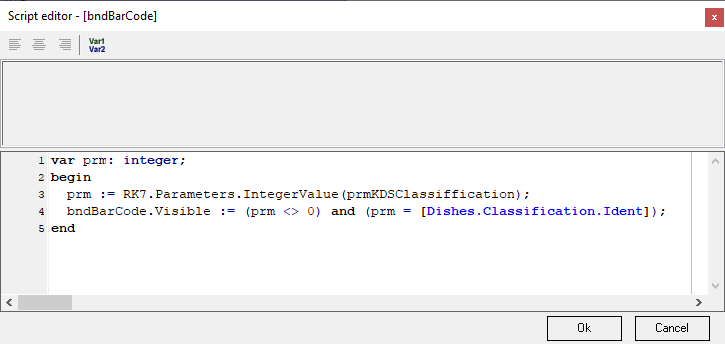
When enabling the parameter KDS Classification for KDS and VDUand VDU parameter is enabled, service receipts checks will have an additional section containing barcodes that can be used for labelling dishes.
To avoid printing barcodes, you should edit the current service receipt check layout by deleting the band or changing the script:
Displaying Orders
...
after Saving
...
To display an order on the screen after saving it or printing a pre- bill, you should configure sending orders to the VDU via service print.
To do so, you should:
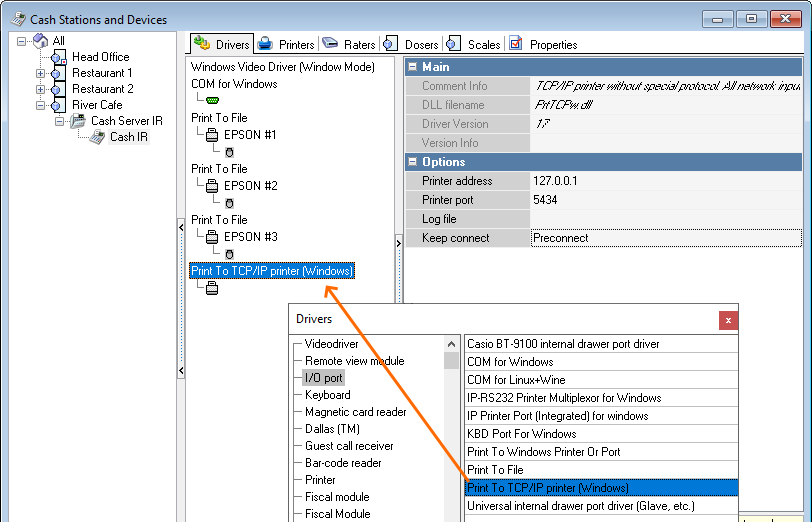
- Add the
...
- Print to TCP/IP printer (Windows) driver to the
...
- cash station
- Configure the following parameters in the
...
- Options section of the
...
- driver properties:
...
- Printer address
...
- — the IP address of the computer where the VDU is installed
...
- Printer port
...
- — any
...
- free
...
- port
...
- Keep connect
...
- — to set the Preconnect value.
Add any printer to the driver and clear the Encode lines for the printer. Next, add the service print layout from the VDU directory (— SP.mak).
Configure service print of this layout when for changing/,adding /and deleting dishes. Configure the added printer as an XML printer.
Delete the VDU cash server interface from the POS cash station.
SAPI4 Voice Generator Setup
To configure voice notifications that orders are ready, you shoulddo the following:
- Install Infovox Desktop 2.220 Engine and the voice module
- License the program as by default a trail version is installed for 1 month and after this period the module will stop functioning
- In the installed Lexicon manager app, add the *.dic dictionary of the installed voice module on the tab Lexicon > Voice Associations > Add LexiconLexicon tab
- In theInterface > Sound of the VDU settings of the section Interface > Sound, select the installed voice generator and specify the playback speed and text.

...
These settings can also be
...
specified in the VDU.ini settings file:
| Code Block |
|---|
SAPIEngine=Alyona (Russian) SAPI4 22kHz ; the full name of the voice generator |
...
SAPISpeed=85 ; playback speed. Optimal is 80-100 |
...
SAPISpeakTxt=Order <EQLabel> is ready ; playback text. You can add the <EQLabel> variable to the text; during playback it will be changed to the electronic queue number. |
Electronic Queue Setup
Current Version
The current electronic queue version is called QMS. It is this version that should be set up and connected. The settings are described in the corresponding sectionarticle.The legacy
Legacy version
...
— EQ
To set up the EQ electronic queue:
- Open the settings window. Press the r button on the standard keyboard (be . Be sure to select the English layout).
- On the Orders processing tab, indicate the order statuses 0, 4, 5. Indicate a different color for status 4.
- On the tab 'Appearance/Order view' tab, indicate select the 'EQ label type' parameter. This is how an e-queue number will be generated
- If needed, check the 'Show EQ number' number box on the same tab. This is required for displaying the e-queue number in the order header
- On the tab 'Interfaces/Other programs', specify the path to the guest app ( GuestApp ) and its query period.
To configure order selection by arrows and discarding reseting selected orders, you should check the 'Border mode' box on the settings tab
'the Appearance/Main view' settings tab.
The parameter 'Order spacing' parameter on the tab ' Appearance/Main view '
tab must be more than zero and even. The spacing between orders will be used for framing an active order.
...