Printing the delivery note
You can set up printing of the delivery note on a receipt tape or A4 sheet.
Before setting up the delivery note printing, make sure you have a ready-made layout or create one.
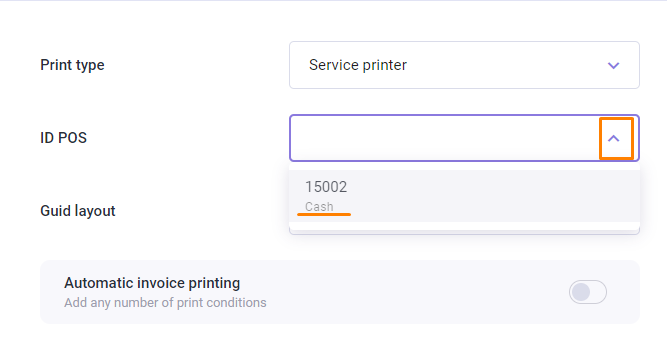
In r_k Delivery fill in the fields:
- Print format — select the format on which the delivery note will be printed
- A4 sheet — You can create an A4 sheet template yourself. Read more about creating a template in the article Delivery Note
- Receipt tape — r_k Delivery takes the receipt tape template from the r_keeper management station. Read more about creating a receipt tape template in the article Delivery Note on Receipt Tape
- Cash register ID — please specify the cash register ID
- Document Presentation Guid — please specify the document GUID.
- Print the delivery note immediately after the order is transferred to the kitchen — Enable this setting to print the receipt tape delivery note automatically after the order is sent to the kitchen. The field is only available when a receipt tape is selected.
The cash register ID and GUID should be taken from the r_keeper management station.
To speed up the work and minimize errors, instead of manual entry, select an option from the drop-down list.
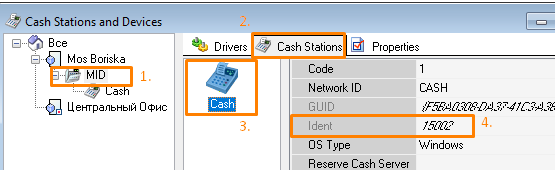
Cash register ID
The cash register ID in r_keeper can be found as follows:
- Go to r_keeper manager station
- Go to the menu Service > Stations and devices
- Select your restaurant
- Select the cash register server and go to the Cash Register Stations tab
- Select the cash register and go to its Properties
- Expand the Main section and find the Identifier field. Copy the number
- Paste this number into the ID field of the cash register station in the r_k Delivery system.
Document GUID
The GUID of a document in r_keeper can be found as follows:
- Go to Settings > Printing > Documents & Layouts
- Find the layout you want to use for delivery
- Go to its properties and copy the GUID
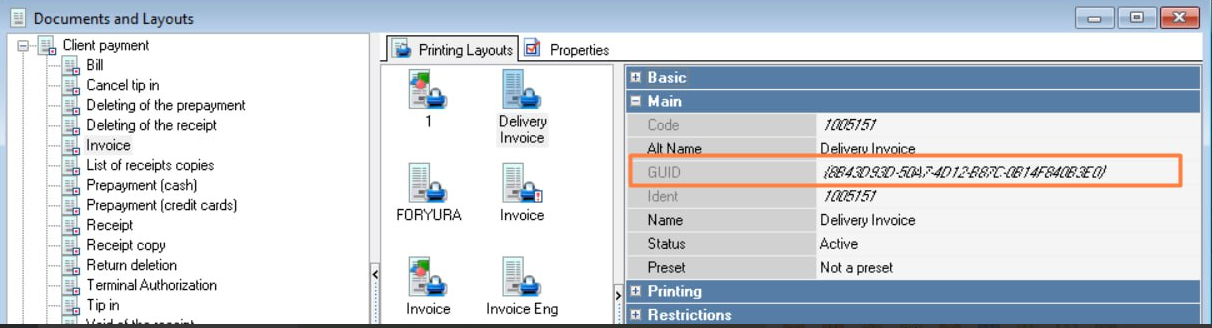
- Insert this number into r_k Delivery.
Please note: The selected layout must be added to the print schemes and usage rules must be configured for it.
To add a layout to print schemes:
- In the r_keeper management station, go to the menu Settings > Printing > Printing schemes
- Select a group of print views
- In the Document views field, right-click and select Add document view
- Select the desired layout and click OK
- Save changes.
Now you need to set the rules for using this print scheme. To do this:
- In the r_keeper management station, go to the menu Settings > Print > Using print schemes
- In the window that opens, in the left field, select the document presentation group
- In the right field - the rules of use. For the correct operation of print schemes for delivery notes, make sure that there are no restrictions, in particular by table, order category, order type
- Save the changes.
Now the selected layout will work correctly for the delivery note.
Adding an order number to the layout
To add an external order number from the r_k Delivery system to the layout:
- In the r_keeper manager station menu, go to Settings > Setup > Advanced Properties
- Select the Properties group for orders
- Right-click the Extended Property Types field and select New Extended Property Type
- Set the title and system name: extordername
Please note the case: the system name and title must be written in lowercase letters.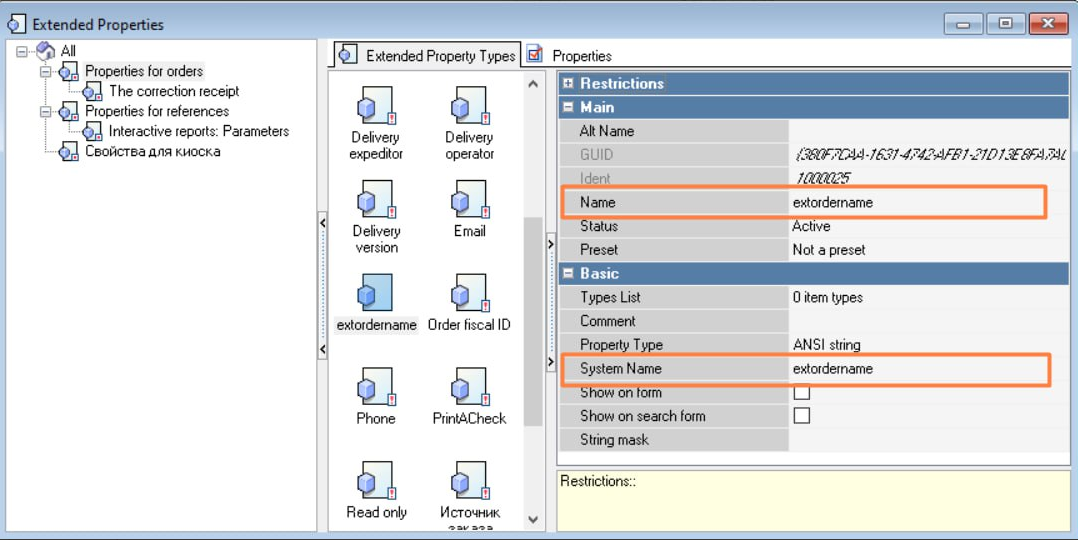
- Save the changes.
Done, the extended property is now available for selection in the layout under the name [Orders.extordername].
If the extordername property is missing, an error will be displayed on the note on the receipt tape instead of the order number.