Connecting POS Terminals
Introduction
A payment terminal, also known as a point of sale (POS) terminal is a device used to authorize bank cards and conduct payment transactions. A terminal contacts the r_keeper 7 cash station using one of the supported protocols described below. Depending on the protocol, a bank card can be read using its own bank terminal reader or a reader connected to the r_keeper 7 cash station.
Payment terminals allow paying for orders using bank cards, with an automatic request for transactions to the r_keeper cash station. For this:
- Allow using the terminal for the selected card type. To do this, go to Money > Currencies > Credit cards and check the Use POS terminal box in the Interface section of the card properties
- Add the appropriate device to the configuration. To do this, go to Service > Stations and Devices, select the required cash station and add the driver you need on the Drivers tab
- Create a logical device on the Printers tab. To do this, go to Service > Stations and Devices and open the Printers tab of the required cash station
- Select the created device as the POS Terminal. To do this, go to Service > Stations and Devices, select the required cash station and in the Printer Assignments section of its properties, select the created device in the Authorization Terminal field.
The general settings for the Verifone vx510 and Ingenico 5100 terminals are as follows:
- DebugLogFile — the name of the file to which debug information will be output
- LogLevel — the level of details of debugging information, where 3 is the highest.
The vx510 driver has the CmdRetries configuration parameter. It determines the number of attempts to execute the authorization command if the terminal does not give either a positive or a negative response to it.
Interaction Scheme
Schematic diagram of the interaction between the authorization terminal and r_keeper 7: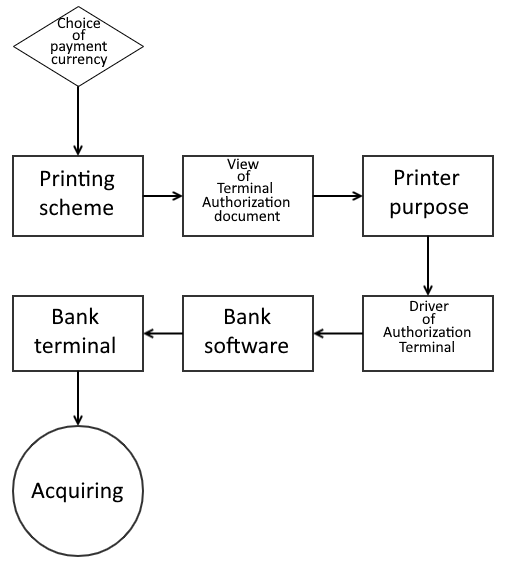
There may be no bank software.
Document views can be found in Printing Schemes. To do this, go to Options > Printing > Printing Schemes. Select the Main > Card authorization group. Make sure the Document type is Terminal Authorization.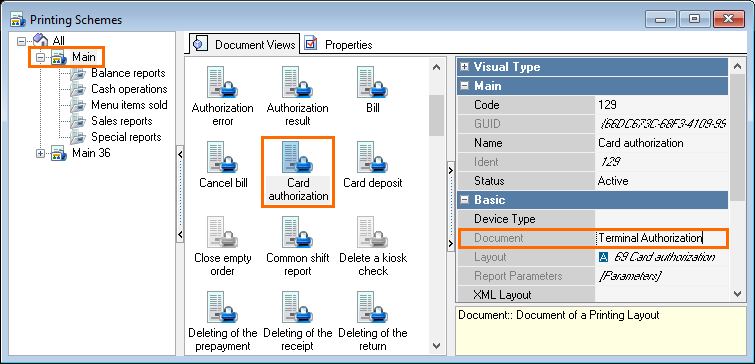
Supported protocols
EFTPos
- The r_keeper 7 driver file is EFTPos.dll
- Supported by UnitedCardService
TrPosX
- The r_keeper driver file is Hyp4220.dll
- Lanter support
- Installation guide
ZVPos
- The r_keeper driver file is ZVTPos.dll
- Supported by EasyCash
Inpas
- The r_keeper driver is SA Pos INPAS
For detailed information on the authorization protocol, see the Setting up Authorization with POS Terminals via SA protocol by INPAS article.
Arcus
- The r_keeper driver is Arcus.dll
- Supported by Arcom
- The configuration file is ops.ini
Below is an example of a configuration file — ops.ini, usually configured by a banking software company. Some parameters from it can be used when setting the properties of the arcus.dll driver in the r_keeper 7 Manager Station:
# COMPATIBLE for PIN-PADS software for processing OPENWAY,SMARTVISTA,TIETO (NewWay v4.0.2.x)
# The structure of the operation description string (operation configuration)
#
# [op code] [op class] [op id] [op name]
#
# 1 = 1, 1, PAYMENT
# The comment sign - "#" at the beginning of the line - OPERATION IS NOT USED and cannot be called from POS software
# to ENABLE operation processing in Arcus2 mode - DELETE COMMENT SIGN
#
# Op code - operation code for the cash register, CAN BE EDITED FOR A SPECIFIC CASH REGISTER IMPLEMENTATION
# Op class Op id - DO NOT EDIT !!! these codes are may influence the PIN-PAD SOFTWARE operability
# Op class - operation class (1 - financial, 2 - technical, 3 - administrative)
# Op id - operation ID
# Op Name - the operation name to display in the cash register interface, YOU CAN CHANGE THE FORMULATION (without changing the essence of the operation!!!)
#
# For class 1:
# 1 OP_PURCHASE_SMS
# 2 OP_PURCHASE_DUAL, //2
# 3 OP_PREAUTHORIZATION, //3
# 4 OP_CONFIRMATION, //4
# 5 OP_CANCEL, //5
# 6 OP_CANCEL_ADVICE, //6
# 7 OP_BALANCE_INQUIRY, //7
# 8 OP_MINI_STATEMENT, //8
# 9 OP_UNIVERSAL_REVERSAL, //9
# 10 OP_UNIVERSAL_REVERSAL_ADVICE, //10
# 11 OP_REFUND, //11
# 12 OP_CASH_SMS, //12
# 13 OP_CASH_DUAL, //13
# 14 OP_CREDIT, //14
# 15 OP_CREDIT_VOUCHER, //15
# 16 OP_UTILITY_PAYMENT, //16
# 17 OP_BILLING_PAYMENT_SMS, //17
# 18 OP_BILLING_PAYMENT_DUAL //18
#
# For class 2:
# 0 - Log printing
# 1 - Reconciliation of results
# 2 - Cashier Menu
# 3 - Technical reversal of the last operation
#
# For class 3:
# 1.2 - Time Synchronization
# 4 - TMS session
# 5 - Admin Menu

# Trading and service operations (TSP)
1=1,1, PAYMENT FOR GOODS
3=1.11, RETURN OF GOODS

# Automated Banking Systems (ABS)
#1=1,12,CASH WITHDRAWAL
#3=1,14,CREDIT
#5=1,7,BALANCE REQUEST

# Hotels and gas stations
5=1,3, PRE-AUTHORIZATION
8=1,4, CALCULATION
#9=1,15,CREDIT_VOUCHER

# Cancels
2=2,3, CANCEL LAST
4=1.5, UNIVERSAL CANCEL

# reports and shift closing
6=2.0, REPORT
7=2,1, RECONCILIATION OF RESULTS

# special functions (compatible with special versions of pin-pad software)
#10=2,4, READ MAP
#11=9,2, READ MAP2
#12=9,7, READ MAP3

# menu and administrative operations
#13=2,2, CASHIER MENU
99=3,5,SERVICE MENU
100=3.4, TMS SESSION

# additional functions
80=3,1,TIME SYNCHRONIZATION
#80=3,2,TIME SYNCHRONIZATIONAs an example of use: in the properties of the arcus.dll driver connected to work with the pin pad, you can configure automatic reconciliation of results when closing a shift at the cash station. To do this, in the CmdClose field, write the value 7 in the «Reports and shift closing» section in ops.ini.
In the r_keeper manager station, configure the following:
- The driver for the cash station. Go to its properties and in the Options section specify:
- Path — a path to the arccom.dll library
- FileRC — a path to the RC.out file, is specified in cashreg.ini
- FileCheq — a path to the cheq.out file, is specified in cashreg.ini
- CmdAuth — an authorization command code. Must match the one specified in ops.ini
- CmdReversal — a return command code. Must match the one specified in ops.ini
- CmdClose — a close command code. Must match the one specified in ops.ini
- IdPrint — a print value identifier
- NeedAskBeforePrint — to ask before printing
- The logical printer driver
- The logical printer for cash station in printer assignment
- The authorization terminal selected as a print layout for current print scheme
- The authorization terminal selected as the document view with the printing assignment
- The currency has the Use POS Terminal setting enabled. To do this, go to the currency properties and expand the Interface section
If you are using a terminal without a built-in printer, the setup is identical, except for the following:
- In the copy of the Authorization result layout, add the [SlipToPrint] memo to the created band or to the Report Title band
- Instead of the POS terminal assignment, select the printer assignment that is used to print receipts and reports
- Add a layout to the print scheme you are using.
Settings in Manager Station on Example of GazpromBank Terminal
To configure the terminal work, do the following:
- In the manager station, go to Service > Stations and Devices
- Select your restaurant, then go to the cash server and select the required cash station. Open the Drivers tab
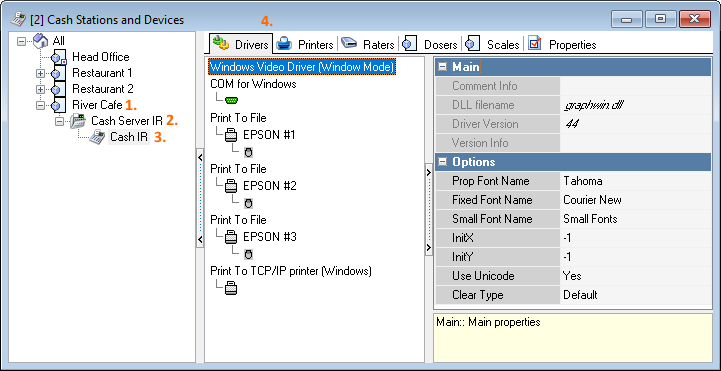
- Add the POS authorization terminal > Universal driver for card validators (HTTP) driver to the cash station

- In the Options section, in the FiscRegTypeID line, select 189 GasPromBank terminal (Russia) from the drop-down list

- Click on the 3 dots in the LowDriverParams line and fill in the lines:
- full path to emvgatessl.dll and emvgate.cfg
- KKM number
- Send number of guests
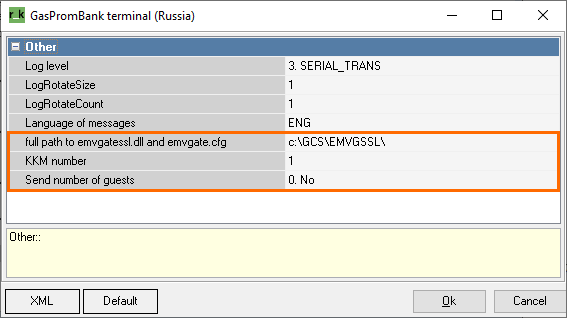
- Save the changes
- Select your restaurant, then go to the cash server and select the required cash station. Open the Drivers tab
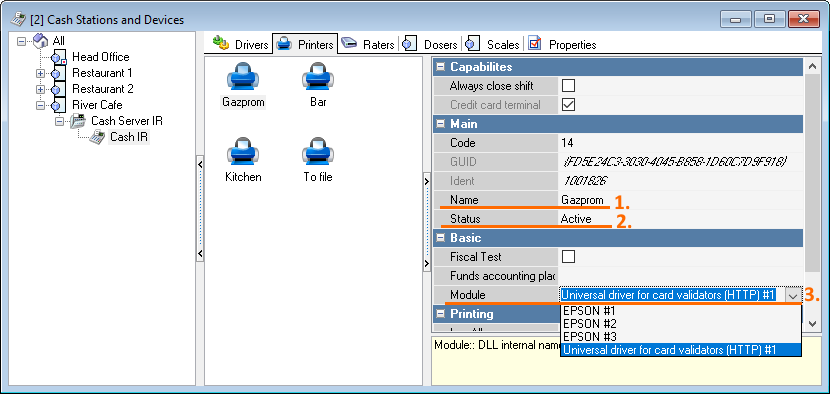
- Go to the Printers tab
- Create a new printer in the empty field, using the context menu item
- Select the created printer and, in the sidebar:
- Name your printer
- Change its status to Active
- In the Module line, select the added Universal driver for card validators (HTTP) driver from the drop-down list
- Save the changes
- Go to the Properties tab
- In the Printer Assignment section, in the Authorization terminal line, select the created printer from the drop-down list
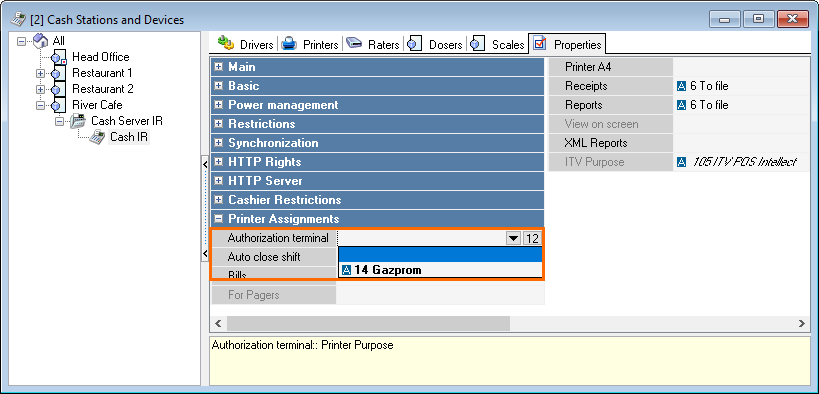
- Save the changes
- In the Printer Assignment section, in the Authorization terminal line, select the created printer from the drop-down list
- Go to the Money > Currencies reference
- From the list on the left, select Credit cards > Bank card pay-discount
- Go to the Properties tab. In the Main section, in the Status line, select Active
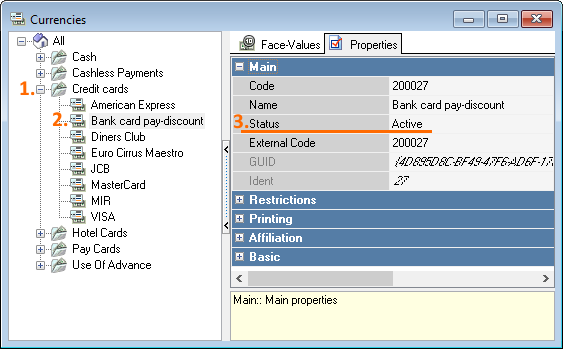
- Save the changes.
Setup completed.