Installation and Connection
This article describes the installation of r_k Guest Screen. Hereafter, the following names may also be used: r_k GS, Guest Screen.
Minimum system requirements:
- Operating System – Windows 7. Operation on older operating systems is not guaranteed.
- Processor – 1 GHz x64. Support for x86/x32 has not been tested.
- RAM – 4 GB.
- Hard disk space – 1 GB.
- .NET Framework 4. Download: http://microsoft.com/ru-ru/download/details.aspx?id=3556
- Visual C++ Redistributable 2013 libraries. Download: https://www.microsoft.com/ru-RU/download/details.aspx?id=40784.
If you receive an error "Please install the VC redist 2033 package", install the x86 version. - The following ports must be open on the server:
- 443 for access to the licensing system and https://weblate.ucs.ru/
- 60606 for access to the licensing system.
For GS versions 3.0.xx+ system requirements on Windows 7:
installed packages:
- Microsoft Visual C++ 2015-2019
- Redistributable (x86) - 14.29.30156.
Installation and configuration consist of several stages:
- Guest Screen Installation
- Licensing
- Settings in the Manager Station
- Settings in Guest Screen.
Starting from version 3.1.0-dev.13, GS can be launched using the HTTPS protocol. All new installations will use it by default.
When updating older versions, the HTTP protocol will be retained. Settings can be changed in the appsettings.json file, in the directory where GS is installed, in the urls section: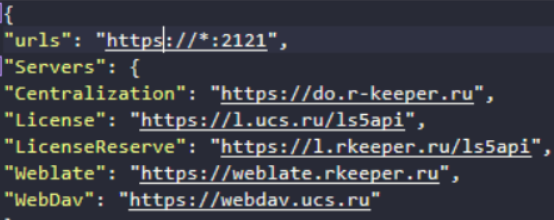
The HTTPS protocol is not available on Windows 7; HTTP will remain there.
Guest Screen Installation
To install:
- Download the installation file from the FTP server at https://files-rkcloud.ucs.ru/d/65231391cff842d49a1a/?p=/rk7/other/Guest_Screen&mode=list
- Install GuestScreen by following the installer prompts.
- Select the installation path. Note that if you install GS in Program Files, the program will need to be run as administrator each time.
- Specify the port on which GS will run. You can leave the suggested one.
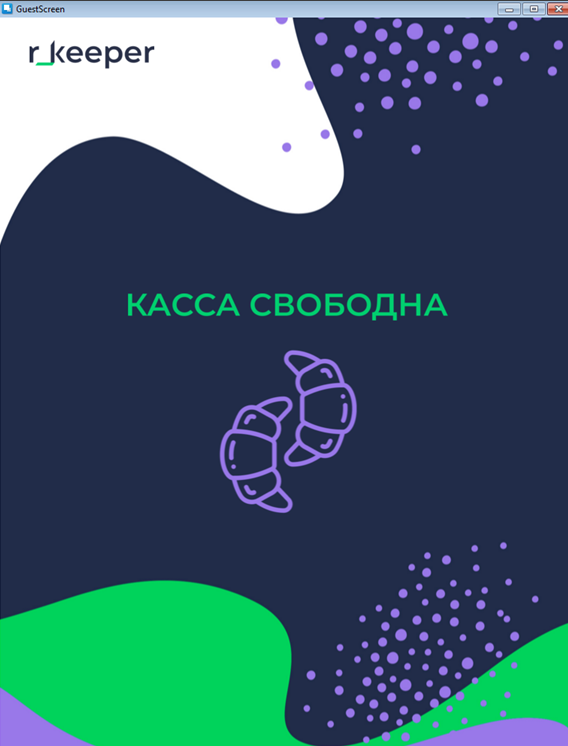
- Starting from Guest Screen 1.0.0.68, the installer includes a selection of preset themes. Themes available for selection:
- Bakery
- Сafe

- Pizza

- Bakery
During installation, select a preset theme and screen resolution. Click Next
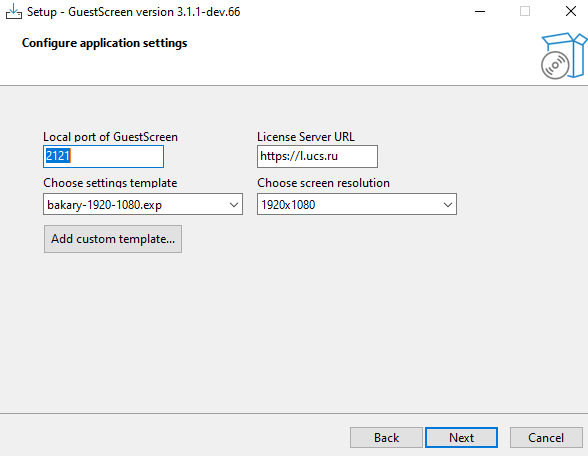
These themes are available for the following screen resolutions:For landscape orientation, pixels For portrait orientation, pixels 800*600 600*800 1024*600 600*1024 1024*768 768*1024 1024*1280 1280*1024 1366*768 768*1366 1440*900 900*1440 1600*900 900*1600 1920*1080 1080*1920 1280*800
800*1280
- Complete the installation.
After installation, an r_k GS client shortcut will appear on the desktop. The first launch of r_k GS must always be performed as administrator.
After installation, go to Settings > Modes and check for the presence of mode and scene templates. There should be 8 standard modes in the list. If they are missing, import the templates.
Licensing
r_k Guest Screen must be licensed.
Two types of licenses are required for operation:
- A subscription license for Guest Screen – R-Keeper Guest Screen 12 months Software module. It is verified online.
- For r_keeper 7.6.5 and higher, an additional license for the HttpOrderNotify interface is required. It is called R-Keeper Order Notification Interface Software module. The license is added automatically when purchasing the r_k GuestScreen license. The validity period of the HttpOrderNotify license equals the validity period of the r_k GuestScreen license.
The number of R-Keeper Order Notification Interface Software module licenses must equal the number of additional connections to HttpOrderNotify.
For detailed information, read the article Licensing.
Settings in the Manager Station
Updating the Driver
Integration of r_keeper and r_k Guest Screen requires the HTTP Order Notify driver version 18 or higher. If the driver version is outdated, perform the following steps:
- Stop the directory server and the cash server.
- Download the httpnotf.udb file. It can be taken from an archived version of rk7 at \base\workmods or from the link.
- Copy the httpnotf.udb file to the [RK7 installation folder]\base\workmods folder, replacing the existing file.
- Start the r_keeper servers.
Settings in the Manager Station
- Open the r_keeper manager station.
- Go to the Service > Cash Stations and Devices
- Select the restaurant and the cash server that will send data to r_k GS.
- In the Properties:
- Enable the use of HTTP port on the cash server
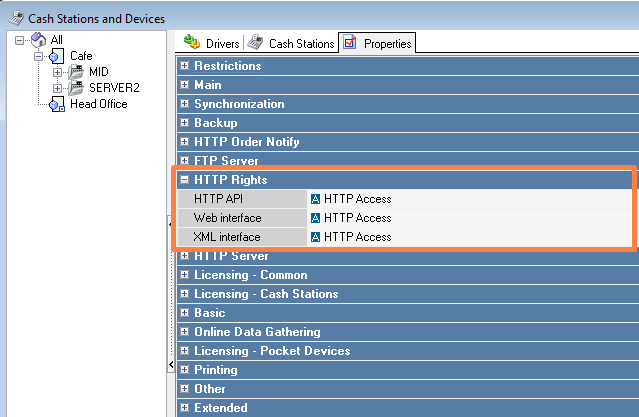
- Specify a free port in the HTTP Data Port field and do not set the Use Free Listen Port flag
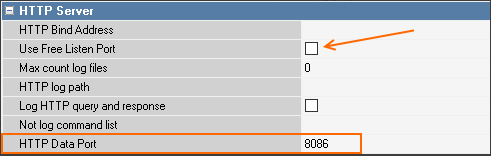
- Enable the use of HTTP port on the cash server
- Next, you need to configure the HTTP order notify driver.
For r_keeper 7.6.5 and higher
Starting from version 7.6.5.371, the Http Order Notify settings have moved from Devices to the Cash server properties. The procedure for these versions is as follows:
- In the driver parameter DestURLs, specify the connection string as:
http://GS_server_address:GS_server_port/api/httpNotify/postOrders - Save the changes.
- Restart the cash server.
If you need to specify multiple connection strings, they can be specified separated by semicolons ";".
For example: http://127.0.0.1:2121/api/httpNotify/postOrders;http://127.0.0.1:1234/orderTaker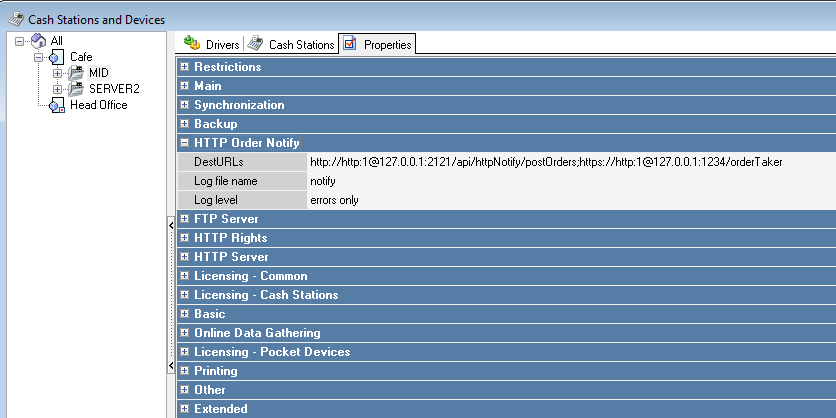
 If multiple connection strings are used, the cash server property HTTP Order Notify must be licensed. Read more in the article Licensing.
For r_keeper older than 7.6.5
If your r_keeper version is lower than 7.6.5, you need to add the HTTP Order Notify interface to the cash server yourself. To do this:
- For KDS PRO to work, driver version 18 or higher is required. Therefore, if your version is lower, download the driver from FTP before adding the interface to the cash server:
ftp://ftp.ucs.ru/rk7/other/KDS_PRO/Extra_Files/httpnotf.udb - Copy the httpnotf.udb file, replacing it in the directory server folder.
- Restart the cash server.
- Add the HTTP Order Notify driver to the cash server.
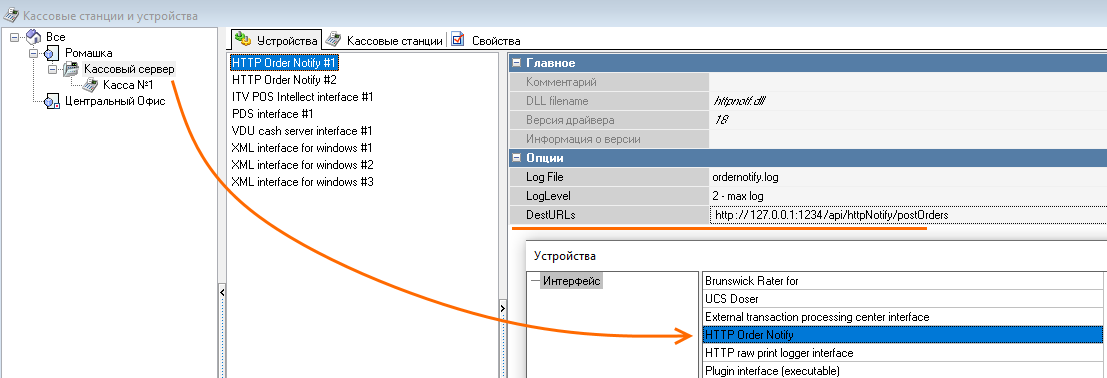
- Configure the driver for all cash servers as needed.
- In the driver parameter DestURLs, specify the connection string as:
http://GS_server_address:GS_server_port/api/httpNotify/postOrders - Go to Service > Interfaces and create a new interface.
- In the Library Files (DLL) section, select the desired restaurant and assign the HTTP Order Notify driver to the cash server.
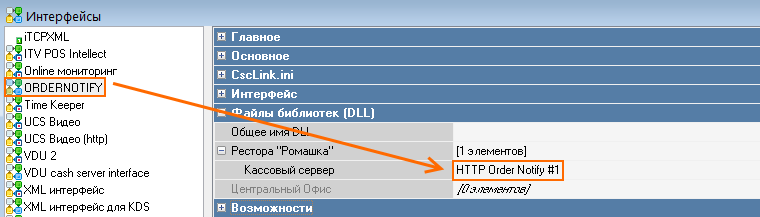
- Activate the interface and save.
Next, create a user that will link r_k GS and r_keeper. To do this:
- Go to Personnel > Employees.
- Select the restaurant where r_k GS will be used.
- Create a role and name it HTTP Access.
- Go to the role's Properties.
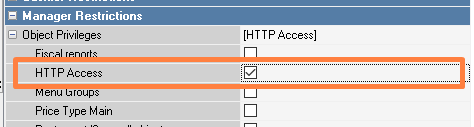
- Expand the Manager Restrictions > Privilege on Objects section and set the flag in the HTTP Access/HTTP Driver
- Create an employee in the HTTP Access role. The employee's name must be written in Latin letters without spaces, for example, http.

- In the Account field, specify the employee's password and save the changes.
Settings in r_k are complete. Restart the cash server.
Launch Parameters
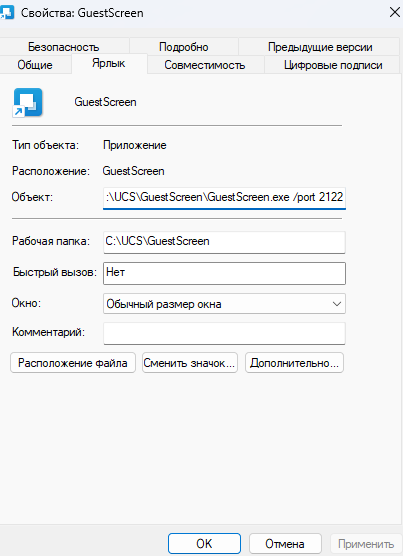
The following parameters must be specified in the shortcut properties:
- /port 2121 — application launch port, numbers are specified after a space; default is 2121
- /db gs.db — application database name after a space; default is gs.db
- /theme C:/ucs_1.0.95.zip — theme import parameter at startup; specify the full path to the theme file after a space
- /exp C:/GS-UCS-0.0.1.33.exp — template import parameter at startup; specify the full path to the exp file after a space
- /screenres 1024.768 — window size setting at startup; two numbers separated by a dot, after a space
- /gpu-acceleration — enable GPU acceleration in the CEF embedded browser.
Settings in r_k GuestScreen
To enter the settings of r_k GS, run the program and click 5 times in the upper right corner of the screen. A white circle should appear when clicking.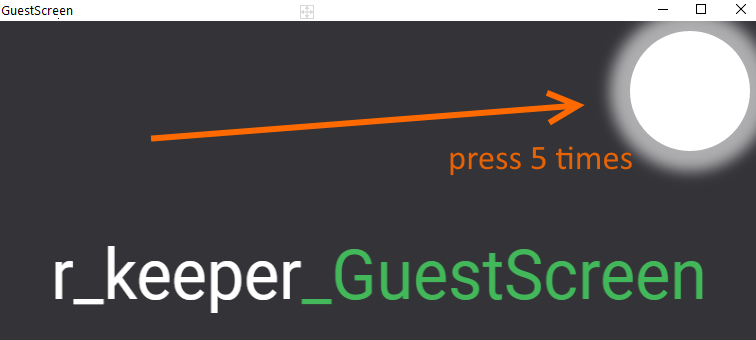
After five clicks, the settings will open. To open the menu, click the button with three lines in the left corner 
To enter settings, click the gear icon in the upper right corner.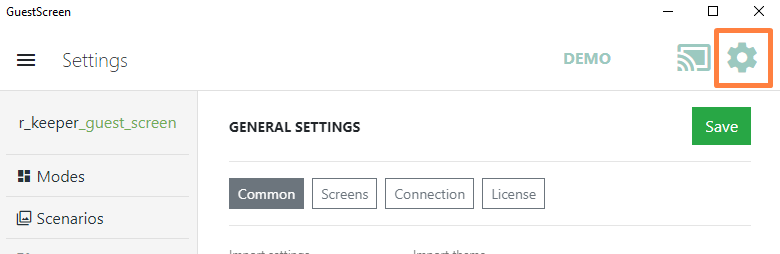
The connection settings screen will open. Enter the connection data to the cash server via the HTTP interface.
- XML int.: address – IP address of the cash server.
- XML int.: port – HTTP port of the cash server.
- RK7: login – the username from the HTTP-Access group.
- RK7: password – the password for this user.
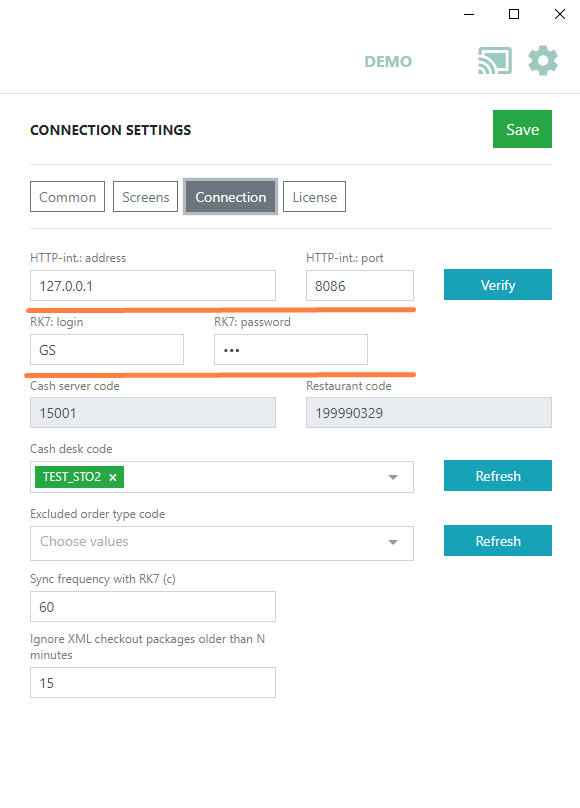
- Click the Check button. The system will check the connection and display a message depending on the result.
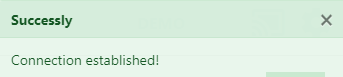
- If the data is entered correctly, a connection established message will appear
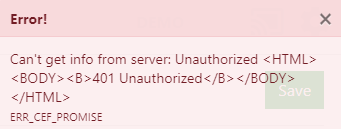
- If the login and password are incorrect, an Unauthorized error will appear
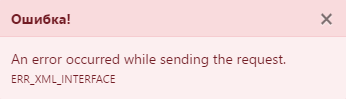
- An error occurred while sending the request means the connection settings to the cash server are incorrect. Check the IP and connection port.
- If the data is entered correctly, a connection established message will appear
- After a successful connection, the restaurant and cash register codes will be loaded from the cash server. Select the required cash registers from which orders should be received in the Cash register code field
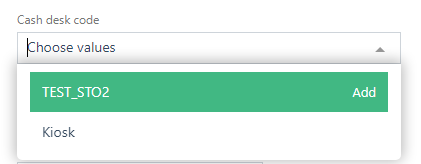
- If cash registers are not displayed, click the Refresh button
- In the Excluded order type code field, if necessary, specify the order category that should not be displayed on the GS screen.
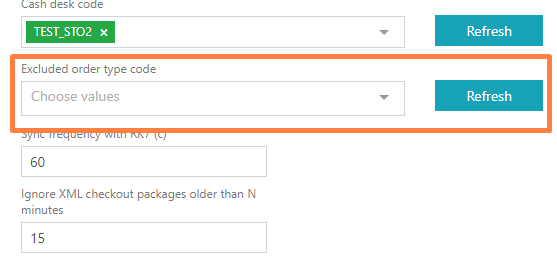
If order categories are not displayed, click the Refresh button. - Optionally, specify the synchronization frequency with r_keeper and the number of minutes after which cash XML packets will be ignored (e.g., if the cash server was turned off for a long time and then turned on, sending unsent packets that will be displayed in r_k GS)
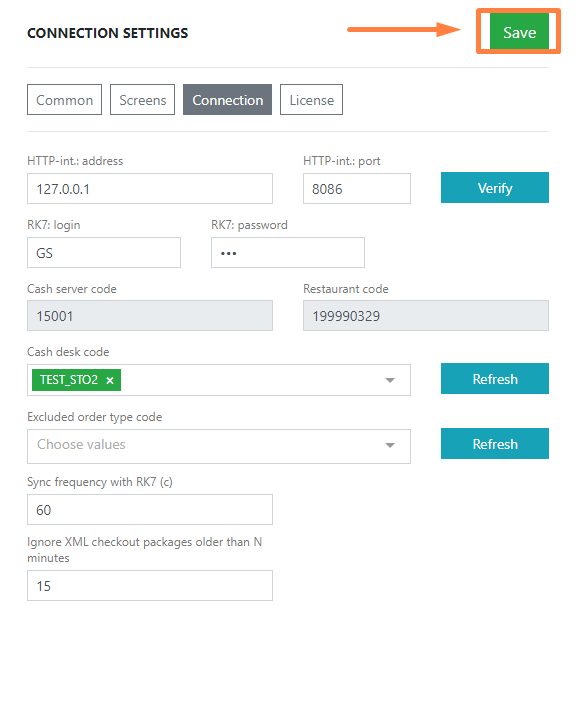
- Click the Save button.
Connection setup is complete.
For the settings to take effect correctly, restart the computer.