The "Documents" tab is used to configure the automatic filling of certain fields when creating delivery notes, requests, and templates.
If documents from multiple FoodFactory applications are uploaded to one r_k StoreHouse Pro database, you can specify a text prefix for the document number for additional identification of delivery notes in the "Prefix for Document Numbering" field.

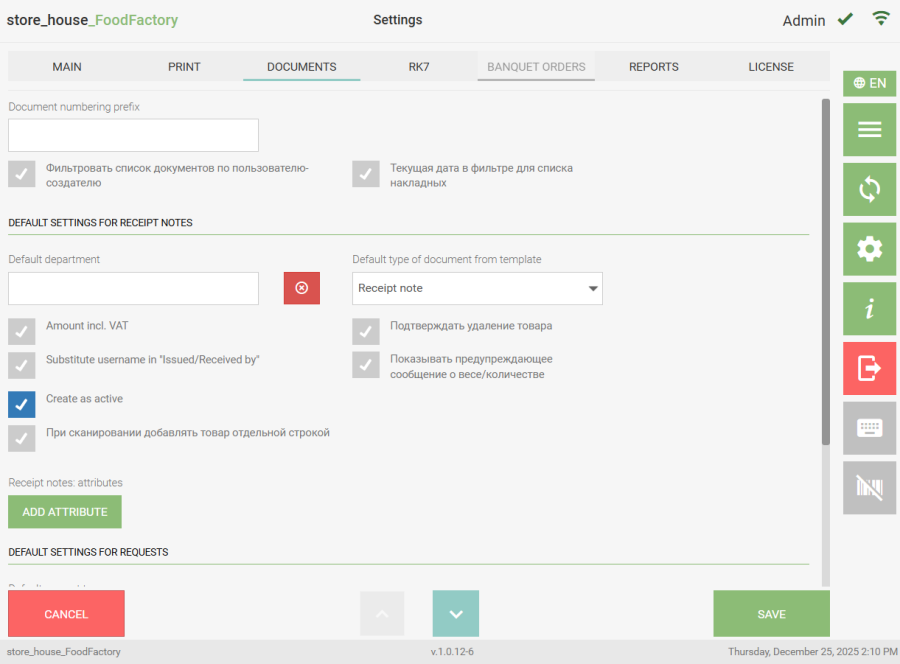
Documents in the program are numbered automatically during saving. If a value was entered in the "Prefix for Document Numbering" field, it will be saved before the document number.

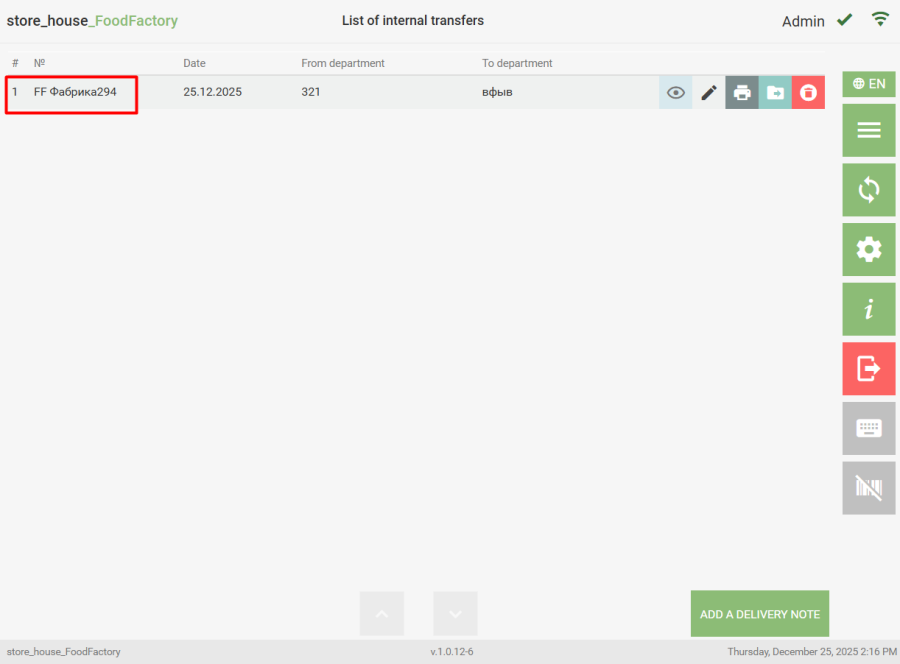
Starting from FoodFactory version 1.0.11-15, ONLY for receipt notes, the "Number" field can be filled in manually when creating the document. The field is text-based and not mandatory. If the receipt note number is filled in, the manually entered number will be assigned during saving, and the "Prefix for Document Numbering" will not be used. If the number remains unfilled when creating the receipt note, upon saving the document, a number will be assigned to the receipt note according to the document numbering rules.

For r_k StoreHouse Pro, the "FoodFactory Delivery Note Number" is a delivery note title attribute. This attribute is created automatically in the r_k StoreHouse Pro database by the FoodFactory application. After data is transferred from FoodFactory to r_k StoreHouse Pro, numbering with prefixes will be displayed in the corresponding field in documents.
This field can be displayed in the r_k StoreHouse Pro delivery notes list and used for contextual search.

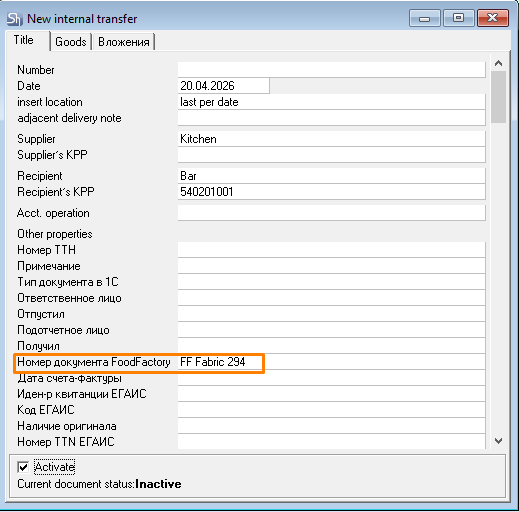
If the number was filled in manually when creating a receipt note or if the number was changed when editing a receipt note, then after the documents are transferred to r_k StoreHouse Pro, the number assigned in FoodFactory will be displayed on the "Title" tab in the "Number" field and in the corresponding field of the delivery note title's additional attribute.

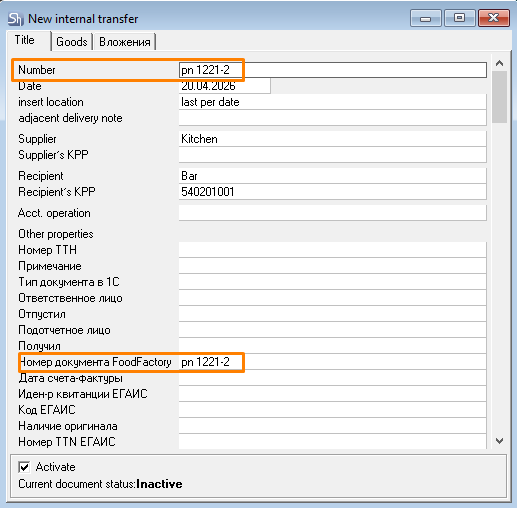
Filter document list by creator-user — when this flag is set, the user will only have access to delivery notes created by them for editing and viewing, both in the "SH5 Delivery Notes List" and in delivery notes not yet sent to r_k SH Pro. To see delivery notes from other users, remove the flag from this parameter.

To get the "SH Delivery Notes List" by creator user, the FoodFactory user must have the system privilege for "Read User List". This right is set in the Sdbman warehouse management application.


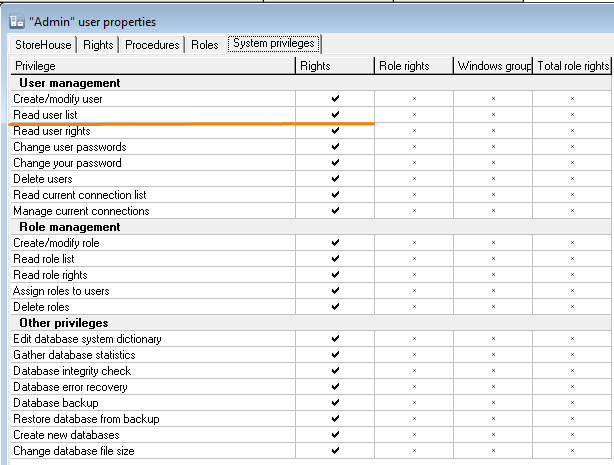
The "Filter document list by creator user" function is available from r_k StoreHouse Pro version 5.131.631. If an attempt is made to set this flag with a version of r_k StoreHouse Pro lower than that, the system will generate an error when saving the settings.

Current Date in Filter for Delivery Notes List - when this flag is set, the filter for the "SH5 Delivery Notes List" is filled with the current date. When the flag is cleared, the filter is set to a period from the current date to one week back.

Default Parameters for Delivery Notes

In the "Default Parameters for Delivery Notes" area, preliminary settings must be made if it is necessary to fill some delivery note fields with default values.

In the "Default Department" field, you can select a department that will be automatically inserted into the corresponding field when creating a new delivery note. To select a department, click the "Default Department" field. The department selection mode will open.
The list will display departments from the r_k StoreHouse Pro departments dictionary according to the permission settings of the authorized user.
Department selection can be done in two ways:

  • click on the required department in the opened list
  • enter part of the department name in the search bar and select the required department from the filtered list.

If the search finds only one department, it will be immediately inserted into the "Default Department" field.

The "Sum Including VAT" flag is set if amounts in delivery notes need to be displayed including VAT.
The "Substitute User Name in 'Released By/Received By'" flag is set if certain fields in delivery notes need to be filled with the name of the authorized user:

  • in receipt notes — the Received By field;
  • in expenditure delivery notes — the Released By field;
  • in internal transfers — the Released By field, if the user creates an internal transfer;
  • in processing notes — the Released By field, if the user creates a processing note.

The "Create as Active" flag is set if the flag in the "Activate" field needs to be set by default when creating a delivery note.

The "Add Scanned Goods Item as Separate Line" flag is set if it is necessary for a scanned goods item (with the same code, name, unit of measurement) to be added as a separate line in the delivery note. To merge lines with the same goods item, click the [Pack] button. In r_k StoreHouse Pro, documents will be uploaded with the number of lines specified when creating the document in FoodFactory.

The "Confirm Goods Item Deletion" flag is set if a warning message should appear when deleting a selected goods item.

The "Show Warning Message about Weight/Quantity" flag is set to control the input of quantity in the document. On the r_k StoreHouse Pro product card (see the r_k StoreHouse Pro User Guide for details) on the "Stock" tab, you can define the maximum stock of the goods item by departments. If a quantity greater than the maximum stock is specified in the document, a warning message will appear.

In the "Delivery Notes: Attributes" field, you can select "Delivery Note Title Attributes" and "Delivery Note Specification Attributes" created in r_k StoreHouse Pro (see the r_k StoreHouse Pro User Guide for details). The selected attributes will be displayed in the created delivery note after saving the settings.

"Delivery Note Title Attributes" can be selected from attributes of text and enumerable formats. "Delivery Note Specification Attributes" can be selected in any format.

To select an attribute, click the "Add Attribute" button. The attribute selection window will open.

Select the delivery note title attributes that need to be filled in the delivery note when creating it — set the flags in the "Select Attribute" area. The selected attributes will be available for filling on the document title page.
After selecting attributes for filling in delivery notes, you can define which of the selected attributes to display in the "Document Lists". To do this, in the "Attributes for Lists" area (in the green fields), select the necessary attributes.

Select the "Delivery Note Specification Attributes" that need to be filled in the delivery note when creating it — set the flags in the "Select Attribute" area. The selected attributes will be available for filling on the document goods page.
After selecting all necessary attributes, click the "Close" button.

If attributes for lists were selected, columns for these attributes will be displayed in the delivery notes list regardless of whether these fields are filled in the delivery note.

The selected attributes will be displayed to the right of the "Add Attribute" button in the "Selected Attributes" field.

To delete an attribute, click the cross to the right of the attribute name or click the "Add Attribute" button and clear the flag from the attribute, then click the "Close" button.
In the "Default Document Type from Template" field, you can select the document type that will be automatically inserted into the corresponding field when creating a document from a template.

Initially, the Receipt note document type is selected by default. To select a document type, click the "Default Document Type from Template" field. A list will open where you need to select the required document type.

To save the changes made, click the "Save" button; to cancel saving, click the "Cancel" button.

Default Parameters for Requests

In the "Default Parameters for Requests" area, preliminary settings must be made if it is necessary to have the ability to fill some request fields with default values.

In the "Default Request Type" field, you can select the request type that will be automatically inserted into the corresponding field when creating a request.

Initially, the Internal Request request type is selected by default. To select a request type, click the "Default Request Type" field. A list will open where you need to select the required request type.

In the "Sale Location" field, you can select a Sale Location from the r_k StoreHouse Pro dictionary. This value will be automatically inserted into the corresponding field when creating a new request. To select a Sale Location, click the "Sale Location" field. The sale location selection mode will open.
Also, for the convenience of forming a request, the "Period" field can be automatically filled. To do this, select the corresponding value in the settings.
The "Create as Active" flag is set if the flag in the "Activate" field needs to be set by default when creating a request.
The "Automatic Generation of Delivery Notes" flag is set if delivery notes need to be automatically generated for requests after they are transferred to r_k StoreHouse Pro.
The "Automatic Activation of Delivery Notes" flag works if the "Automatic Generation of Delivery Notes" flag is set and determines that delivery notes for uploaded requests will be generated as active.
In the "Requests: Attributes" field, you can select request title attributes created in r_k StoreHouse Pro (see the r_k StoreHouse Pro User Guide for details), in the field of which, after data is uploaded from FoodFactory to r_k StoreHouse Pro, the comment entered during request creation will be displayed, as well as attributes for the list that will be displayed in the requests list. The selected attribute will be displayed in the created request after saving the settings.
Attribute selection is performed in a manner similar to selecting an attribute for delivery notes.

The selected attributes will be displayed to the right of the "Add Attribute" button in the "Selected Attributes" field.

To delete an attribute, click the cross to the right of the attribute name or click the "Add Attribute" button and clear the flag from the attribute, then click the "Close" button.
To save the changes made, click the "Save" button; to cancel saving, click the "Cancel" button.